
On 26 February 2016, Apple pushed an update to the Incompatible Kernel Extension which came with a bug blocking the loading of the kernel extension responsible for implementing the Ethernet port on many Macs. Its effect was to completely disable and vanish that Ethernet port when an affected Mac was next started up. Apple didn’t push a fixed update until two days later, and neither apology nor explanation was ever provided.
Diagnosing that and other network problems isn’t easy. We tend to try a few things at random, hoping that we can guess right quickly. Although this can solve some problems simply, when they prove more obscure we often don’t know what to do next. Using a more systematic approach is then essential, and the subject of this article.
Key tools for working with network problems are the Network and Sharing panes where services are configured, and the Wireless Diagnostics app. As I’ve recently explained its use in detail, I won’t repeat that here. One important collection of tools, Network Utility, has now been removed from macOS Monterey; the best third-party replacement for that is Bryan Christianson’s superb and superior WhatRoute, which I’ll use here.
The best way to structure your testing and diagnosis of network problems is based on the seven layers of the OSI model, which we should all be at least vaguely familiar with. I summarise its layers in this diagram.
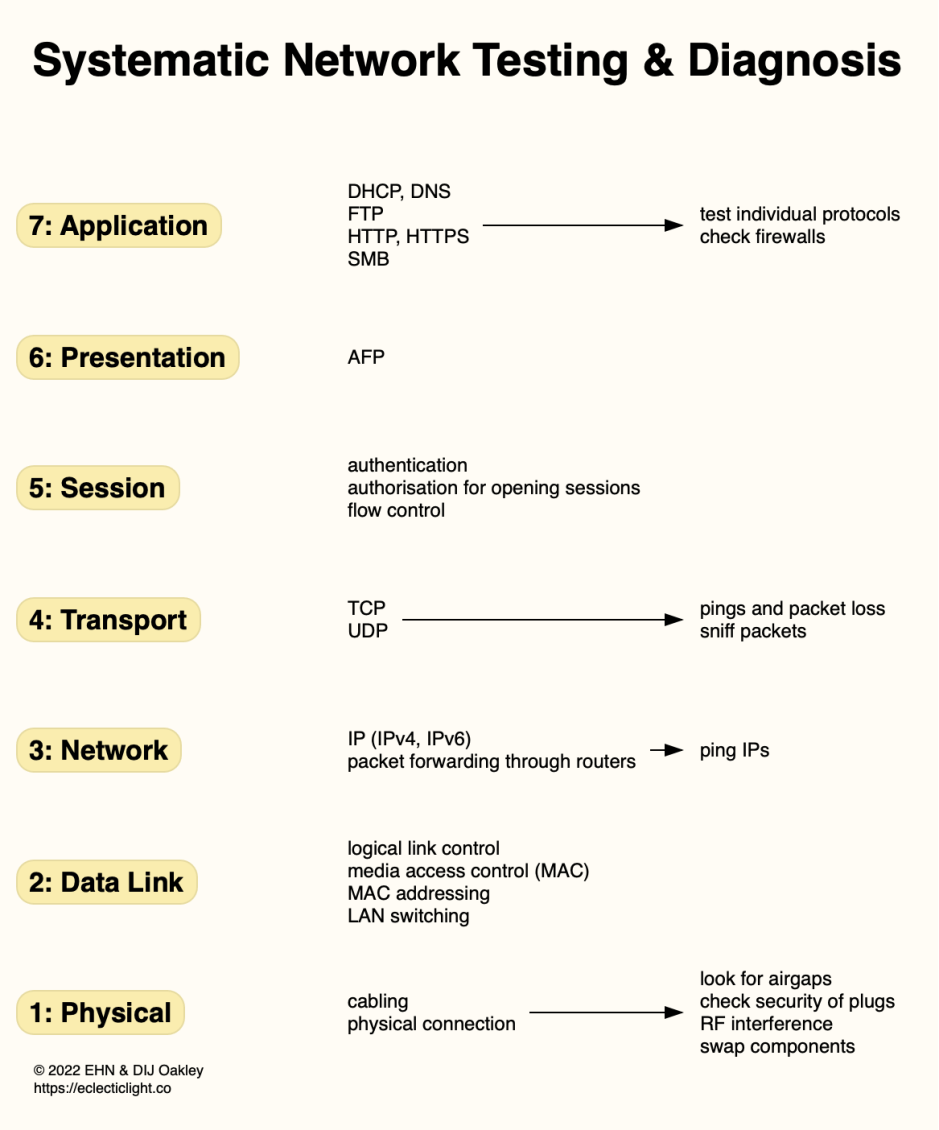
After your first inspired guesswork, you’ll often need to start at the bottom with layer 1 and work your way steadily upwards. However, if you have a thorough assessment of the symptoms and signs already, you may be able to satisfy yourself that lower layers are already working normally. For example, if only one of the protocols in layer 7 is affected, and the others are working fine, there’s little point in going round checking all your Ethernet cables, as you should already know that the first few layers are fully functional. That said, you could find yourself coming back to look at lower layers according to your findings.
Starting with layer 1, it’s more than helpful if you have a spare Ethernet cable or adaptor you can swap into a wired network to confirm whether a component has failed. You can also try more direct connections: all modern Macs with built-in Ethernet ports autosense their connections, so you don’t need to use a ‘crossover’ cable intended for back-to-back connection between them.
Once you’re happy that there’s no air gap blocking the packets, move on to the most important step of mapping IP addresses, which covers layers 2 and 3. This is easiest if all your IPs are set manually, as you should know what’s where already, and checking each device is quick and simple.
If those rely instead on DHCP assigning IP addresses, there could be either of two surprises in store: you could have two DHCP servers handing out IPs, or you could have two devices with the same IP. Multiple DHCP servers are not uncommon when a network has two or more systems which can route traffic and may by default provide a DHCP service, and can give rise to all sorts of strange problems when different devices are assigned the same IP address by different servers.
Armed with your IP map, you can now start confirming which devices are visible from others on the network, and start looking at layer 4, by checking whether packets are being delayed or lost. Ping is the standard tool for this, and well-supported in WhatRoute.

As illustrated in my opening example of the blocked kernel extension, there’s more to layers 1-3 than just a visible connection. Sometimes, perhaps following a macOS update, services can behave oddly. While you might be able to connect to another local Mac using Wi-Fi, a wired Ethernet connection may not work right, if at all. One useful procedure that can fix such problems is to make that service inactive in the Network pane, then delete it with the – button. Click on the Apply button, wait a few moments, then add it back with the + button and check its advanced settings. When changing settings in that pane, remember to click on the Apply button, or your changes may not take effect.
Layers 5 and 6 are normally fairly barren territory for the troubleshooter on Mac local networks, with layer 7 as the next large and thorny area. This involves checking each service out individually, and confirming that it’s working correctly. For some services like File Sharing, you may need to turn them off, remove all shared folders, and restart before configuring them afresh.
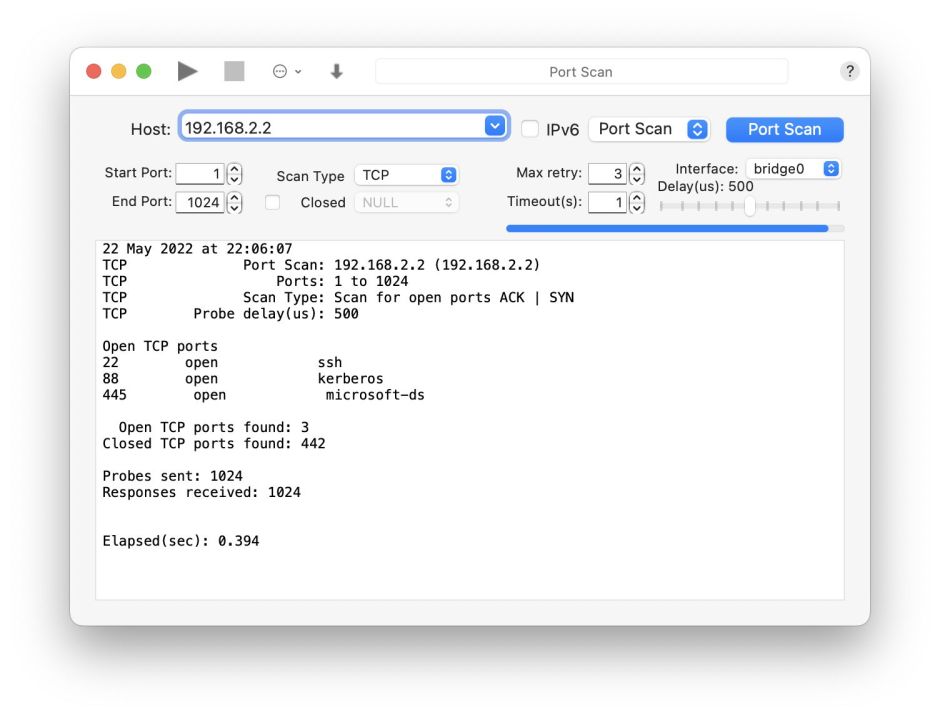
Another of WhatRoute’s useful tools is Port Scan, used in conjunction with Apple’s list of well-known ports, which lets you know the ports left open for services, here ssh, Kerberos including Screen Sharing authentication, and the SMB domain service.
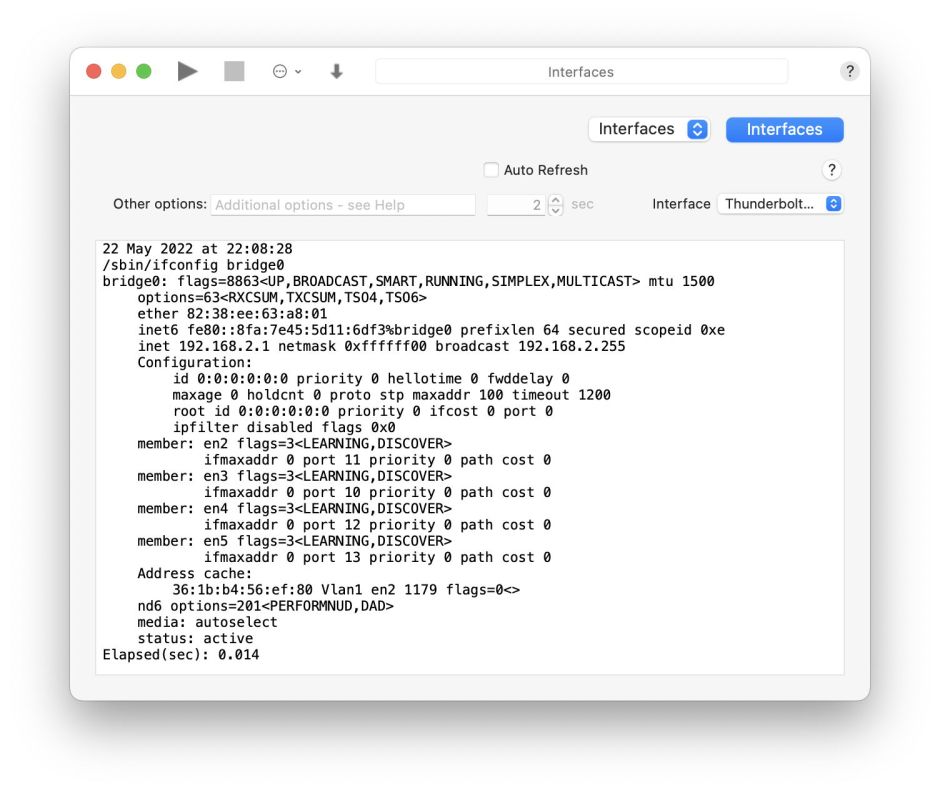
If all else fails, you can inspect each networking interface too.
Sometimes, for all their complexity, network problems are solved rapidly by inspiration. When that fails, a careful, thorough and systematic approach is best. It may seem laborious, but should get you there in the end.
