
One of the big surprises when Apple announced its requirement for notarization over two years ago was that it also applies to command tools. At the time, many who developed their own tools didn’t even sign them, and the other surprise is that – while you can embed signatures into a Mach-O executable file – there’s still no way of adding a notarization ticket to it.
Since my last article about notarizing command tools, the process has changed, and many of us also want to build Universal binaries to run native on both Intel and Apple Silicon Macs. This article explains how to achieve all of this using the current beta-release of Xcode 12 (Beta 6), in the light of my latest experiences doing just that. Here I step through:
- Getting Xcode’s build settings right.
- Exporting the signed and built tool.
- Building the package using Packages.
- Getting that package notarized.
- Stapling the ticket to the package.
- Checking steps as necessary.
Xcode
Apple’s list of requirements for successful notarization includes:
- all executable code is to be signed using a Developer ID signature;
- the signature must include a secure timestamp;
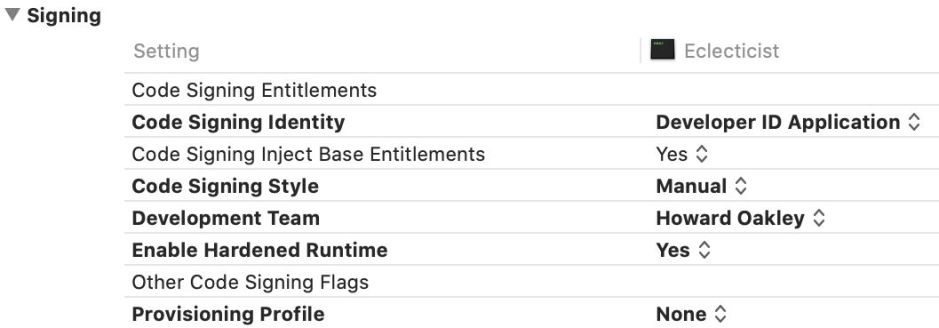
- apps and “command line targets” are to have hardened runtimes;
- the com.apple.security.get-task-allow entitlement isn’t to be set;
- code is to be linked against the macOS 10.9 or later SDK.
Note that this no longer requires that command tools have an embedded Info.plist. However, there are several good reasons for using one, including the fact that that tool will then display a version number in the Finder, which is valuable information for all. I therefore routinely add one to all command tools which I’m going to build, and set the following keys as a minimum:
- Bundle Identifier,
- Bundle Name,
- Bundle Versions String, Short.
If you don’t intend distributing this tool over the Internet or another method like AirDrop which attaches a quarantine flag, you don’t need to notarize it, but all ARM code to be run on Apple Silicon now requires at least an ad-hoc signature. If that’s all you need, you don’t want to notarize at all, and once you’ve set your tool to be signed to be “run locally”, you need go no further.
If, as here, you’re going to distribute your tool over the Internet and want to provide an Installer package, you’ll need to be registered with Apple as a developer, fully paid up at the time, and to obtain two certificates, Developer ID Application and Developer ID Installer. The first is used to sign the executable, and the second to sign the package. If you’re leaving the user to perform their own installation and not supplying your tool packaged, then the second isn’t required, but you’ll then need to submit your tool for notarization in a Zip archive or alternative.
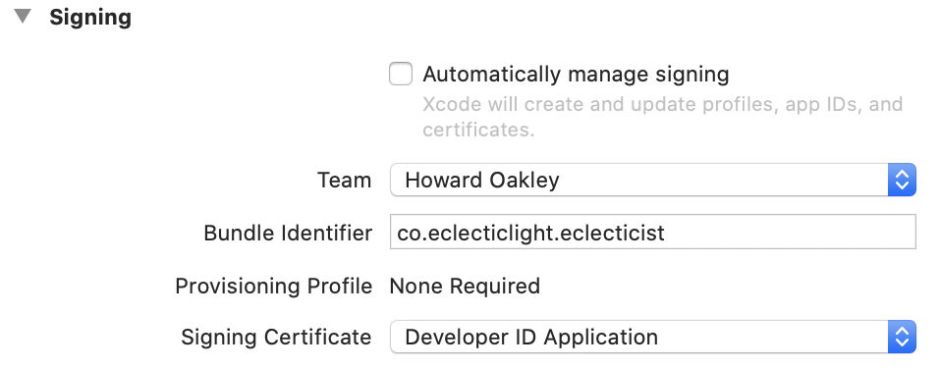
Once you’ve sorted your signatures out, the next items to check are that the hardened runtime is enabled, and it’s going to be built for “Standard architectures”. By default, the hardened runtime is now turned on for both apps and tools, and they’re built as Universal binaries.
Once you’re happy with its settings, build and export an archive, which provides the finished tool ready for packaging. You’ll find the product buried inside the resulting archive package. The final step is to check the signature on the executable, using a command like
codesign -dvvvr - toolname
which generates an output torrent. Check that your tool has the right identifier, is a Mach-O Universal, has the runtime flag set for hardening, and its certificate details.
Packages
Although you can generate packages in Xcode, I gather, the documentation looked forbidding for my simple requirements, so I use Stéphane Sudre’s wonderful Packages app. Over the course of a couple of minutes, in three tabs, I configure a simple package to be built and signed using my Developer ID Installer signature.

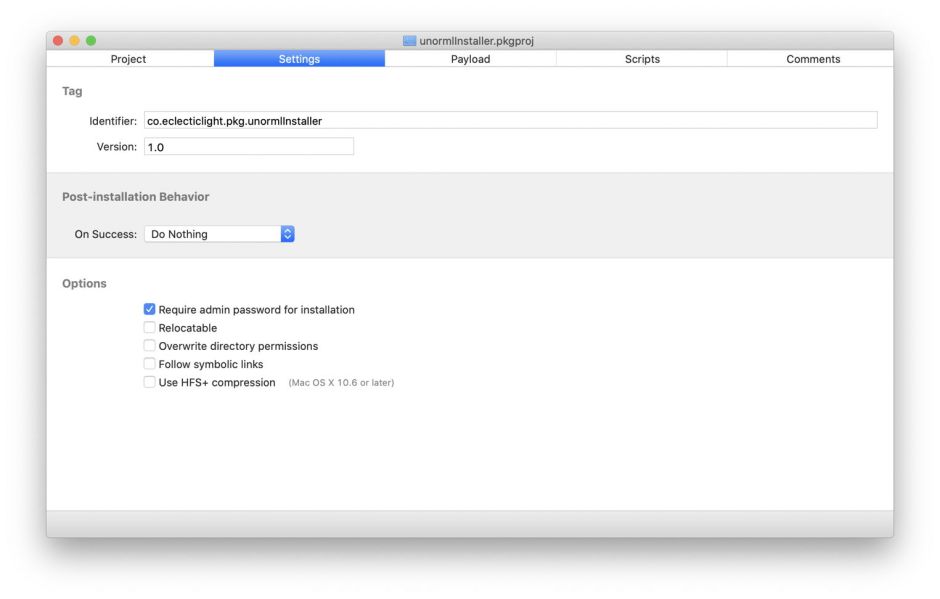

The only trick needed here is knowing that you have to press Cmd-. in the Payload tab to view all folders, including the install destination /usr/local/bin. The signature is added in the Project tab, using the Set Certificate command in the Project menu.
And that’s it. Build that package containing the hardened and signed Universal binary tool, ready for notarization. At this stage, I used to run spctl as a check, but that now requires notarization so is less helpful here, and should be delayed until completion.
Notarization
Before you notarize in Terminal for the first time, you’ll need to obtain an app-specific password for your Apple ID to use the Xcode altool command. Do this from your Apple ID account page as explained here. Copy that and paste it somewhere safe such as your keychain, but I also put it into a text document into which I assemble the notarization command.
As @rosyna kindly points out, the secure and proper way to use altool below is to store your app-specific password in your keychain and then use -p "@keychain:item-name" instead of the --username and --password options which I give below. I’m afraid that I’m just going to be non-secure, quick and dirty here, for which I apologise.
If you have two or more tools which need to be notarized, Apple now lets you submit them together in a single Zip archive. This is particularly useful if you’re intending to distribute them together, or you don’t use Installer packages.
Performing the notarization step requires a long and complex command which I always compose in a text editor, check thoroughly, then copy and paste into Terminal. It goes something like
xcrun altool --notarize-app --primary-bundle-id "co.eclecticlight.blowhole.pkg" --username "yourappleid@me.com" --password "zzzz-zzzz-zzzz-zzzz" --file BlowholeInstaller.pkg
where you substitute an appropriate identifier, your Apple ID username, the app-specific password, and the name of the signed Installer package to be notarized.
There will then be a long pause, during which the package is uploaded for notarization. Once that is complete, the command should return with
2019-06-11 13:10:38.353 altool[72153:25911638] No errors uploading 'BlowholeInstaller.pkg'.

RequestUUID = 0000000-0000-0000-0000-000000000000
which confirms all went well and provides the crucial UUID which you use to refer to this notarization job. Make a note of that RequestUUID, as you need that in the event that anything goes wrong and you want to check on progress.
If you’ve notarized apps in Xcode, you’ll be aware that its Organiser window tells you when your app has been notarized and can be saved ready for distribution. One of the irritations with notarizing in Terminal is that there’s nothing as reliable to inform you. You may catch a notification, or the Notary Service may send you the email promptly, but if either of those isn’t working well at the time, you can be left sat waiting for a job which has already completed.
You can check on progress using the command
xcrun altool --notarization-info 0000000-0000-0000-0000-000000000000 -u "yourappleid@me.com" -p "zzzz-zzzz-zzzz-zzzz"
where you substitute the RequestUUID for the zero UUID, and your Apple ID and the app-specific password.
The command
xcrun altool --notarization-history 0 -u "yourappleid@me.com" -p "zzzz-zzzz-zzzz-zzzz"
returns your recent notarization history.
Once you know the notarization has been successful, staple the ticket to your Installer package, using
xcrun stapler staple "BlowholeInstaller.pkg"
which should return
Processing: /Users/hoakley/Documents/BlowholeInstaller.pkg

Processing: /Users/hoakley/Documents/BlowholeInstaller.pkg

The staple and validate action worked!
Then run a quick check using
spctl -a -vv -t install ToolnameInstaller.pkg
before verifying that, when a quarantine flag is attached, your package works as advertised. You can use my free extended attribute editor xattred to add a quarantine flag.
Here’s an updated tear-out PDF detailing each step in the process: NotarizeCmdTool2
References
Apple’s documentation is now comprehensive and detailed, including
Apple developer documentation on notarization (root)
Apple’s guide to notarizing from the command line
Apple’s advice on dealing with common problems
Armin Briegel provides his detailed account and a script which you might find useful, at Scripting OS X.
