
Yesterday I noted how one of the changed requirements in macOS 10.15 Catalina is that software which isn’t run by LaunchServices, such as command tools, will still need to satisfy new requirements for signature, hardening and notarization. This article looks at how you can achieve that, working through what I have done with my tool blowhole.
Some time ago, I described how I went about turning my command tools like blowhole into signed Installer packages, using Stéphane Sudre’s excellent free Packages. This saves you a fair bit of effort, particularly now that it can sign the package too, but unfortunately there’s still plenty of preparation and commands.
In the past, writing command tools in Xcode has been relatively simple. There was no need for any Info.plist file or code signature, so all you concentrated on was your code.
Those days have gone: to be hardened and signed, as required by Catalina, your tool needs an Info.plist file, a signature, and the hardening flag. Once you’ve exported the built tool in an archive, you then build it into an Installer package, which has to be signed using a special Developer ID Distribution certificate from Apple. That signed package is then submitted to Apple for notarization. If you’re successful in that, you finally staple the ticket to the package, and it’s ready to distribute.
Xcode
Command tools must have an Info.plist file containing a minimum of three items: the Bundle Identifier, such as co.eclecticlight.blowhole, the Bundle Name, such as blowhole, and a version number, in a short Bundle Versions String. When Xcode builds the tool, these will be embedded in the single Mach-O binary. Add a new Property List file with the name Info.plist to your project, and add those items to it.

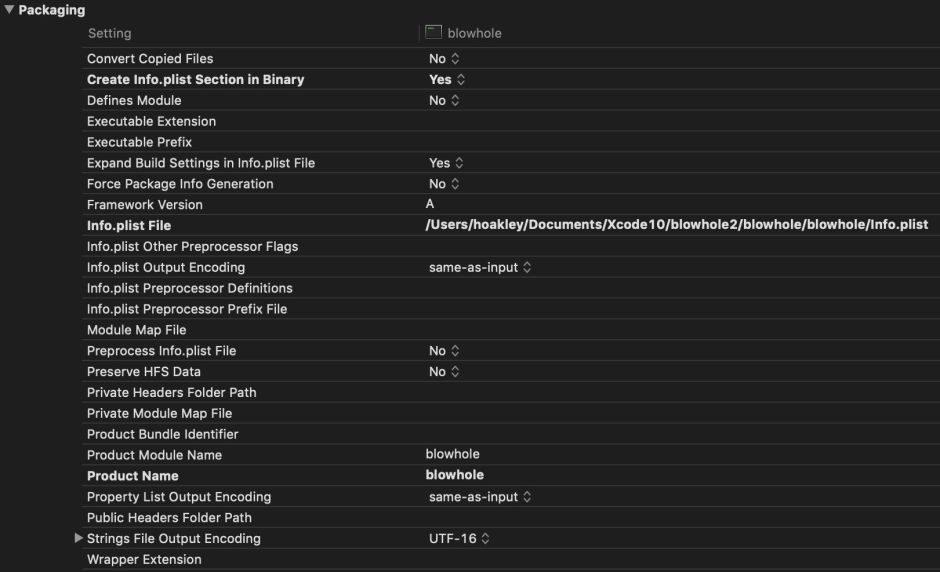
In the Packaging section of the Build Settings, ensure your Info.plist is created in the binary, and uses the correct file, as shown below.
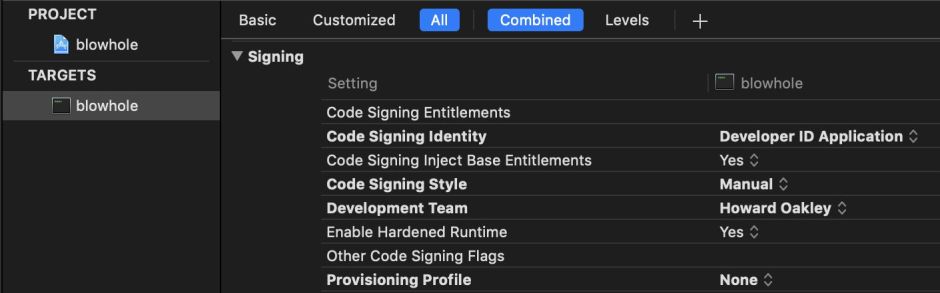
Finally, ensure that the Signing section is properly set up to use your Developer ID Application certificate, and that the Hardened Runtime is enabled there.
Once you’re happy that the tool is ready to build for distribution, build an Archive, which should then contain a hardened and signed command tool, complete with timestamp. Then check that your tool is all ready to build into a package.
The command
codesign -dvv blowhole
should return something like
Executable=/Users/hoakley/Documents/blowhole

Identifier=co.eclecticlight.blowhole

Format=Mach-O thin (x86_64)

CodeDirectory v=20500 size=549 flags=0x10000(runtime) hashes=8+5 location=embedded

Signature size=8926

Authority=Developer ID Application: Howard Oakley (QWY4LRW926)

Authority=Developer ID Certification Authority

Authority=Apple Root CA

Timestamp=11 Jun 2019 at 09:22:57

Info.plist entries=12

TeamIdentifier=QWY4LRW926

Runtime Version=10.14.0

Sealed Resources=none

Internal requirements count=1 size=220
And
spctl -a -vv -t install blowhole
should return
blowhole: accepted

source=Developer ID

origin=Developer ID Application: Howard Oakley (QWY4LRW926)
Packages
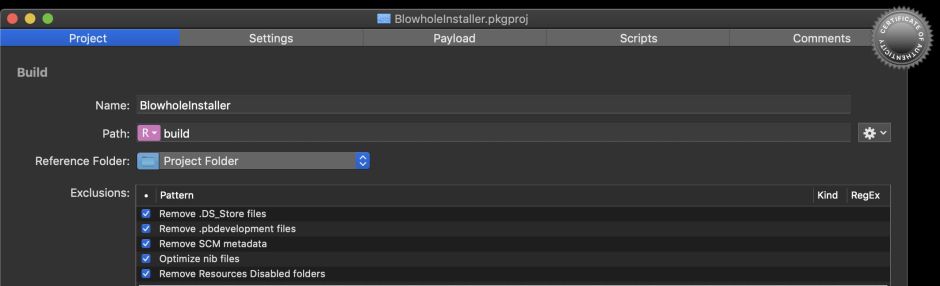
Using Packages is straightforward, and detailed help is here. Because this is just a single, simple command tool to be installed, I opt for a flat .pkg, with Project settings like
The Settings tab looks like this:

In the Payload tab, press Cmd-. to view all folders, and work your way through to /usr/local/bin. With the last folder selected, the + button at the foot is enabled. Click on that and select the hardened and signed command tool from Xcode’s archive to add it to the payload of the package.

Once those are set, select the Project tab again and add your Developer ID Distribution signature using the Set Certificate command in the Project menu. This new feature saves you from having to add the signature at the command line afterwards, and is a boon.
Before going any further, I checked that the Installer package was properly signed using
spctl -a -vv -t install BlowholeInstaller.pkg
which should return
BlowholeInstaller.pkg: accepted

source=Developer ID

origin=Developer ID Installer: Howard Oakley (QWY4LRW926)
Notarization
Apple details the notarization process here. Your first step is to create an app-specific password for your Apple ID to use the Xcode altool command. Do this from your Apple ID account page as explained here. Copy that and paste it somewhere safe such as your keychain, but I also put it into a text document into which I assembled the notarization command itself. That should look something like:
xcrun altool --notarize-app --primary-bundle-id "co.eclecticlight.blowhole.pkg" --username "yourappleid@me.com" --password "zzzz-zzzz-zzzz-zzzz" --file BlowholeInstaller.pkg
where you substitute your Apple ID username, the app-specific password, and the name of the signed Installer package to be notarized.
There will then be a long pause, during which the package is uploaded for notarization. Once that is complete, the command should return with
2019-06-11 13:10:38.353 altool[72153:25911638] No errors uploading 'BlowholeInstaller.pkg'.

RequestUUID = 0000000-0000-0000-0000-000000000000
which confirms all went well and provides the crucial UUID which you use to refer to this notarization job.
If the notarization is successful, you’ll then get a notification and an email back to your developer account to inform you. The final step in producing the Installer package is to staple the ticket to that package, using
xcrun stapler staple "BlowholeInstaller.pkg"
which should return
Processing: /Users/hoakley/Documents/BlowholeInstaller.pkg

Processing: /Users/hoakley/Documents/BlowholeInstaller.pkg

The staple and validate action worked!
My last check at the command line is:
spctl -a -vv -t install BlowholeInstaller.pkg
which should return
BlowholeInstaller.pkg: accepted

source=Notarized Developer ID

origin=Developer ID Installer: Howard Oakley (QWY4LRW926)
Note that its source is a Notarized Developer ID now, and that it refers to a certificate origin of your Developer ID Installer for the package, rather than the Developer ID Application of the command tool inside it.
My routine testing is to present the product as the user will obtain it. Here I put the package into a Zip archive, applied a quarantine flag to it using my utility xattred, then on a Catalina system extracted and installed the command tool, and ran it to verify that it works.
The steps above are summarised in this PDF cheat sheet:
NotarizeCmdTool
I wish you success in your notarization tasks. If you discover a simpler way, I’d love to hear about it.
It has taken me 4 apps in addition to Xcode, 4 command tools invoked in 6 different commands, 2 different developer certificates and an app-specific password, to turn my 260 lines of Swift into a usable 50 KB command tool. That’s security for you.
