
Snapshots can be one of the most puzzling features of APFS and Time Machine. Few of us use them, although Time Machine makes a set of local snapshots with every backup, and some wish they could change that behaviour. This article helps you get the best out of them while avoiding their penalties.
Snapshots and storage space
A snapshot saves all the data required to be able to roll back a volume to the exact same state is was in at the time the snapshot was made. That includes a complete copy of the file system data, which is relatively small, and all the data for the files within it. From that moment on, until that snapshot is deleted, the file system has to retain all the storage blocks in use at the time the snapshot was made, even if they could normally be freed when files are deleted later. So instead of file deletion freeing up storage space, that storage has to be retained with that snapshot. The same applies to changes made to files: storage blocks that would normally be freed and replaced by updated ones must be retained to enable a roll-back.
I’ll now explain that in slower motion with the aid of diagrams.

Before the snapshot is made, this file’s data takes 4 blocks of storage, 01-04. The snapshot is made, and the data in those four blocks then has to be retained until that snapshot is deleted.
That file is edited, and changes to data in blocks 03 and 04 are saved to blocks 05 and 06.

If there were no snapshots, at this point blocks 03 and 04 would be returned for reuse. But because of the snapshot, they have to be retained, otherwise the original file couldn’t be recreated if the volume was rolled back to that snapshot. Thus, with the snapshot, instead of the used space remaining the same at 4 blocks, it increases to 6 blocks when that edit is saved.
If that file were to be deleted now, although blocks 05 and 06 could be returned for reuse, as they aren’t included in a snapshot, the original blocks 01 to 04 still have to be retained, to ensure the volume could be rolled back to that snapshot. So deleting the file at that stage only returns 2 blocks, not the 4 blocks of its current size, nor the full 6 blocks it’s actually taking.
Over time, as more data blocks are changed in the live volume, the size of the data retained by a snapshot grows, and can after a few weeks become enormous, depending on how active its file system is. What was initially measured in MB quickly becomes GB, and if you forget about that snapshot, it will become hundreds of GB in size.
Because of that, Time Machine automatically removes snapshots:
- by age, once a snapshot’s age reaches 24 hours;
- by space, if a volume’s free space falls too low, old snapshots may be purged automatically through
deleted.
Why snapshots?
Provided snapshots are managed carefully, they can be useful in many ways, including:
- Time Machine can use the most recent snapshot of a volume to determine what needs to be backed up.
- You can roll your Mac’s Data volume back to a snapshot far more quickly than restoring or migrating from a backup.
- If there’s a problem with accessing a recent backup, you can restore files from a snapshot.
- If your Mac can’t back up to its normal storage, snapshots can substitute for missed backups.
- Unlike a backup, a local snapshot contains (almost) every file and directory in that volume.
- Local snapshots can supplement macOS versions for reverting edits.
Make snapshots
The only methods of creating Time Machine local snapshots are using the command tool tmutil, which offers a choice of two:
tmutil localsnapshotcreates a new local snapshot on all volumes currently being backed up by Time Machine. If that isn’t enabled, then a new local snapshot is created on only the current Data volume.tmutil snapshot(undocumented) creates a new local snapshot on only the current Data volume, and works when Time Machine isn’t enabled.
Control snapshot size
APFS snapshots are always of whole volumes. If you have large database or VM files, although Time Machine and other backup utilities can exclude them from taking up space in their backups, they can’t exclude them from their snapshots. If you do want to keep such large files, it’s usually better to put them in a volume that is completely excluded from backing up, so it doesn’t get snapshots made of it.
To add a new volume to the boot volume group on your Mac’s internal SSD, open Disk Utility, ensure its View options are set to Show All Devices, then select the Container holding the boot volumes. Click the + tool to add the new volume.

Give the volume a name, then click on the Size Options… button.

Enter your chosen Quota Size, as the maximum you want to allow the extra volume to use on the boot SSD, and click OK.
Use plain APFS or APFS (Encrypted) as the extra volume can’t be protected by FileVault. If you encrypt the volume, safeguard its password as there’s no recovery option if you lose it. This extra volume performs as well as any other volume on the internal SSD, and is far faster than using external storage. If you need to back up the contents of the volume, use a third-party utility such as Carbon Copy Cloner, ensuring that it doesn’t make local snapshots of that volume.
Delete snapshots
If a snapshot does contain a very large or unwanted file, because snapshots are read-only, there’s no way to delete that file from the snapshot, and it’ll remain there until the snapshot itself is deleted.
Delete snapshots using Disk Utility. Open its View menu and first enable Show All Devices, then Show APFS Snapshots. Select the Data or Macintosh HD – Data volume in the left of the window, and you’ll see a list of all APFS snapshots for that volume, together with an indication of the size of each.
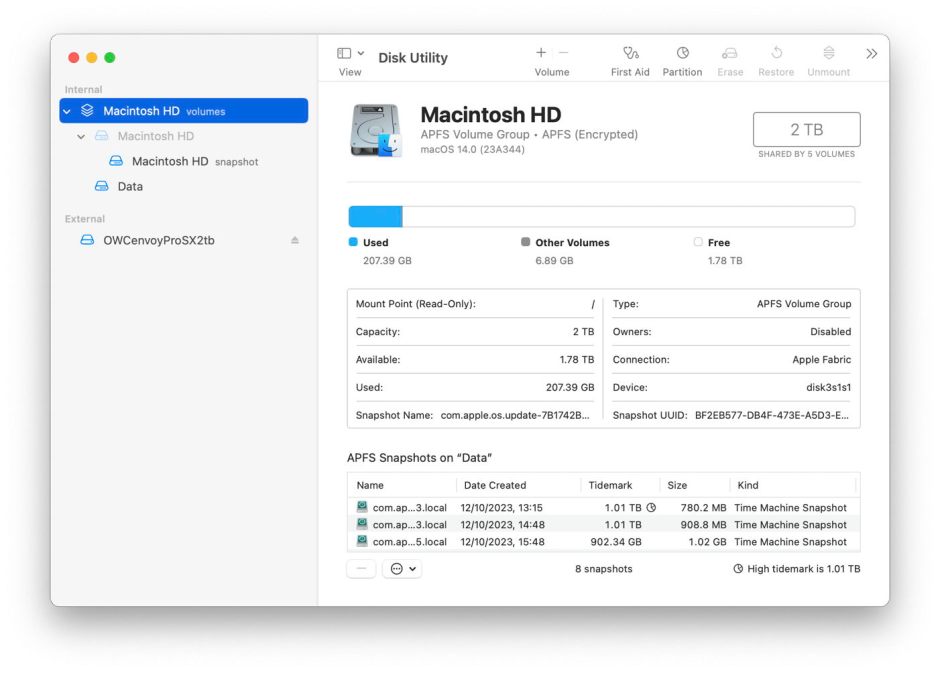
To delete a snapshot in Disk Utility’s list, select it and use the Delete… command from the contextual menu (Control-click). Be careful as there’s no undo. You can safely remove all Time Machine snapshots from that volume except the most recent, which is also the smallest. That latest snapshot is needed when that volume is next backed up by Time Machine. If you remove that too, then the next backup could be a full backup of everything on that Data volume, something best avoided if possible.
If you discover your Mac has just made a very large snapshot, perhaps unintentionally containing a VM, if there’s sufficient free disk space, don’t rush to delete it. If you can, wait until Time Machine has made its next backup with a fresh snapshot, then delete the large snapshot just before it.
As an alternative to manually deleting snapshots, when a volume is backed up by Time Machine you can let it decide which local snapshots to delete. To do that use the command
tmutil thinlocalsnapshots mount_point [purge_amount] [urgency]
where mount_point is that for the volume containing the snapshots, purge_amount specifies the target free space to be reclaimed in bytes, and urgency is a number between 1-4 for the urgency to be used.
Roll back to a snapshot
To roll back your current Data volume to a previous local Time Machine snapshot, first check in Disk Utility that the snapshot you intend to use is still available, if necessary using the command Show APFS Snapshots in its View menu when the Data volume is selected. That will list all those available.
Then shut your Mac down and start it up in Recovery mode, passing through to the main window in Recovery Assistant. Then enter Time Machine System Restore and select the snapshot you want to roll back to.
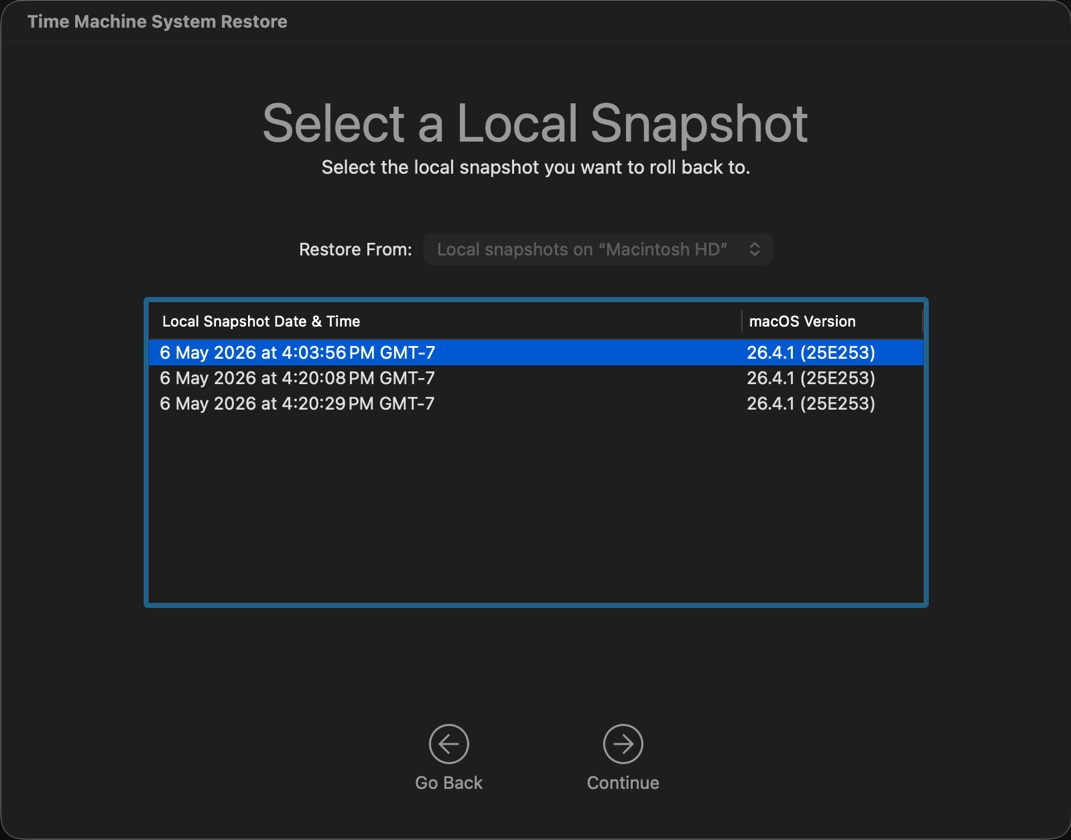
Rolling back is almost instant, but automatically deletes all later snapshots. Full details are given here.
Access snapshot contents
The simplest way to access a snapshot to obtain files from it, is to mount it in the list provided in Disk Utility, then access it like any other volume.
For example, select your Data volume in Disk Utility and ensure its View menu is set to Show APFS Snapshots. In the list of those at the foot of the main window select the snapshot you want to mount, and use the popup menu below the list to Mount it. It will then appear in the list of mounted volumes named something like Data@snap-5682771, and can be browsed there.
Key points
- Snapshots will only grow in size over time. Don’t leave them lying around.
- They have their uses, and are used by Time Machine when backing up. They can be valuable when your Mac is away from its backup storage.
- Create a snapshot using
tmutil localsnapshotortmutil snapshot. - Exclude large files like VMs by moving those to volumes that don’t have snapshots made of them.
- When deleting snapshots, retain the most recent for the next Time Machine backup.
- Roll back to a snapshot using Time Machine System Restore in Recovery.
- Mount a snapshot using the list in Disk Utility and access them in the Finder.

