
Keychain problems have occurred not infrequently in the past, but with the addition of the Data Protection keychain in macOS they have become less common, and sharing your keychain in iCloud should now eliminate the great majority of problems. There may still be occasions when a user is prompted repeatedly for the password to a keychain. This article considers how to address that and other problems.
Access dialog
When you’re prompted to provide a keychain password, the dialog shown is crucial, both in terms of validating the request and discovering why you’re being asked in the first place.
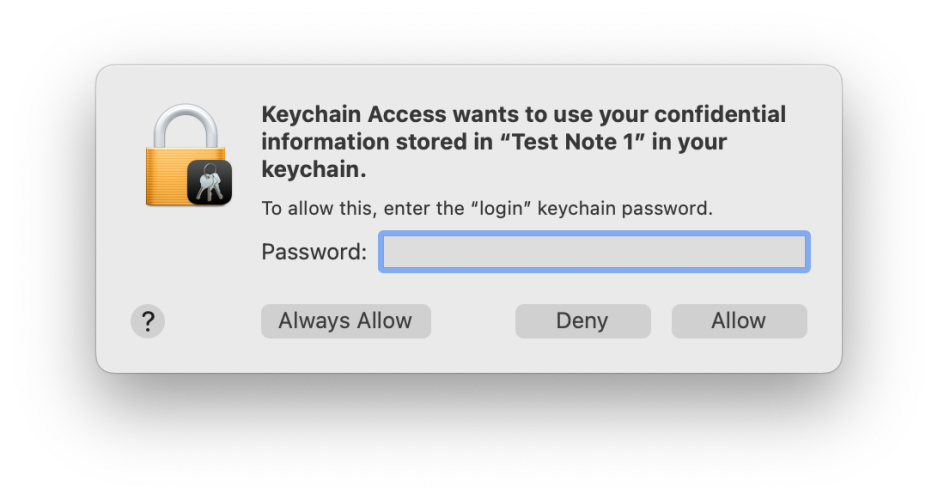
Not only should you check carefully that the dialog is genuine, but use its contents to discover why you’re being asked to provide the password. First, verify its icon, the app name, keychain item, keychain name, and its three standard buttons. When you’re happy that it’s genuine and not a fake or a different type of request, record:
- the requesting app, here Keychain Access,
- the keychain name, here the login keychain,
- the keychain item, here a secure note named Test Note 1.
When you’ve decided whether to allow or deny the request, consider whether to Allow it just this once, or to Always Allow it.
Be wary of apps suddenly requesting access that they should already have. For example, Safari is normally given full access to your web and internet access passwords, so it doesn’t prompt you for individual access. If you start seeing requests from Safari to open a keychain to give access to passwords that it should already have, suspect that the app has been changed, forcing reset of its access rights, or that the requests are bogus; either way you should suspect a security problem.
There are two sound reasons for repeated requests for authentication to unlock keychains: either the app making the request isn’t trusted to access that keychain or that item within it, or the keychain is being locked again after use, something that shouldn’t happen for the login or iCloud keychains.
If you’re happy that app should be given access to that keychain, instead of pressing Return to Allow that access, click on Always Allow. Your Mac’s security system will then decide whether to give that app lasting access, so saving further requests. One common error here is pressing Return or clicking on Allow, then wondering why a similar request follows almost immediately: if you want that app to have access in future, click on Always Allow instead.
Locking
Locking of keychains is simple to observe in the sidebar of Keychain Access, or in Mints‘ Keychain tool.
To change locking behaviour of a keychain, select that keychain in the sidebar of Keychain Access and use the Edit / Change Settings for Keychain menu command to show that keychain’s settings. You can then increase the time before that keychain is locked automatically, or disable locking altogether.
If you have custom keychains that are being accessed repeatedly and resulting in unnecessary password requests, try copying the items being accessed from there to your login keychain, which should eliminate the need to keep opening that custom keychain. Even when you set a custom keychain to be kept unlocked, before you can access it the first time after each login, you’ll be required to enter its password, as it can’t be unlocked automatically in the way that the login keychain is.
Login password mismatch
By default, your user login and login keychain passwords are identical, enabling macOS to automatically unlock your login keychain whenever you log in as that user. When you change your user password, that should automatically change the password for the login keychain as well, ensuring that unlocking still works automatically.
Sometimes the two passwords become different, usually because you changed the password on the login keychain separately. This results in login requiring you to enter two passwords instead of one. It can normally be rectified by changing the password for the login keychain to the same as the user login password.
Broken keychains
In the past, Keychain Access has also provided a First Aid feature to check and repair faulty or damaged keychains, but it no longer does. Manually reconstructing a keychain or building a fresh one, for instance after resetting the login keychain and wiping its contents, is lengthy and tedious. It’s generally better to migrate or restore from a backup or copy, which isn’t an easy option either.
Apple Support can be helpful with keychain problems, and can talk you through the steps required to get your Mac’s keychains working again.
Expired certificates
When running older versions of macOS, security certificates provided in system keychains can fall out of date, and then may cause all sorts of problems accessing websites and services. If you can locate an updated certificate, install that in the System keychain in /Library/Keychains and those problems should vanish. Note that you can’t remove, change or add certificates to SystemRootCertificates or other keychains stored in /System/Library/Keychains as they’re on the SSV and can only be changed by a macOS update.
Data Protection (iCloud) keychain
Keychain Access only provides limited access to the Data Protection keychain, whether that’s shared in iCloud or kept on your Mac as Local Items. As it can only display the passwords stored in this increasingly important keychain, it’s now better to access those through the Passwords item in System Settings, or using the Passwords tool in Safari’s Settings.
Protecting other data
Unlike most third-party password managers, keychains in macOS are designed to hold passwords, keys, certificates and small secure notes, but not arbitrary data like images and documents. This is intentional, as it limits the size that keychains can grow to, and makes them more reliable to share in iCloud. macOS provides a range of other secure storage methods that are better suited to storing other data, ranging from locked Notes to FileVault itself, many of which are protected by the Secure Enclave and free of any cost or dependence on third-parties. I will look at those in a future article.
