
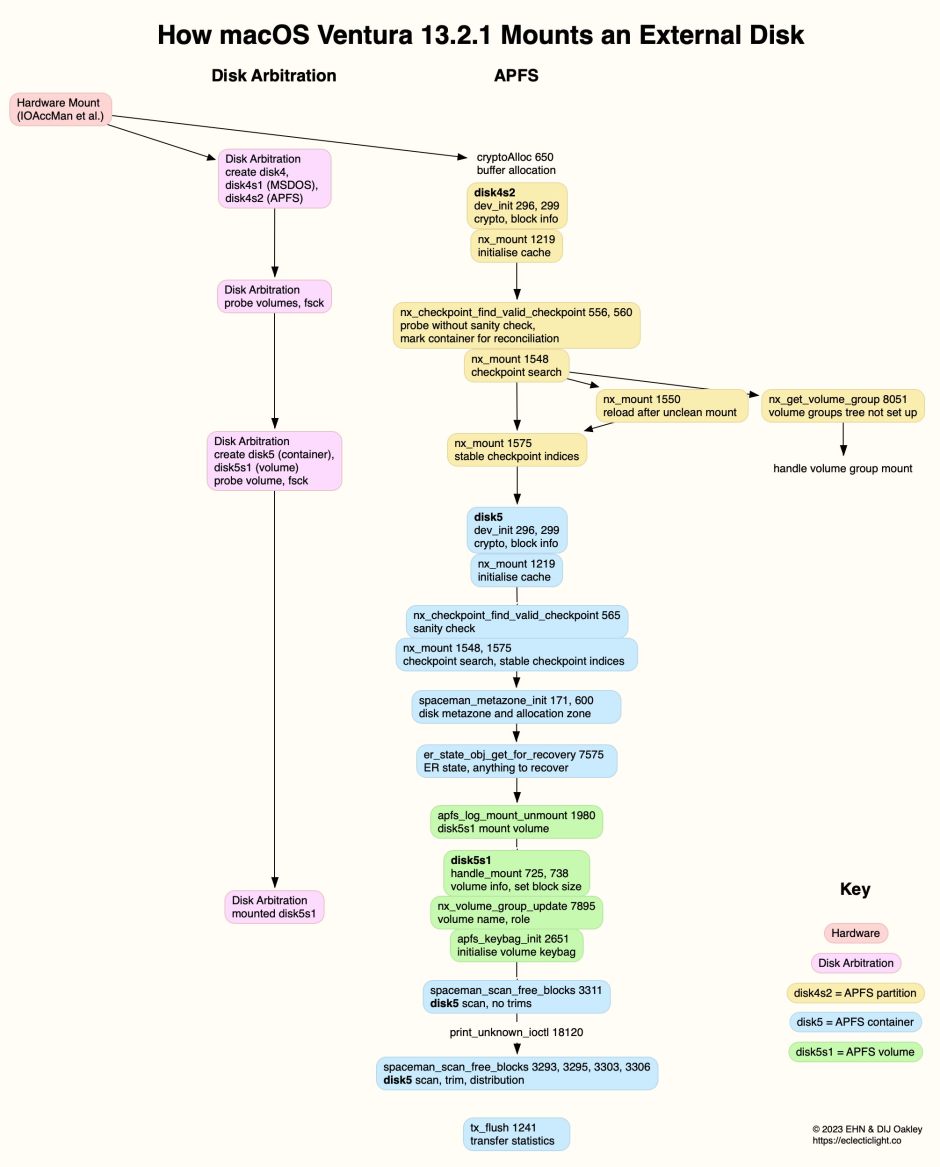
Since adding the feature in Mints 1.11 to obtain log extracts looking at APFS and how disks are mounted, I’ve been busy examining extracts for several different types of mount, and other procedures involving APFS. I’ve also matched these against the limited information provided in the APFS reference (last updated nearly three years ago), and here attempt to provide better insight into how APFS mounts the containers and volumes of an external disk.
The message field of each log entry made by APFS has a standard structure:
- The descriptive name of the APFS task, which might refer to a code procedure, e.g. nx_get_volume_group.
- The task-specific identity number, e.g. 8051 for nx_get_volume_group. Some tasks can have more than one ID.
- A description of the activity undertaken and any result.
The diagrams used here provide the first two items, and a brief summary of the third.
After the hardware subsystems have established connection with the external disk through its interface and internal drivers, Disk Arbitration creates the new disk devices. In this case, I’ll consider a plain SSD formatted with a single APFS container and unencrypted volume. This is partitioned as follows:
- At the top level, disk4 is divided into two partitions, disk4s1 and disk4s2.
- disk4s1 is a hidden EFI partition in MSDOS format.
- disk4s2 is an APFS container, disk5.
- disk5 contains a single APFS volume disk5s1.
Bootable external disks have a more complex structure within their APFS container; I’ll examine mounting them in a later article. Encrypted APFS volumes are stored in the same layout, and are mounted in a similar process, although volume operations can only take place once the user has entered their password. Again, I’ll examine those in a later article.
Partition
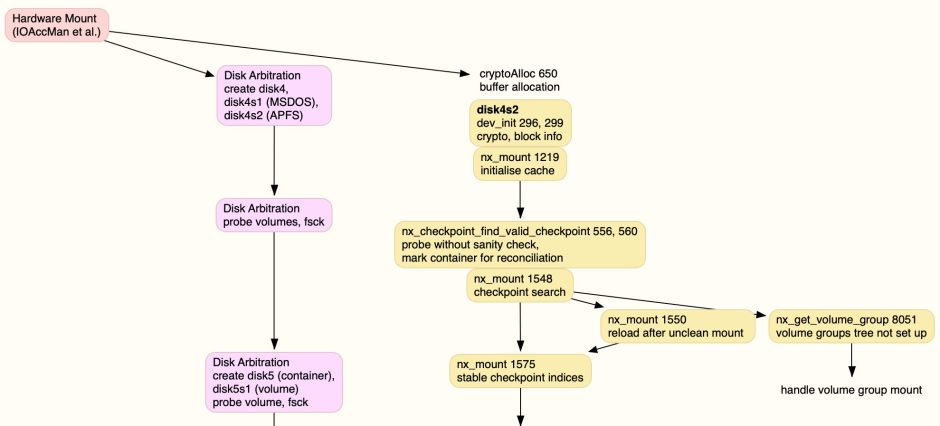
Disk Arbitration probes each of the partitions on the disk, and runs fsck on them to determine the health of their file systems. For the EFI partition, that’s almost instant, but the APFS container takes longer.
While that’s in progress, APFS gets ready to handle the mount by allocating a buffer for crypto purposes, initialises the device and block information, and cache. The next and most important task is for APFS to locate the latest valid checkpoint in the APFS partition/container. This consists of the container’s superblock and checkpoint-mapping blocks that are the most recent and valid. When a disk has been unmounted cleanly, the container superblock required should be that in the first block of the partition, and provides the location of the checkpoint descriptor area. This should have the largest transaction identifier, and is checked using its magic number and checksum. This leads to the stable checkpoint indices.
If the first block of the partition has an older copy of the container superblock, that indicates the disk wasn’t last unmounted cleanly, and the latest container superblock must be located before mounting can proceed. Another variation that can be encountered at this stage is when the container has a boot volume group to be mounted, as I’ll describe in a later article.
With the latest valid checkpoint located, Disk Arbitration creates the container and volumes, and starts to probe them, running an fsck on the volume.
Container
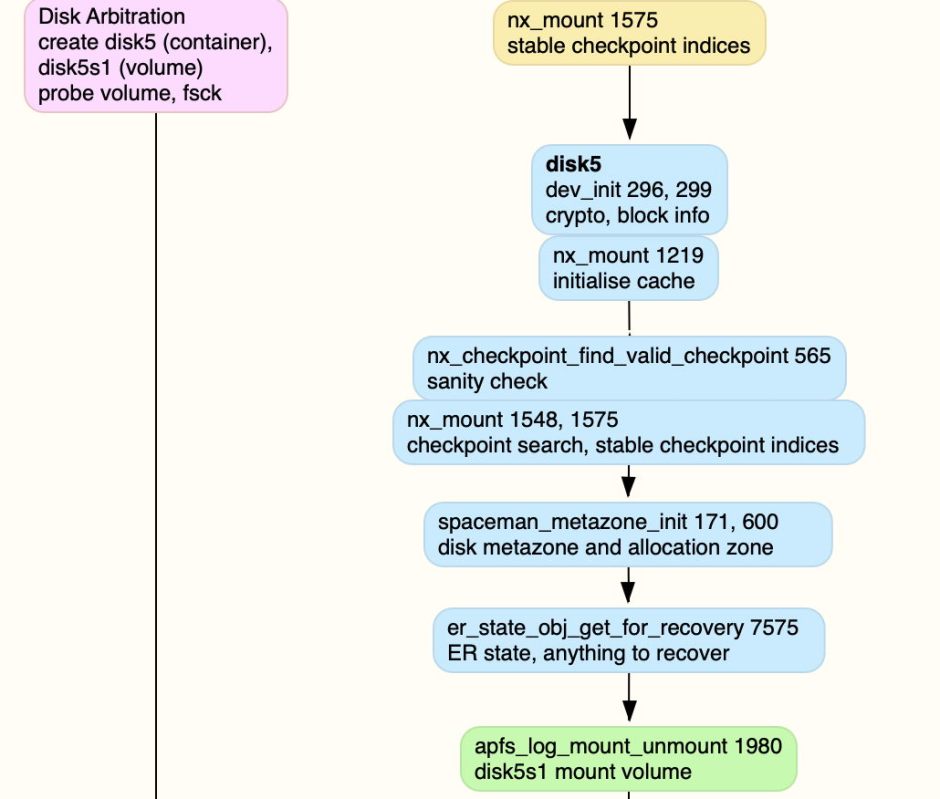
APFS prepares to examine the container and its volumes by initialising the container device and block information, and cache. It then performs a sanity check on the latest valid checkpoint before locating the disk metazone and allocation zones within the container. Once it has checked whether there’s anything to recover within the container, it mounts the single APFS volume within that container.
Volume
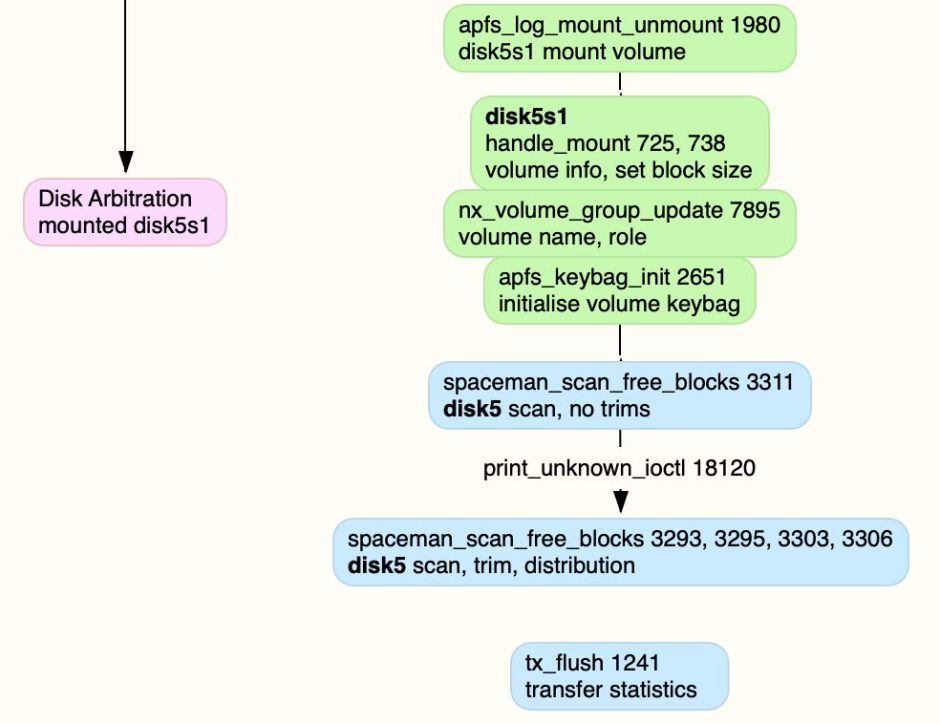
With the volume mounted, APFS acquires the volume information and sets the block size to be used, then declares the volume name and its role. In the case of a general-purpose volume, this confirms it’s not a System or Data volume, which need special treatment to ‘stitch’ them together using their firmlinks, and has no other special role, such as Preboot, which will automatically be unmounted.
In anticipation of the requirement to handle encryption, APFS tries to initialise the volume keybag. This is a data structure to store the collection of keys required, and is only found with encrypted volumes, so fails when the volume is unencrypted. Disk Arbitration should by now have received the results of fsck on the volume, and declares the volume mounted.
Container scans
Once all the volumes in the container have been mounted, APFS scans the container for free blocks without performing any trims. At about this time, APFS sends an ‘unknown’ IO control message to the disk, normally resulting in an error; the purpose of this isn’t clear, but it appears to happen once during each volume mounting sequence. Any volume snapshots to be mounted will normally be handled at about this time, a process I’ll examine in a later article.
Finally, the container’s Space Manager scans for free blocks again, this time performing trims, and reporting the distribution of free block sizes available once the trims are complete, for example as
disk5 trim distribution 1:1461 2+:1267 4+:4121 16+:785 64+:822 256+:675
Trims appear to be performed reliably with NVMe SSDs, whether connected via Thunderbolt or USB-C, but don’t appear to happen by default with SATA SSDs.
After that, APFS normally reports transfer statistics for containers after periodic flushes, but doesn’t appear to perform any further trims. A typical transfer report might read
tx_flush:1241: disk3 xid 1312713 tx stats: # 4160 finish 4140 enter 273 wait 83 2024us close 16us flush 1159us
Summary
The full summary is shown in the diagram.
A tear-out PDF version is available from here: basicmountapfs1p
As ever, I welcome corrections to my errors.
