
Apple Silicon Macs are different from previous Intel models, in that the whole of the boot process is owned by Apple. They don’t have UEFI, but have Secure Boot designed into them from the start. In this article, I rely on the information provided in Apple’s Platform Security Guide, documentation generously provided by Hector Martin @marcan42 and the team developing Asahi Linux, and my own small explorations. My aim here isn’t to duplicate detailed information already available there, but to paint a broader picture which should help you understand important issues such as how the Signed System Volume (SSV) is verified, and what happens in the event that there’s a problem.
Overview
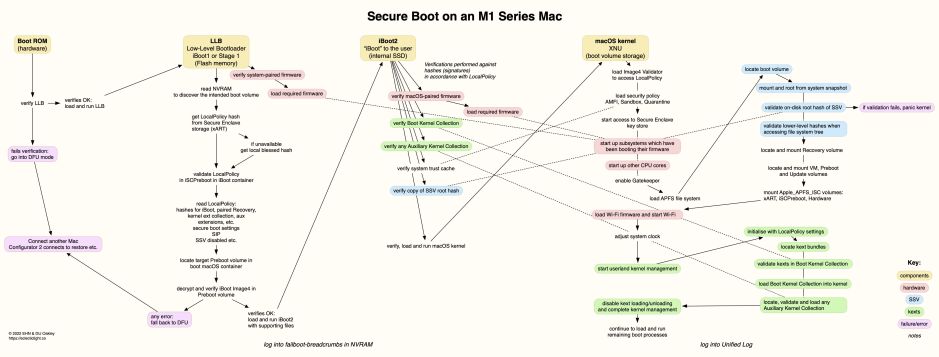
Booting an M1 series Mac consists of four main stages:
- The Boot ROM, which is in the hardware, and can’t be changed. In this context, its most important task is to verify the executable for the next stage, load and run it. If that isn’t possible, then the fallback is to go into DFU mode and await a connection over USB.
- The Low-Level Bootloader, LLB, which verifies and reads stored security settings in the LocalPolicy, locates and verifies the software for the next stage, then hands over to it.
- iBoot, popularly but incorrectly called the M1 ‘firmware’, which verifies a set of hashes used to guarantee the integrity of key information, by comparing a stored copy of the hash against a hash of that hash, termed its signature. Among these is the root hash of the SSV, but iBoot doesn’t attempt to access the SSV or its hashes, merely passing on the verified root hash for the kernel to use later. Once it has completed those checks according to LocalPolicy, iBoot verifies, loads and runs the macOS kernel.
- macOS, whose kernel takes over from iBoot to start up the rest of the hardware, security systems, the SSV and other storage, and load all the required kernel extensions. These ultimately bring the Mac to life, and the user login screen.
The first three stages concentrate on a succession of checks which are fundamental to Secure Boot, and fuller details are given in the Platform Security Guide. They don’t write entries in the Unified Log, which isn’t started until the kernel has loaded. iBoot does though leave some cryptic information as failboot-breadcrumbs in the NVRAM, but few outside Apple have made much sense of those.
Failure
In the event that anything goes wrong, such as a verification failing, there are only two likely courses: the Mac is put into DFU mode to await connection from another Mac, or it’s put into Recovery instead. Although the guide refers to the latter happening in the event of problems with the SSV, in practice what normally occurs is the Mac enters a kernel panic boot loop. In that, the kernel panics, forces a restart, which encounters the same problem, and that causes another panic, hence the term boot loop.
As with all boot loops, if you leave your Mac long enough, it will eventually stop panicking, as it should be put into Recovery and you may then be informed of the reason for the boot loop occurring. Widespread and good practice for dealing with a boot loop is to force the Mac to shut down, then to try starting it up in Recovery. Whether that will also result in the user being informed of the cause of the panic isn’t clear, and trying to browse a panic log in Recovery isn’t straightforward either. Maybe a future update to iBoot will realise the promise of the guide, and restart straight into Recovery after the first panic occurs, rather than entering an unfriendly boot loop.
DFU mode
Each of the first three stages loads only the code which it needs to access hardware to perform its tasks. In the case of the Boot ROM, this is minimal, and includes support to access the Flash memory containing LLB, and basic USB support to connect to another Mac when in DFU mode. That explains why DFU mode won’t work over a Thunderbolt connection, as that would require additional systems in the chip to be active to provide the hardware support necessary. Similarly, the connecting Mac needs to be able to send a substitute for LLB to enable the M1 Mac to proceed to install a fresh LLB and Preboot components, then restore the rest of the internal SSD.
Essential components
One of the most common questions people ask about M1 Macs is whether, like Intel Macs, they can boot fully from an external disk. A quick glance at the overview above doesn’t help, either, as iBoot and macOS can readily be loaded from external storage, and the first two stages are stored in the SoC and local Flash.
Problems come with securely stored data, particularly LocalPolicy, which must accessed by LLB. Currently, those are largely stored in the iSCPreboot volume in the iBootSystemContainer on the internal SSD. Another volume in that container which is key to Secure Boot is trusted storage for the Secure Enclave, in xARTS. The RecoveryOSContainer on the internal SSD is also indispensable: in Big Sur, it provides the primary Recovery system, and in Monterey it remains the Recovery system of last resort.
So the answer is that M1 Macs rely on their internal SSD to complete the initial stages of booting macOS successfully. If that SSD or the Flash containing LLB fails or becomes corrupted, then the Mac will be unable to boot, and its only recourse will be DFU mode, in the hope that it can be restored successfully.
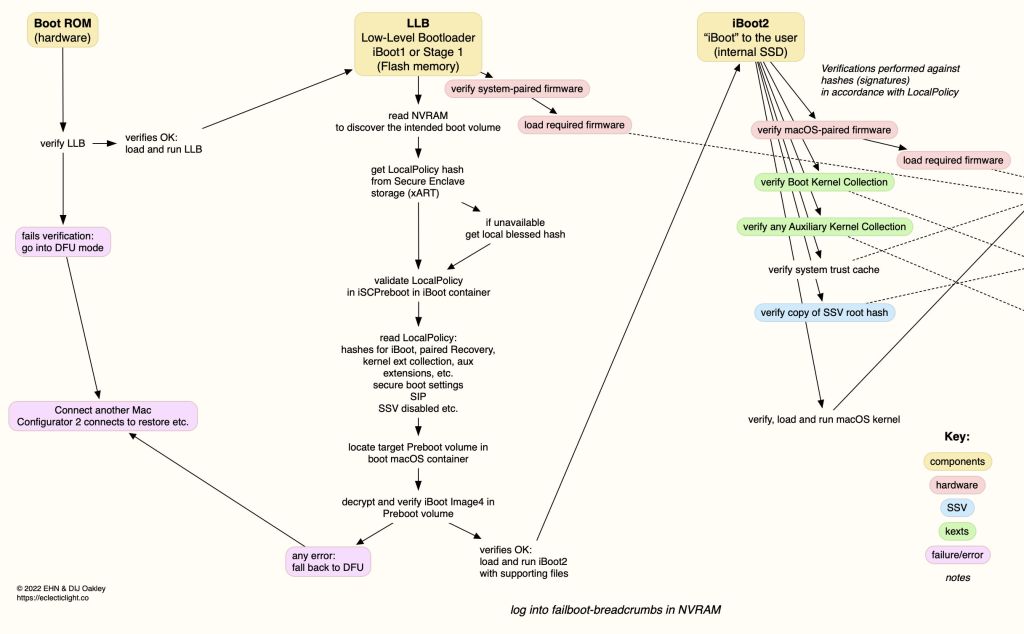
From Boot ROM to LLB
The first major transition in the boot process is handover from the Boot ROM to LLB. Although primarily a bootloader and still a far cry from the kernel, LLB starts working with the Secure Boot settings held in the LocalPolicy for the boot volume. This series of stages is shown in outline in the following diagram:
A tear-out PDF is available from here: SecureBootM1v2
That’s where we’ll start in the next article.
If you see any errors in this article, or its diagrams, please don’t hesitate to correct me, so I can correct them.
