
It’s not that long ago that taking a Mac back to ‘bare metal’ was a simple matter of booting from an external disk and reformatting the internal drive, followed by installing macOS from scratch. Of course that didn’t do anything with the Mac’s firmware, which you were stuck with. While you can certainly boot a T2 or Apple silicon Mac into Recovery, wipe and rebuild its macOS partition (container), in many cases that isn’t likely to be sufficient to return it to full working order. This article looks at some good reasons for taking a modern Mac back to bare metal and starting from scratch.
Reasoning
In those older and simpler times, the internal boot disk had just two partitions: a hidden EFI partition, and the main container for its APFS volumes. That started to become more complex when a dedicated Recovery volume was added, and since Big Sur even Intel Macs have had at least five APFS volumes in that main macOS container.
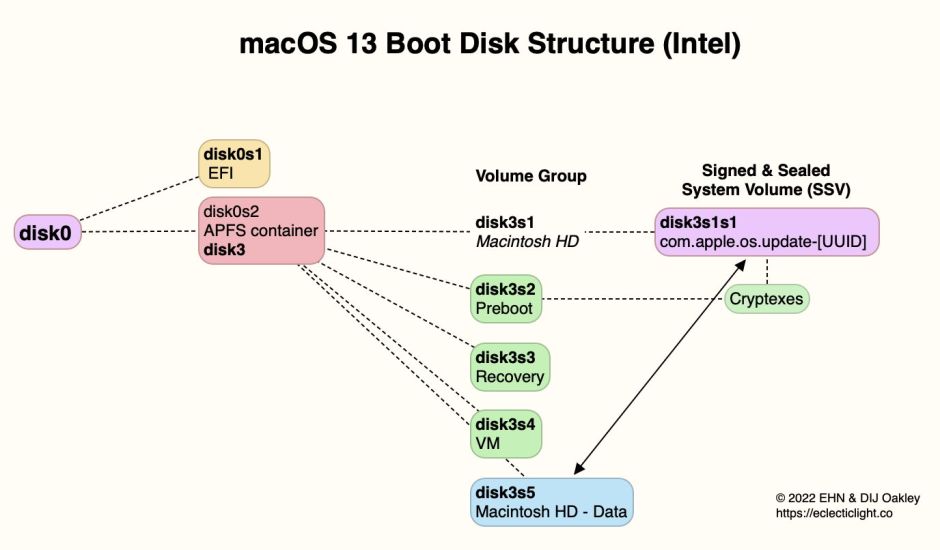
From the start, Apple silicon Macs have come with three containers or partitions on their internal SSD, of which only one is used for the five volumes making up the boot volume group. Erasing just that macOS container can’t fix some problems occurring with the internal SSD.

DFU mode is run from the Boot ROM of Apple silicon Macs, so is the lowest level at which they can run. It’s so basic that it doesn’t even support Thunderbolt connections, only USB-C. Because it doesn’t rely on firmware such as LLB or iBoot, those have to be sent over the USB connection from the Mac running Apple Configurator 2. Apple provides detailed instructions for this in the Help book for Configurator 2, also available online for Apple silicon and T2 Intel models.
Firmware and system software for a revive or full restore of an Apple silicon Mac in DFU mode comes in an IPSW image, supplied only by Apple. Configurator will happily download the current 14 GB image for you, and previous versions are accessible through Mr. Macintosh’s listing. Reviving installs a fresh copy of all the firmware and the Recovery container on the internal SSD, but leaves the macOS container untouched. Restoring erases the whole internal SSD, then installs the firmware, Recovery and macOS containers to the same state when that Mac was first unboxed, ready for personalisation and configuration of the fresh copy of macOS, and migration of data from a backup.
For T2 Macs, the processes are slightly different. Reviving downloads and installs the current iBridge (BridgeOS) firmware, but doesn’t touch the System or Data volumes in the macOS container. Restoring installs the current firmware and erases the boot volume group. Following that, you have to boot the Mac into internet (Remote) Recovery to download and install the current version of macOS, then migrate from a backup.
As a general principle, unless you want to completely erase the internal SSD, you should try to revive first. If that fails, or doesn’t fix the problem, then proceed to restore.
Automatic
There are some circumstances where Apple silicon Macs enter DFU mode as a last resort, for example when their firmware has become damaged. Most then shown no obvious signs of life. This is even true of MacBook Pro models with MagSafe 3 power cables: in DFU mode, their LED doesn’t light up. Neither will a notebook keyboard light, nor is there normally any indication that a built-in display has power.
Notable exceptions to this are:
- Mac Studio and Mac mini, whose power status indicator light should display amber;
- Mac Pro 2019, whose status indicator light should display amber and may flash.
For all models, once Apple Configurator has connected successfully to the Mac in DFU mode, you should see the Apple logo and a progress bar on any connected display during IPSW download.
For the Mac Pro 2019, the status indicator light will flash amber in different patterns as a result of memory, PCIe card and other faults. Apple explains those here.
Spontaneously entering DFU mode should be a very rare event, but in most cases the only way to determine whether it has happened is to connect the Mac using a suitable USB cable to another Mac running Apple Configurator 2, which should then connect to the Mac in DFU mode.
Boot loop
One well-known if rare cause of boot looping, where the Mac panics and restarts in an endless loop, is a problem with firmware. For T2 and Apple silicon Macs, the preferred solution is to shut the Mac down, boot it in DFU mode and revive the affected Mac. If that doesn’t fix the boot looping, then a full restore is necessary.
Locked Mac
A full restore is the only reliable way to access a T2 or Apple silicon Mac that can’t be unlocked because the password has been lost, and no recovery is possible using the Apple ID or Recovery Key.
Roll back macOS and firmware
Intel Macs are unable to roll back macOS and its firmware in DFU mode as Apple doesn’t supply old versions of firmware, and old macOS can’t be installed using internet Recovery.
Apple silicon Macs can readily be reverted to older firmware and macOS, though, by putting them into DFU mode and restoring that older version of macOS complete with its firmware in the appropriate IPSW image.
Lost Recovery Mode
Rarely, both regular paired Recovery, in the boot volume group, and Fallback Recovery, in its separate container on the internal SSD, may be lost on an Apple silicon Mac. The only way to restore Recovery then is by reviving or restoring in DFU mode.
For T2 Macs, if both local and internet (Remote) Recovery are unavailable, a full restore is necessary.
Deployment
DFU mode can provide a quick and effective way to deploy Macs in small to enterprise settings, for example specialist twocanoes offers its MDS.
Deep sanitisation
Macs that have been used with potentially malicious software or in other circumstances in which they need to be erased completely should be restored in DFU mode, as the only code that isn’t erased and replaced is that in their Boot ROM.
Cleaning
Preparing a Mac for disposal by completely erasing all non-system data shouldn’t normally require the use of DFU mode. Both T2 and Apple silicon Macs offer Erase All Content and Settings (EACAS) as the preferred method for doing this, as it’s quicker, simpler, and minimises erase cycles on the internal SSD.
Other situations in which internal storage might have been erased in the past are also usually better addressed using EACAS, provided that the Mac’s firmware and system software are functioning normally.
