
The three different types of Mac handle external bootable disks quite differently: Intel Macs without a T2 chip boot straight from a suitable disk with macOS installed on it; those with T2 chips have to be allowed to do so in Startup Security Utility; Apple silicon Macs rely on an elaborate system of ownership and security policies known as LocalPolicies. As a result, some find it difficult or impossible to get an M1 or M2 Mac to start up from what should be a bootable external disk. This article examines what could go wrong, and how you can investigate ownership.
Initial key and certificate creation
There are two situations in which an Apple silicon Mac needs to be set to its default state: when it’s brand new, and when it has been fully erased and restored in DFU mode using Apple Configurator 2. As Apple explains: “When macOS is first installed in the factory, or when a tethered erase-install is performed, the Mac runs code from temporary restore RAM disk to initialize the default state. During this process, the restore environment creates a new pair of public and private keys which are held in the Secure Enclave. The private key is referred to as the Owner Identity Key (OIK). If any OIK already exists, it’s destroyed as part of this process.”
So during this creation of the default state, the OIK, the private half of a public-private key pair, is generated and stored in the Secure Enclave. Also created is a new User Identity Key (UIK) for Activation Lock. This is sent to Apple for certification, where it’s checked to see if it’s associated with a lost Mac using the Find My Mac service. If it is, then certification is refused and that attempt to set that Mac up fails. If the UIK is certificated successfully, then that User Identity Certificate (ucrt) is used to sign in RemotePolicies, which provide constraints for LocalPolicies.
The ucrt and OIK are then used to obtain an Owner Identity Certificate from Apple: “When an Activation Lock/ucrt is successfully retrieved, it’s stored in a database on the server side and also returned to the device. After the device has a ucrt, a certification request for the public key which corresponds to the OIK is sent to the Basic Attestation Authority (BAA) server. BAA verifies the OIK certification request using the public key from the ucrt stored in the BAA accessible database. If the BAA can verify the certification, it certifies the public key, returning the Owner Identity Certificate (OIC) which is signed by the BAA and contains the constraints stored in ucrt. The OIC is sent back to the Secure Enclave. From then on, whenever the Secure Enclave signs a new LocalPolicy, it attaches the OIC to the Image4.”
At the end of these processes, the Mac has an OIC, kept in the Secure Enclave, which is used to attach to all LocalPolicies for that Mac, a private OIK, also kept in the Secure Enclave, RemotePolicies which are signed into the ucrt, and a UIK for Activation Lock.
These processes are summarised here:

Ownership
Creating and maintaining LocalPolicies requires a user to have access to the private OIK in the Secure Enclave, making that user an Owner. Apple states: ‘Access to the Owner Identity Key (OIK) is referred to as “Ownership.” Ownership is required to allow users to resign the LocalPolicy after making policy or software changes.’
Who is an Owner?
Any user with access to the OIK is therefore an Owner. Although there’s only one OIK for any given M1/M2 Mac, and by default only the primary admin user has access to it: “The OIK is protected with the same key hierarchy as described in Sealed Key Protection (SKP), with the OIK being protected by the same Key encryption key (KEK) as the Volume encryption key (VEK). This means it’s normally protected by both user passwords and measurements of the operating system and policy.”
So any user with access to the Volume Encryption Key for the internal storage also has access to the OIK, and has Ownership. By default, that includes all users added after FileVault encryption is enabled on a Data volume, for example.
Installing a second operating system
Apple silicon Macs always start their boot process from their internal storage, even when they’re then going to boot from a second operating system stored elsewhere. To be able to boot from that second OS, it requires a LocalPolicy with an OIC attached, and Ownership has to be handed off to an Install User created when that OS is installed. Creating and changing that LocalPolicy thus requires Ownership, for which the same password is required as for access to encrypted internal storage.
Handing off Ownership to the Install User is more of a problem, as users are only created once the installation is complete. To accommodate that, macOS offers to copy a user from the current boot system as the Install User, and the primary admin user, on the second OS. Apple states: “When running an Install Assistant and targeting installation for a secondary blank volume, a prompt asks the user if they’d like to copy a user from the current volume to be the first user of the second volume. If the user says yes, the “Install User” which is created is, in reality, a KEK which is derived from the selected user’s password and hardware keys, which is then used to encrypt the OIK as it’s being handed to the second operating system. Then from within the second operating system Install Assistant, it prompts for that user’s password, to allow it to access the OIK in the Secure Enclave for the new operating system.”
Apple strongly recommends that this offer is accepted, as it ensures that the Install User can access the OIK, and that security is fully preserved. However, if the user decides not to copy the current user, macOS will create an Install User with a blank password.
These processes are summarised here:

When this works properly, it’s almost transparent to the Owner, and Ownership is handed over securely to the primary admin user of the second system.
The first step is usually simple: you’re prompted to select one of that Mac’s users to become Owner of the new disk. With one admin user on the internal SSD, that’s a choice of one, as here. Select that user, and you’ll be invited to copy that user’s account settings as the owner. Unless you know what you’re doing, simply tick the box here and proceed to Install.

You’ll then be asked to authenticate as that user before installation continues. Once that’s done, your Mac will restart from the external boot disk for you to personalise that system. In previous versions of macOS, this could result in a very long pause of “1 minute”, but with Ventura that should now be far quicker.

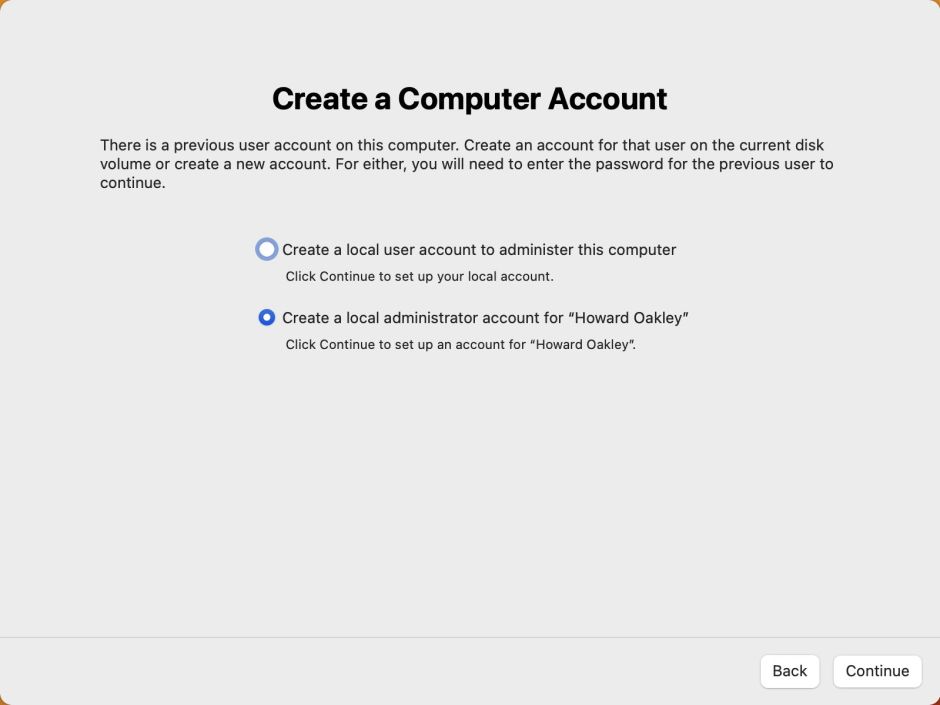
After the installation, you’ll be prompted to create an account on the external disk. The simple answer here is to select the lower option, which creates the primary admin user as the owner of that system.
I describe the whole process in detail here.
Failure
Some still find that they can’t get this to work, and when their Mac should boot from an external disk, it chickens out and drops them back into macOS on the internal SSD. One possible reason for that happening is a problem with ownership. Rich Trouton has recently looked at ownership and its control, and between his excellent article and Apple’s suggestions, you might like to try the following.
There are two good ways to discover which users are owners, and have Secure Token. Simplest is with the command
sysadminctl -secureTokenStatus username
where username is the short user name concerned. This should result in a response like:
sysadminctl[1563:19796] Secure token is ENABLED for user John Smith
You can also get a full list of cryptographic (Secure Token) users with the command
sudo diskutil apfs listUsers /
which should return a list like
Cryptographic users for disk3s1s1 (3 found)

|

+-- 00000000-0000-0000-0000-000000000000

|   Type: Local Open Directory User

|   Volume Owner: Yes

|

+-- 00000000-0000-0000-0000-000000000000

|   Type: iCloud Recovery User

|   Volume Owner: Yes

|

+-- 00000000-0000-0000-0000-000000000000

Type: iCloud Recovery External Key
(I have zeroed out the GUIDs.)
You’ll then need to discover the short username for the local user with
dscl . -search /Users GeneratedUID theGUID
where theGUID is that given for the Local Open Directory User. Alternatively, you can use
sudo fdesetup list -extended
which should generate a list of usernames and their GUIDs like
ESCROW  UUID                                           TYPE USER

00000000-0000-0000-0000-000000000000                   OS User hoakley

00000000-0000-0000-0000-000000000000                   iCloud Recovery Record
You can also use diskutil to discover the list of users for an external disk, with a command like
sudo diskutil apfs listUsers /Volumes/volName
where volName is the mounted volume name of the external disk. Unfortunately, UUIDs/GUIDs returned for an external disk won’t be recognised by macOS running on the internal SSD, but this can confirm that the external disk does have its own cryptographic (Secure Token) user.
Rich Trouton also shows how to assign Secure Token and ownership to an additional user, with
sysadminctl -secureTokenOn username -password password -adminUser adminusername -adminPassword adminpassword
where username and password are for the additional user, and adminusername and adminpassword are those for an admin user with ownership already.
Hopefully this arms you with the knowledge and tools to tackle those troublesome unbootable external disks for your Apple silicon Mac.
References
Rich Trouton’s Der Flounder on ownership
Apple’s Platform Security Guide
Apple’s Platform Deployment Guide
