
It’s now seven years since Apple abandoned macOS Server to die, yet for many, running a Mac as a server remains a good choice. Unlike other options, it offers the full features of macOS native file systems, Mac-specific services such as Content Caching, and spares us from having to learn how to run a Linux server.
Best-suited is the Mac mini, whether in its late Intel (T2) or new M1 versions. Although the former are capable of running Mojave, and almost the last Intel model still on sale, to be most compatible with clients running Monterey or later, you’ll probably prefer to run them with the same version of macOS. This article considers how you can do that, and opens the way for those with experience to provide their advice, please.
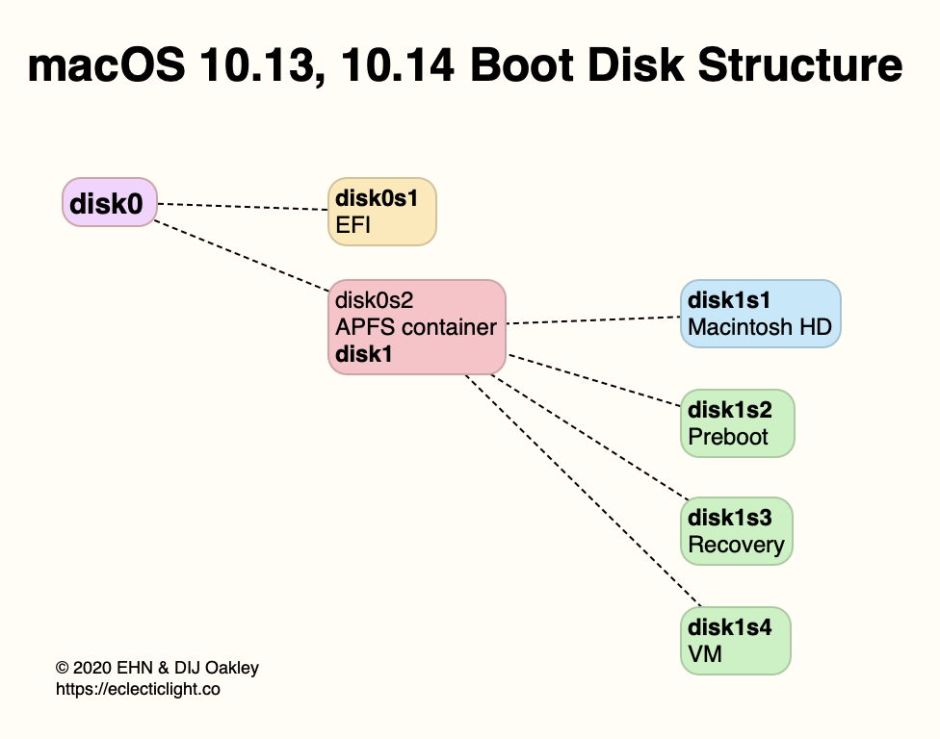
Mojave server
Step back to Mojave, and consider how our server might operate. With its single startup volume (below), the server is configured and run from that, normally headless (without a display, or input devices) using Remote Management, SSH and Screen Sharing.
As late Intel minis have a T2 chip, the whole of that startup volume is encrypted, but you’re unlikely to want to turn FileVault on, as that would require a user password to allow the server to boot. Provided you don’t enable FileVault, should the server restart, its services should start up automatically and any external storage mount correctly.
Managing a headless server can be made easier using a display emulator, such as the Newer Technology HDMI Headless 4K Display Emulator, provided that the server has an HDMI port.
Monterey server
Although Apple silicon Macs have a more complex boot disk than Intel models, the challenges to running a server are essentially the same. Instead of the whole startup volume being encrypted, only the Data volume is (except in Catalina, where both System and Data volumes are encrypted).
This might appear to make running a server simpler, but in practice access to that writable internal storage is just as essential. If FileVault is enabled, then the Data volume is only decrypted when a user has logged in. With FileVault disabled, the Mac should gain access to writable storage without user intervention, and external storage should also be mounted automatically.

When FileVault is disabled, it’s possible to set the server to automatically log into a user account without password entry, which can be valuable for some services, but that isn’t an option when FileVault is enabled, and there’s some dispute as to whether it’s available on Apple silicon Macs even then.
Server security
The stock answer on server security is that it’s all down to physical security, if the server is left running when not attended. When you’re unable to ensure adequate physical security, shutting the server down doesn’t help, as it can be started up without any additional hardware or password entry.
One solution that may prove worth considering for Apple silicon Macs, but not Intel models with a T2 chip, is using a YubiKey smart card. Yubico’s current documentation states that unlocking FileVault on a T2 Mac isn’t possible with a smart card, but that Apple silicon Macs do support FileVault authentication by smart card. The limitation is that only a single smart card can be used, with no possibility of having a backup card, and for that reason alone Yubico doesn’t recommend it.
Perhaps the best answer for greatest flexibility and security is to rent a Mac in the cloud. Among those offering this are MacStadium, Macminicolo, Scaleway, Hetzner, Mac Mini Vault, HostMyApple, and plenty of others. With prices starting from around $/€/£ 25 per month, this could make financial sense too.
