
Learning a little assembly language is not only good for the soul, but it has value for anyone wanting to deepen their understanding of a processor, those who want to read disassembled code such as security researchers, and anyone writing code in a higher-level language such as Objective-C or Swift. Although there are several good books about ARM assembly (see references), using it in Xcode apps is not well documented. Apple’s developer information is most helpful to those who already write assembly and are accustomed to its quirks.
This article is the first of what I hope will be a series to open up access to assembly coding for Apple Silicon Macs. Here I take you through building a simple app which wraps itself around four lines of ARM64 assembly code, and provides a platform for subsequent articles. To work through this, you’ll need an M1 Mac and Xcode 12.5 (free from the App Store), and I assume that you’re sufficiently familiar with that and Swift to be able to build a basic app in AppKit or similar.
The complete Xcode project is available here: asmattic
Start by creating a new project for a macOS app, which I’ve named AsmAttic. Set its Interface and Life Cycle to support your favourite model. In my case, that’s a conventional Storyboard with an AppKit App Delegate and Swift as its language. You’re welcome to use SwiftUI or anything else which you find straightforward.
In its Project Build Settings, set it to build the Active Architecture only for both debug and release versions, so that Xcode will only make ARM versions of the app. If you want to support Intel, you’ll need to add conditionals to ensure that the assembly is only built for and called by the ARM version.
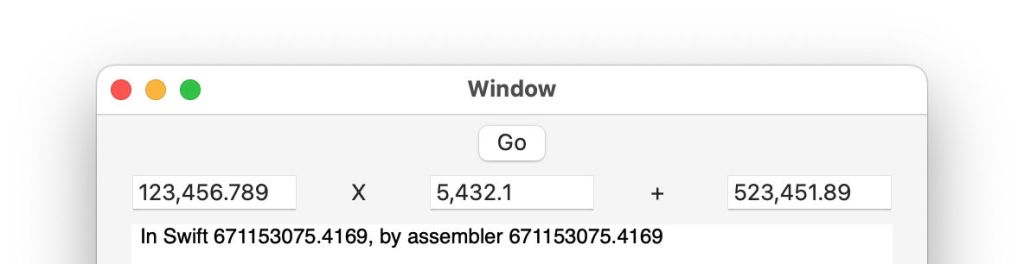
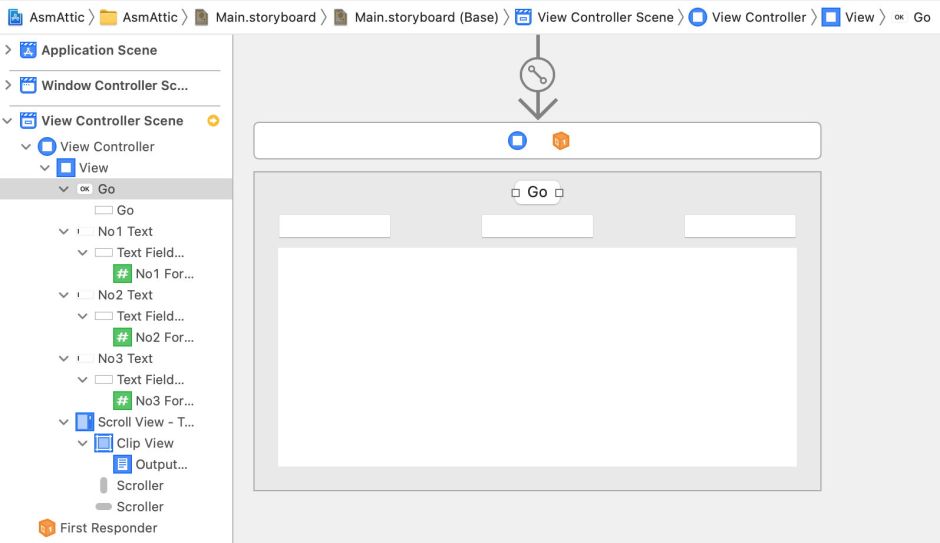
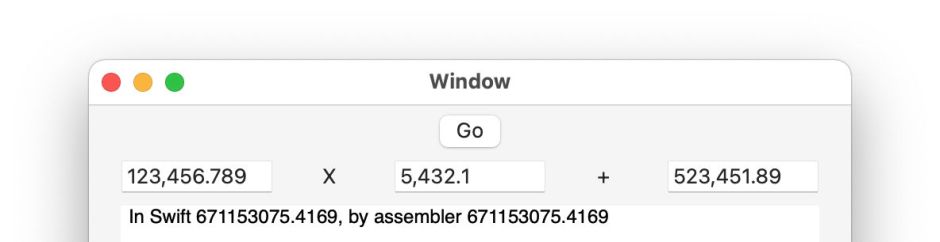
Build your app a little interface window, here with three numeric input boxes, and a scrolling text output view, so that it can take three floating point numbers as input, and write a string containing the results. Add real code to perform the compiled equivalent of what you’re going to code in assembly, a double multiply and add.
My primary purpose in exploring ARM assembly is to look in greater detail at its floating point arithmetic. The instructions which I’m most interested in merge two arithmetic operations, multiply and add. They take three doubles, a, b and c, and calculate the result of
(a * b) + c
They’re of particular interest to me because they reduce error compared with two separate operations. So that’s what this initial version of AsmAttic is going to perform in both Swift and assembly.
At this stage, wire up the window with code which performs that using Swift (see the completed code below for one solution). Test the app to ensure that it works without calling any assembly routines.
When you’re happy that’s working correctly, add a New File, selecting the Assembly type, and naming it asmmath.s. The code that contains is short and sweet:
.global _multadd

.align 4
_multadd:

STR     LR, [SP, #-16]!

FMADD   D0, D0, D1, D2

LDR     LR, [SP], #16

RET
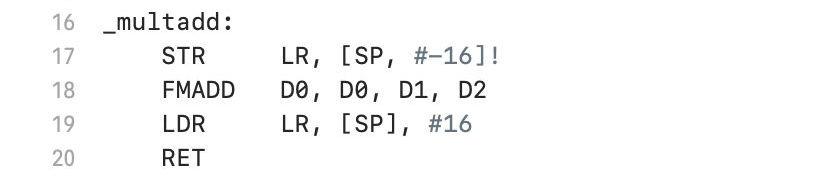
That stores a set of registers, performs the FMADD operation on the three doubles, leaves the result in D0, restores the registers, and returns.
To be able to access that from Swift, you then need a C header file, asmmath.h, which contains just the following:
#ifndef asmmath_h

#define asmmath_h

extern double multadd(double, double, double);

#endif /* asmmath_h */
As with the other files here, ensure this is added to the target of the project.
In theory, Xcode should automatically generate a bridging header to enable your Swift code to call that assembly routine. In practice, I’ve not seen that happen, and have had to create that manually. To do that, add another Header file, this time named AsmAttic-Bridging-Header.h. Inside that, the key line is:
#include "asmmath.h"
which bridges between Swift and the C header, which in turn wraps the _multadd routine in assembly language.
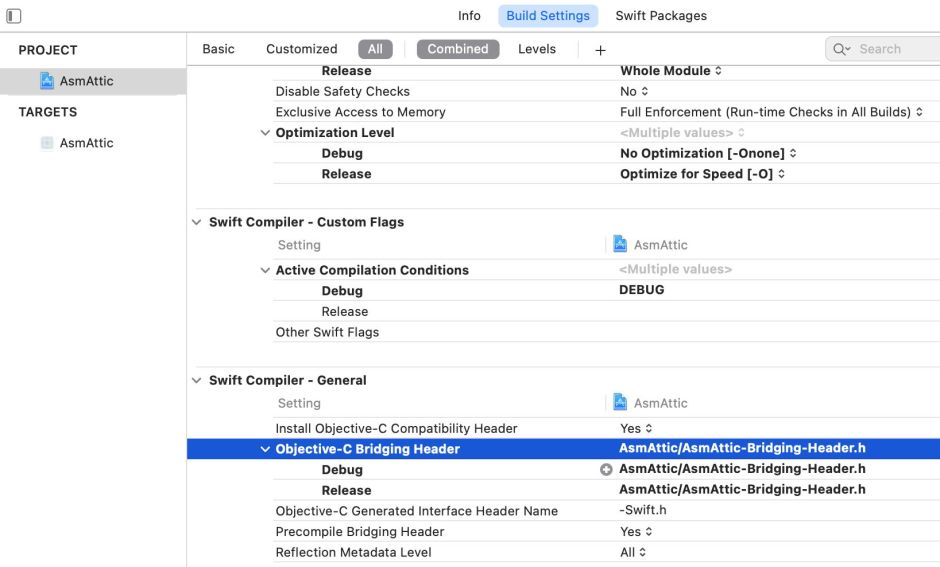
The final step is to tell Xcode to use that bridging header in the project’s Build Settings. Locate within those the Swift Compiler – General section, and add as the location for the bridging header the path to your file relative to the project file, typically something like
AsmAttic/AsmAttic-Bridging-Header.h
If you get that wrong, Xcode will complain that it can’t find the bridging header and builds will fail with that error.
Go back to your Swift code to handle the button press, and call the assembly routine using code such as
let theRes2 = multadd(theA.doubleValue, theB.doubleValue, theC.doubleValue)
so you can print theRes2 as its result in the output text.
My final code for the ViewController reads:
class ViewController: NSViewController {

    @IBOutlet weak var no1Text: NSTextField!
    @IBOutlet weak var no1Formatter: NumberFormatter!
    @IBOutlet weak var no2Text: NSTextField!
    @IBOutlet weak var no2Formatter: NumberFormatter!
    @IBOutlet weak var no3Text: NSTextField!
    @IBOutlet weak var no3Formatter: NumberFormatter!
    @IBOutlet var outputText: NSTextView!

    override func viewDidLoad() {
        super.viewDidLoad()

        // Do any additional setup after loading the view.
    }

    override var representedObject: Any? {
        didSet {
        // Update the view, if already loaded.
        }
    }

    @IBAction func goButton(_ sender: Any) {
        if let theA = self.no1Formatter.number(from: self.no1Text.stringValue) {
            if let theB = self.no2Formatter.number(from: self.no2Text.stringValue) {
                if let theC = self.no3Formatter.number(from: self.no3Text.stringValue) {
                    let theRes1 = theA.doubleValue * theB.doubleValue + theC.doubleValue
                    let theRes2 = multadd(theA.doubleValue, theB.doubleValue, theC.doubleValue)
                    self.outputText.string = "In Swift \(theRes1), by assembler \(theRes2)\n"
                }
            }
        }
    }

}
Your app should now let you set the three variables, calculate the result both using Swift and the FMADD operation, and write the result to the output view.
Passing the three doubles to the assembly language routine and passing the result back relies on the calling convention, which passes the three values in registers D0 to D2, and returns the result in D0. In the next article I’ll look at those calling conventions, which are so crucial to success in assembly language.
References
Stephen Smith (2020) Programming with 64-Bit ARM Assembly Language, Apress, ISBN 978 1 4842 5880 4.
Daniel Kusswurm (2020) Modern Arm Assembly Language Programming, Apress, ISBN 978 1 4842 6266 5.
