
Catalina’s split System and Data volumes have brought many problems and bugs. One of the most persistent, which has only been fixed in the more recent updates, makes clean re-installation fail, or even worse, creates duplicate Data volumes. This has been the result of a bug affecting Disk Utility, which is now fixed in macOS 10.15.6, according to Apple.
Simple re-installation of Catalina could cause similar problems in earlier releases, but they all came to a head when you wanted to erase your existing startup Volume Group before re-installing macOS from scratch: a clean re-install. If you want to clean re-install Catalina, ensure that you’ve updated to version 10.15.6, as that should make it simpler and more reliable.
Once you’ve ensured that you have at least one complete up-to-date backup of all your documents and anything else that you’ll want to re-install, restart your Mac in remote Recovery mode, holding the Option-Command-R keys during startup, or you can restart from 10.15.6 on another boot disk.
Catalina 10.15.6
Provided that you’re running a later version of Catalina, you should be able to erase your startup disk in a single action in Disk Utility, as described by Apple in this article.
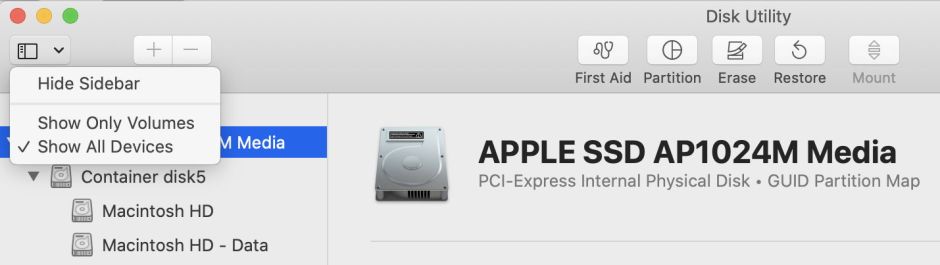
Select Disk Utility from the options offered, and there click on the View tool at the top left of the window, and Show All Devices. This will list all the disks as well as volumes available.
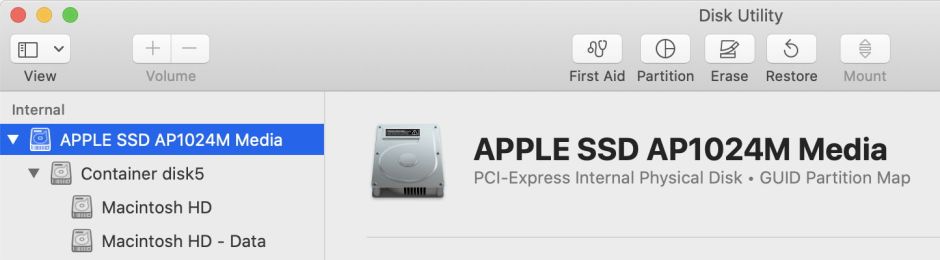
Select the disk that you want to erase, rather than the container(s) or volumes within it, at the left, then click on the Erase tool in the centre of the top toolbar within the window.

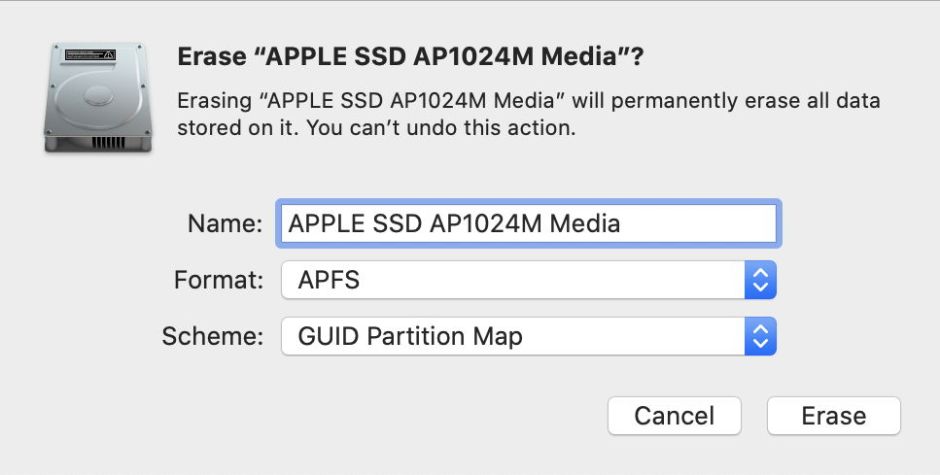
In the drop-down dialog, ensure that the Format is set to APFS, and the Scheme to GUI Partition Map, and click on the Erase button.
Before this can complete, you may be asked to enter your Apple ID. If that completes without error, you may see that disk reformatted with its System and Data volumes, typically named Macintosh HD and Macintosh HD – Data. You’re then ready to re-install macOS.
If the erasure fails, leaving the container and any System or Data volumes, you’ll need to proceed as if you’re running an older version of Catalina, as detailed next.
Catalina 10.15.3 and earlier, and failed Erase
To erase a startup disk in older versions of Catalina, or when the simpler procedure has failed, you need to delete your Data volume, that’s the one named Macintosh HD – Data or similar, and to erase your System volume.
Select the Macintosh HD – Data volume at the left of Disk Utility’s window then use the Delete APFS Volume command from the Edit menu, or use the shortcut by clicking the – tool.
Once that’s deleted, you’ll then need to erase the System volume, by selecting it at the left and clicking on the Erase tool. This may fail with an error reporting that ‘The volume “Macintosh HD” on disk2s5 couldn’t be unmounted because it is in use by the process 734 (kextcache)’, or similar. If that happens, restart into remote Recovery mode and repeat the process of erasing the System volume, which should succeed on the second try.
If you’re performing this clean re-install to try to fix a problem, and don’t want to make its current data particularly inaccessible, then all you should need to do is select the Data volume and erase it; when you re-install macOS that should overwrite everything on the System volume, which is, after all, read-only in normal use. However, as of 10.15.2 that doesn’t work, and results in the creation of yet another Data volume named Macintosh HD – Data – Data.
Deleting the Data volume does make a difference to the end result: when you delete the Data volume then add it back, its Unix-style volume number has changed, perhaps from 2 to 1, and that of the System volume goes from 1 to 5. This shouldn’t make any practical difference, but may be confusing if you ever need to refer to volumes using those numbers.
Re-install macOS
With your volumes prepared, now comes the time-consuming step of re-installing the system on them. At one time, the Recovery volume contained sufficient to restore the current version of macOS if you have entered ‘local’ Recovery Mode using Command-R, but this doesn’t seem to work any more. Whichever type of re-installation you have set now requires that version of macOS to be downloaded afresh.
Depending on which version of Catalina it’s running and how you erased volumes using Disk Utility, you may be presented with a choice of volumes on which to install macOS, which could be a surprise. In the first instance, you should try to install macOS onto the original System volume, Macintosh HD. If that doesn’t prove possible, select the Data volume here, Macintosh HD – Data instead.
Apple explains in this article.
What could possibly go wrong?
The commonest and most peculiar problems arise when the installer gets overenthusiastic about creating new Data volumes, and you end up with additional volumes with names like Macintosh HD – Data – Data. Once macOS has completed the installation, it’s worth opening Disk Utility to check that you have the System and Data volumes you expect, and no more.
If you have too many Data volumes, it’s best restarting back in Recovery Mode, opening Disk Utility there, and going back through the process of deleting and erasing volumes again. Delete all the Data volumes and erase (not delete) the System volume, then re-install. This may seem a pain, but it’s worth getting your volumes straight before going any further, or you’ll only store up problems for the future.
Unfortunately, once you have started your clean re-install, there’s no way to check that everything is going OK until macOS has been fully configured. Exiting the install process at the start of its customisation steps doesn’t leave your Mac in a position to be able to mount as a Target Disk, for example.
