
A significant few who use SilentKnight for the first time discover that their Mac has been running with one of its security systems turned off, for instance disabling all Gatekeeper/XProtect checks. As macOS doesn’t have any dashboard to warn you of such dangerous settings, it’s only too easy for that to happen. This article explains how you should check those essential security settings, and how to put them right.
System Integrity Protection (SIP)
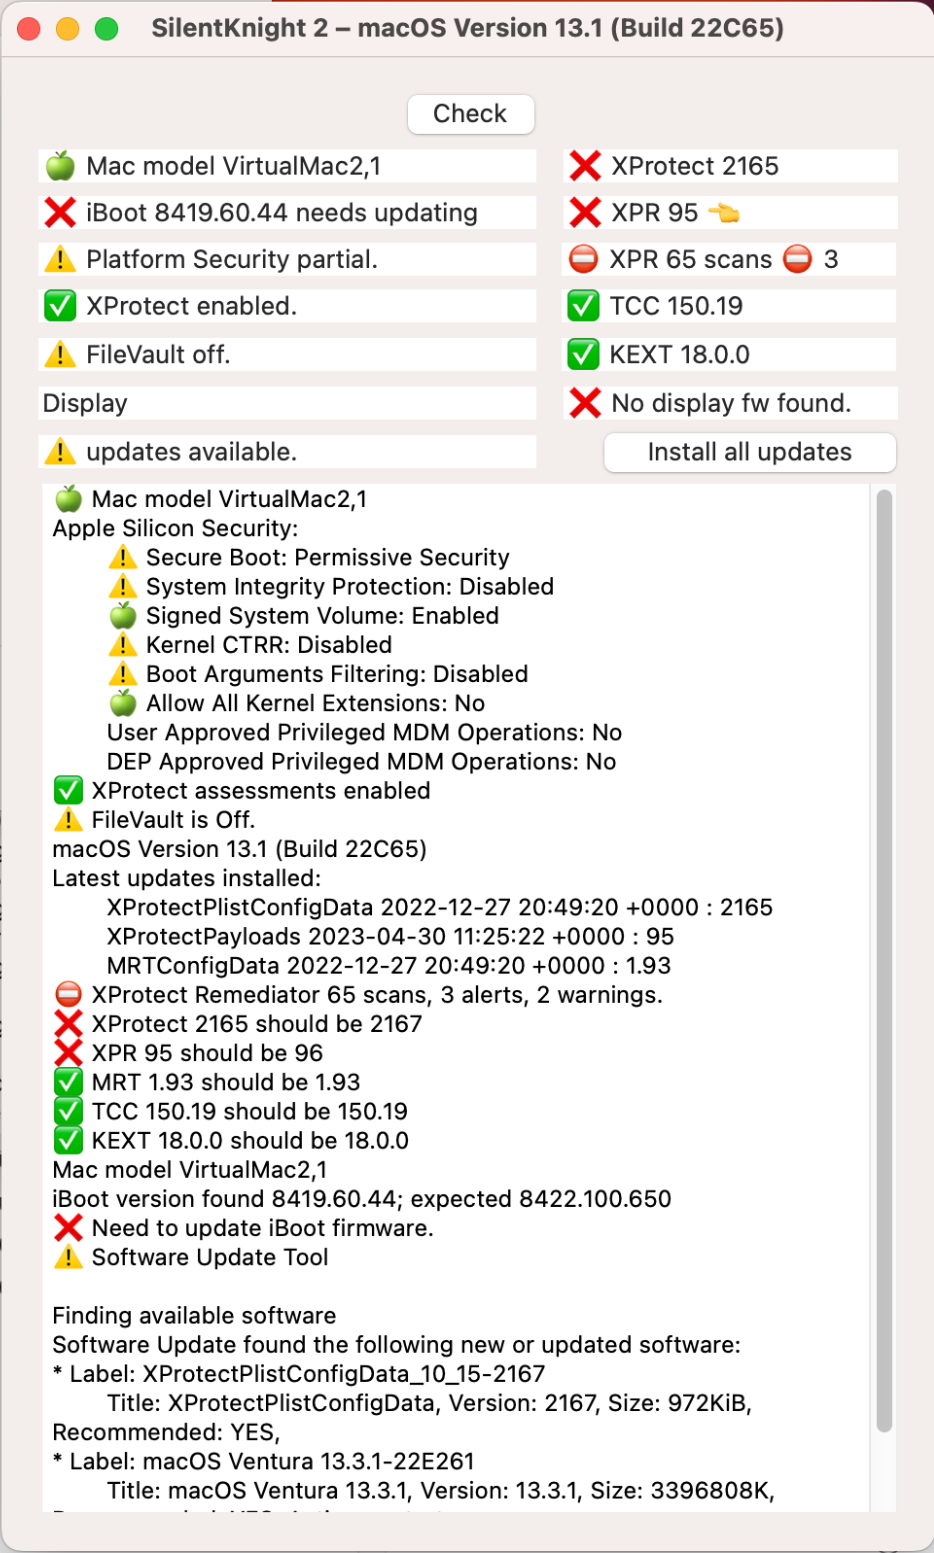
Since El Capitan, macOS has protected all its system files, even down to bundled apps, using System Integrity Protection (SIP). This should make it impossible for malware or even out-of-control software to change those protected files, and its status is reported in the Software section of System Information, as well as in SilentKnight.
You can turn SIP off, something very occasionally needed to perform certain important tasks. Doing so requires you to start up in Recovery mode, enter a command in Terminal there, and restart; Apple silicon Macs also need to have their boot security reduced in Startup Security Utility before SIP can be disabled.
To enable SIP, start up in Recovery mode, open Terminal, and type the following command:
csrutil enable; reboot
Once that’s done your Mac will restart in normal mode, and you should confirm that SIP is reported as enabled.
If you ever do need to disable SIP, do yourself a favour and put a sticky note on your Mac’s display to remind you to turn it back on. This still applies to Big Sur and later, with their protected System volumes, as SIP is essential for protecting system and other important files on your Data volume too. Although it does get in the way at times, SIP is there to protect.
Gatekeeper/XProtect
XProtect is the only free built-in tool to check for the signatures of many common types of malware. These checks don’t just apply to fresh downloads, as XProtect may also take a quick look at existing apps and some documents to see whether they might be malicious. This is one of several checks run by Gatekeeper.
As you don’t have to enter Recovery mode to do so, it’s comparatively easy to turn XProtect’s checks off, although I can’t think why anyone would want to do that: if you have to turn it off in order to open a file, you should ask yourself whether you should be opening that file at all. Disabling XProtect leaves your Mac vulnerable to malware, but there’s nowhere I know of that it’s reported in the GUI, except in SilentKnight and some security software.
If it’s disabled, you may be able to enable it using the command
spctl --enable
but chances are that you will instead need to invoke
sudo spctl --global-enable
which requires you to authenticate using your admin password. Be careful with those commands: the hyphens before enable and global-enable aren’t long dashes, but two separate hyphens.
Signed System Volume (SSV)
When you install Big Sur or later, the vast majority of its system files are saved in its System volume. For your Mac to boot from this, it has to be turned into a snapshot, sealed using a tree of cryptographic hashes, and the master seal ‘signed’ by a hash, which is compared against that set by Apple. This signed system volume is not only extremely secure, but because the integrity of its contents is checked, it’s highly reliable. On Intel Macs, this is only reported in Disk Utility, but Apple silicon Macs list it in System Information too. SilentKnight reports its status for all Macs.
The SSV should always be enabled. If it isn’t, then you need to re-install macOS, the only way to create the SSV.
FileVault
Intel Macs with T2 chips and Apple silicon Macs encrypt the whole of the Data volume on their internal SSD. By default, that uses an internally-generated key that is used automatically when any user logs in. Although it provides good security in most situations, you’re far better off enabling FileVault, as that protects the encryption key with your password too. On those Macs, enabling FileVault imposes no overhead on accessing encrypted data, and even on Intel Macs without T2 chips the overhead is so low as to remain undetectable. FileVault thus provides valuable protection for your data at no cost.
Check whether FileVault is enabled in Privacy & Security settings, where you can enable it if it’s not already turned on. Its status is also reported in SilentKnight.
Current firmware, macOS, security updates
In each new version of macOS, Apple fixes a long list of security vulnerabilities, some of which may already be exploited by malicious software. To ensure that your Mac and its apps are best protected from malware, you need to keep its firmware and macOS up to date at all times. Apple also releases updates to individual security systems such as XProtect and XProtect Remediator to address new and changing threats, and those security updates should also be installed promptly.
Apple lists current versions of supported versions of macOS on its Security Releases page. It doesn’t provide any information about current firmware versions for different models, or the latest data updates for security systems like XProtect.
You can see firmware and macOS version numbers in System Information, in Hardware for the firmware, and Software for macOS. Versions of XProtect and XProtect Remediator can be read in the Finder from the bundles in /Library/Apple/System/Library/CoreServices. You can manually check current versions on this website via pages listed here, or SilentKnight will automatically check them all for you.
The only way to update firmware is with the bundled installer provided in the latest version of macOS. macOS and firmware updates are therefore provided through Software Update, which determines whether there are updates available for that Mac. This can also be performed by SilentKnight, which is intended for the installation of security data updates, but not macOS updates.

XProtect Remediator scans
This new anti-malware scanner was only introduced a year ago, and performs automatic background scans to detect and remove a wide range of malicious software. It’s normally scheduled to run at least once a day, when your Mac is awake but not busy. It’s only available for Catalina and later, and some specialist security software can now access its scan reports in Ventura and later. However, it’s faceless and you can normally only access its reports in the log.
You should ideally check that XProtect Remediator runs its scans at least daily, and will probably want to know if it has detected and remediated any malware. SilentKnight runs a quick check of its activity over the previous 24 hours, and XProCheck provides detailed reporting and analysis.
Secure Boot (T2 & Apple silicon)
To get full benefit from the SSV and all the other protection built into Apple silicon Macs, they should be run at Full Security. This prevents them from loading third-party kernel extensions, and requires recent approved versions of macOS. If you need to run kernel extensions or other software that can’t be loaded in Full Security, you’ll need to use Startup Security Utility in paired Recovery mode to set the Mac to Reduced Security, and enable kexts.

Settings are different for Intel Macs with T2 chips, where there are three levels of boot security, and the most frequent reason for reduction from Full Security is to enable that Mac to boot from external drives.
The Secure Boot setting is shown in System Information, and in SilentKnight.

Summary – check:
- SIP is enabled.
- Gatekeeper/XProtect is enabled.
- the Mac has booted from an SSV.
- FileVault is enabled.
- it’s up to date with firmware, macOS and security data updates.
- XProtect Remediator scans are taking place daily.
- it boots in Full Security, if possible.
