

Like Doctor Who’s TARDIS, disk images and virtual machines can be bigger on the inside. Create a macOS VM with an internal disk capacity of 155 GB on an Apple silicon Mac, and it may only take 18 GB on disk. Similarly, a read/write disk image of 1 GB capacity could take less than 1 MB on disk. This is because these formats are saved as APFS sparse files, and only use the space that they actually require to store their contents.
VMs
Virtual machines are notorious consumers of space, and even when we have plenty to spare, we usually try to minimise their size. A basic installation of macOS Ventura 13.0.1 in a 50 GB nominal VM leaves only around 30 GB free disk space on its boot volume group, and is probably the smallest on which you’d want to update macOS.
The great majority of the size of these VMs is taken up by the Disk.img file containing the boot disk: other components required by macOS virtualisation are:
- AuxiliaryStorage of just over 30 MB;
- HardwareModel of 150 bytes;
- MachineIdentifier of 68 bytes.
Although those can vary slightly between different virtualisation apps.
The size of Disk.img is determined when you create the VM:
- a 50 GB nominal VM is 53.69 GB,
- a 100 GB nominal VM is 107.4 GB,
- a 150 GB nominal VM is 161.1 GB,
but each of those only takes 15 GB on disk. Size taken in storage will rise as you add more to the VM, but it should fall again when contents are deleted. In these examples, updating macOS 13.0.1 to 13.4 increased space used on disk for Disk.img by around 2 GB.
DMGs
You can see the same effect in good old-fashioned disk images, which make for quicker and simpler demonstrations. Using DropDMG or Disk Utility, create an empty unencrypted read/write plain disk image (UDIF read/write, or UDRW) of several GB size in either APFS or HFS+, saving it to an APFS volume. At that stage, it will take the same space on disk, and will be empty when mounted. Eject that disk image, then double-click it to mount it again, and eject it. In the Finder, Get Info for the DMG file and you’ll see that the space taken by it on disk has fallen from GB to MB, as it has been turned into a sparse file.
Benefits
The Finder is far too sensible to be fooled by sparse files, though: create a 100 GB nominal VM at a size of over 100 GB and it won’t allow you to copy it to a partition/container of only 100 GB, even though there’s just 15 GB of data there. However, you can create a VM larger than the capacity of a partition using Viable.
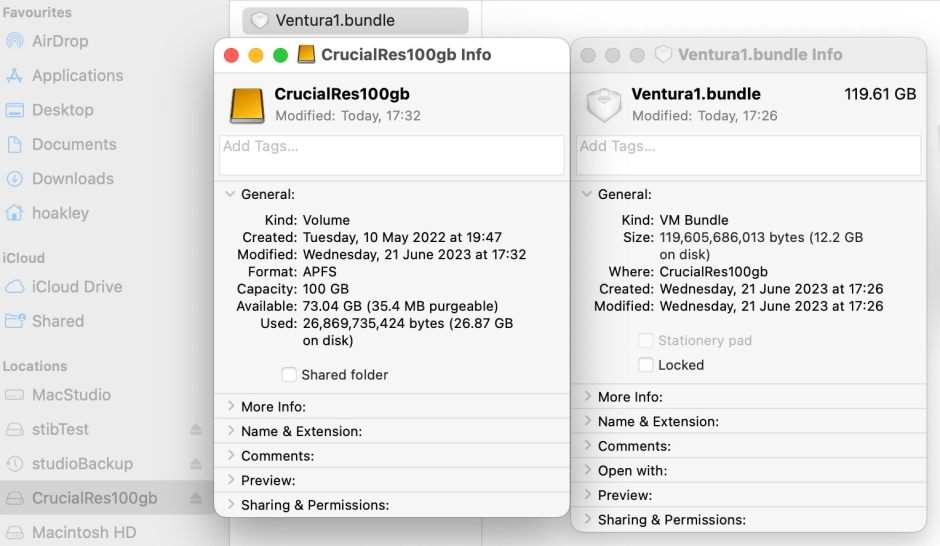
Here’s one I made earlier, showing a VM bundle of nearly 120 GB installed directly in a 100 GB APFS container. This VM runs perfectly well too.
The danger with installing a VM that could grow larger than the container allows is that, if you do expand it to fill the container, the VM will fail and be lost. Of more practical benefit is the fact that unused storage remains unused, so reducing the ‘wear’ on the SSD, an important consideration for VMs and other disk images that are used frequently.
Sparse VMs and disk images need be handled carefully, or they can easily explode to full size. While macOS does preserve their format when copying between APFS volumes, they’re completely unsupported on HFS+ volumes, and surprisingly don’t survive being moved by AirDrop either. When you want to keep them sparse, compress them using a method that retains their sparse format, such as AAR, available in Keka and my own Cormorant. In the latter app that requires them to be put into a folder before compression.
How they work
To be saved in sparse file format, a disk image, including the Disk.img file in a VM, must be written in a particular way, so that it only writes real data, and skips all that is empty. For regular disk images, this requires them to be saved once with all that empty space; when they’re next mounted by macOS their unused space is trimmed, and recent versions of macOS then convert that unused space into skipped data in the sparse file format.
More information about these technical aspects is in this article, and practical details are here.
