
With the annual resurgence of interest in running macOS betas, this article considers how you can run a developer or public beta-release of macOS on an Apple silicon Mac.
Primary system
By far the simplest way of running any compatible version of macOS is to install or upgrade to it as your primary boot system, on your M-series Mac’s internal SSD. Even if you keep an external bootable disk with Ventura on it, this involves commitment: if the beta turns sour and you need that Mac for something else, then you’re faced with the task of removing the beta and installing Ventura instead. But if you have the Mac to spare, this should be your first choice.
With macOS 13.4, Apple has changed the way that betas are authorised. Previously you had to download a separate seed utility to enrol in the beta programme. Enrolment and unenrolment could be fragile, and I’ve had more than one Mac stuck with betas, and unable to install regular releases.
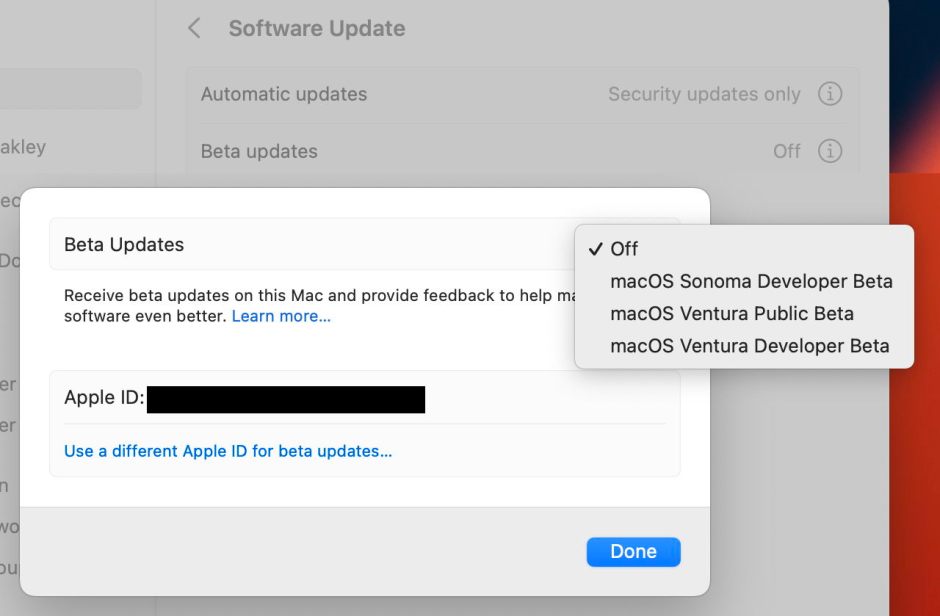
Now, that Mac has to be connected using the Apple ID registered with the beta programme; for developer betas, that’s the Apple ID by which you’re recognised as a developer. You should then be able to opt for Beta Updates in Software Update, in System Settings > General. Click on the Info tool on that line, and select the beta you want to install. You can also use that to connect using an Apple ID specifically for betas.
Dual-boot
This has been the traditional solution for many smaller developers and others who can’t commit a whole Mac to running betas, but comes with several risks, particularly with Apple silicon Macs.
Dual-booting from the internal SSD alone has been used successfully by many on Apple silicon Macs, but carries the risk that a renegade beta could spoil both systems to the point where you have to put the Mac into DFU mode and perform a full restore. If you don’t have a second Mac to do that, or think it would be beyond your skill level, then you should avoid it.
Apple silicon Macs don’t provide any Startup Manager, engaged with the Option key on Intel Macs, so there are only two ways to switch startup systems: Startup Disk in System Settings > General, and in Recovery mode. Both of these depend on Local Policy and ownership, which can at times cause problems. Sometimes these can be resolved with a cold boot, rather than merely restarting.
Dual-booting from different disks could provide useful separation, the comfort of retaining Ventura as the primary system, and could be a better compromise if you have a fast Thunderbolt 3 SSD available. I provide detailed instructions for setting up a bootable external disk in this article.
VM
Running macOS in a lightweight virtual machine (VM) on Apple silicon is free, simple, and performs at close to native speeds. Although it has some significant limitations, notably no iCloud access and App Store apps (and others depending on your Apple ID) can’t run in the VM, for many it can prove a valuable option.
Although other virtualisers such as Parallels Desktop, UTM, and VirtualBuddy should be able to do this, my own Viable (and ViableS if you want a locked-down VM) does this a treat.
The most difficult step is installing the beta into a VM: the new enrolment process appears to operate at that step, so once you’ve set your VM up fully, you can run it on another Mac that isn’t enrolled in the beta programme. There are two reliable ways of doing this with the full IPSW image supplied through the beta programme. The simpler is first to install the beta on your Mac, then while running that, to install the IPSW into a fresh VM, and personalise and configure that. During installation, enrolment will be checked by macOS, and the installation should be correctly authorised.
Alternatively, if you don’t want to install the beta on that Mac, you should be able to install its matching beta-release of Xcode instead. Once that has been authorised, you should be able to install the beta into your VM successfully, even though the host operating system might be an earlier release version of Ventura.
If you do use Viable, then you may be dismayed to see your downloaded IPSW image disappear when it’s installed: it’s actually only hiding in the VM .bundle, and can be moved back from there once the VM has been fully set up, and used again. If installation fails, you may want to rescue that IPSW file and try again.
You’ll find full information about Viable and lightweight virtualisation on this page.
Running a beta in a VM is just about the safest thing you can do: it can crash and burn as badly as it likes, and all you have to do is trash the VM (keeping its IPSW file safely) and build yourself another. I do this regularly when trying something out that might prove destructive, or to look at configurations that I wouldn’t wish to use on a host Mac, such as running with SIP disabled.
One important tip for those who use VMs: don’t store them in folders you exclude from Time Machine or other backups, but keep them in a separate volume excluded not only from backups but also from snapshots, or you’ll wonder why your Mac’s snapshots are so large.
Happy beta-testing!
Postscript
If you are unsuccessful installing Sonoma beta 1 in a VM, then visit the Developer Downloads page, where Apple has provided a Device Support Update that should enable that to work. I’m grateful to Mr. Macintosh for alerting me to this recent addition.
