
We pay a lot for SSDs and expect their performance to reflect our investment. One reason for them writing data very slowly is that they need trimming, to perform the housekeeping necessary to make memory blocks ready to use again. This article looks at how you can tell whether an SSD needs a trim, and whether it can get one in your Mac.
Why trim?
Unlike hard disks, which can write new data over old, SSDs have to erase previously used memory before it can be written to again. Erasing memory is relatively slow, and to maintain good write performance, SSDs try to erase memory in bulk before it’s needed for writing. However, they can only erase relatively large blocks: while SSDs write data in blocks of 4 KB, they may need to erase them in 256 KB or more at a time.
Even though an SSD may have little of its storage currently in use, much of it may need to be erased before it can be reused. To keep write performance as high as possible, your Mac may tell an SSD when to perform a bulk erase, a process that can take 5 seconds or longer. This is known as a trim, from the command normally sent to SATA SSDs to initiate this housekeeping.
Without periodic trimming, some SSDs suffer poor write performance when they need to be trimmed. For example, a SATA SSD normally capable of writing at 600 MB/s could see a reduction of that to 150 MB/s when every write has to be preceded by an erase.
Does your SSD need a trim?
There’s a simple way to check if any SSD is in need of a good trim: measure its write speed. There are several utilities to do this, including my free Stibium, BlackMagic Disk Speed Test from the App Store, and AmorphousDiskMark, also available from the App Store. You don’t need to run anything sophisticated, as all you need is a quick and approximate result.
Your SSD is probably in need of a trim if:
- it’s a SATA SSD and has a write speed of less than 250 MB/s;
- it’s an NVMe SSD connected by USB 3.x and has a write speed of less than 500 MB/s;
- it’s an NVMe SSD connected by Thunderbolt 3 and has a write speed of less than 1,000 MB/s.
Trimming may still improve write performance on those SSDs doing rather better, but those are indicators that it now has a problem erasing blocks before it can write to them.
Does the SSD have trim support?
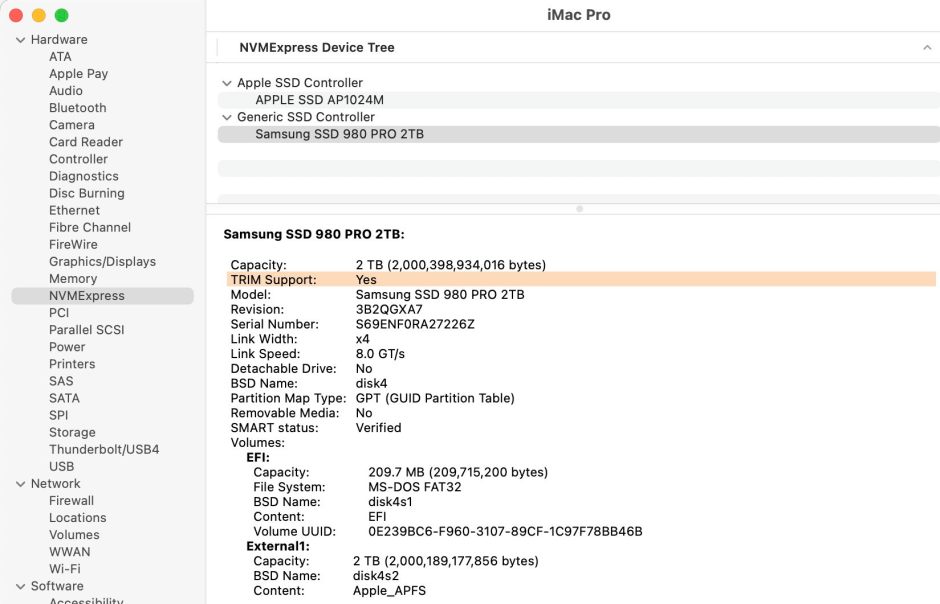
To assess whether any given combination of Mac and SSD has support for trimming, connect them and open System Information, for instance through the About This Mac menu command.
If the SSD has an NVMe interface, as all faster USB 3.x and Thunderbolt products should, look for it in the NVMExpress item in Hardware.

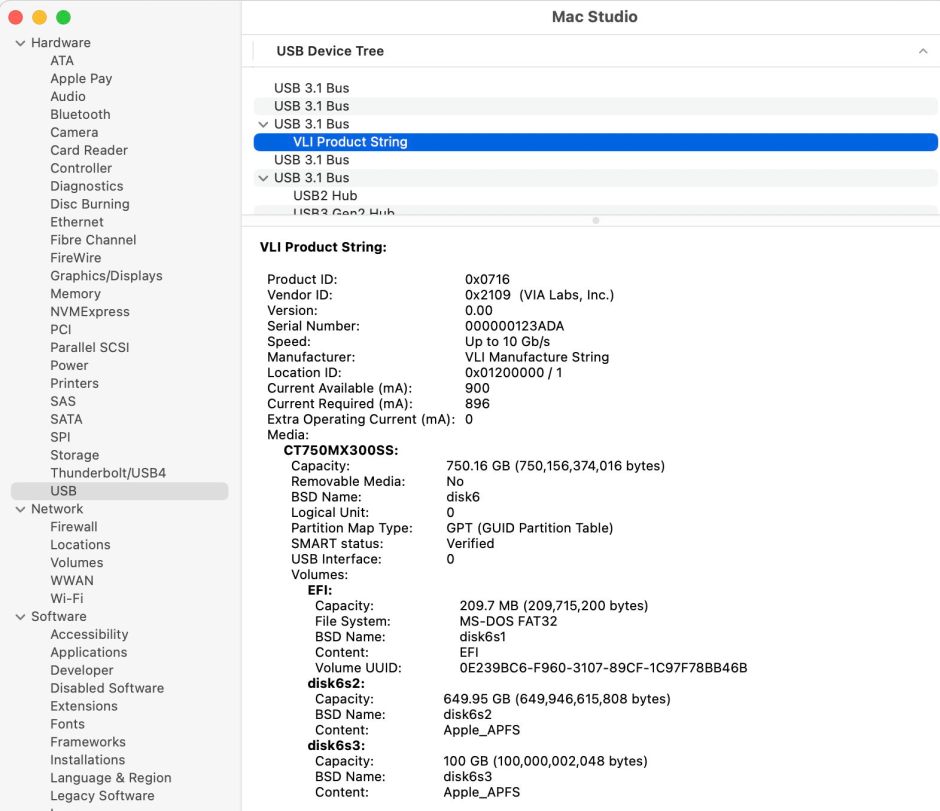
If the SSD has a SATA interface, then you may have to look harder. Those with a SATA interface connected direct to a Thunderbolt or USB 3.x port on your Mac could be listed under SATA or USB. Unfortunately, when listed under USB it’s unlikely that there will be any entry for TRIM support.

If you connect an SSD with System Information already open, you’ll need to refresh the app so it shows data for that disk; use the Refresh Information command in the File menu to do that.
My experience is that SATA SSDs never have trim support, while NVMe ones always do, but your mileage may vary.
Does APFS trim the SSD?
Even though an SSD may support trimming, that doesn’t mean to say that trimming will be performed. To check that, you need to look for a trim report in the log using Mints or another log utility.
To use Mints with an SSD that isn’t yet mounted:
- When the menu bar clock reaches a round time, like 12:03:00, connect the disk and note that time.
- Leave your Mac alone until all the disk’s volumes have mounted.
- Twenty seconds after connecting the disk, or ten seconds after the last volume has mounted, open Mints.
- Click on the Disk Mount button, and set the time in the log window to the time you connected the disk.
- Set the period to a minimum of 20 seconds, sufficient to cover the period to ten seconds after the last volume mounted.
- Uncheck all the category checkboxes except the first, APFS +.
- Click the Get log button. When the log entries are displayed, scroll to the end and look back for the trim entries.
If you prefer to use the log show command or another tool such as Ulbow, the predicate to find APFS log entries is
senderImagePath CONTAINS[c] "apfs"

If the disk is already mounted, choose a convenient time, for instance in between Time Machine backups. Open Disk Utility, and there select the disk and unmount it. Once it has been successfully unmounted, select the disk again and mount it and all its volumes if necessary. Do that at a known time by the menu bar clock and follow the sequence above to get a log extract covering the trim entries.
The characteristic series of entries that you’re looking for should look something like these:
23-03-25 19:01:06.930 apfs spaceman_scan_free_blocks:3311: disk5 scan took 0.030901 s (no trims)

23-03-25 19:01:10.960 apfs spaceman_scan_free_blocks:3293: disk5 scan took 4.030544 s, trims took 3.944665 s

23-03-25 19:01:10.960 apfs spaceman_scan_free_blocks:3295: disk5 471965989 blocks free in 9131 extents

23-03-25 19:01:10.960 apfs spaceman_scan_free_blocks:3303: disk5 471965989 blocks trimmed in 9131 extents (432 us/trim, 2314 trims/s)

23-03-25 19:01:10.960 apfs spaceman_scan_free_blocks:3306: disk5 trim distribution 1:1461 2+:1267 4+:4121 16+:785 64+:822 256+:675

Check that the named disk, here disk5, is the SSD or APFS container on the SSD that you’re checking. If it has entries reporting that blocks have been trimmed, this confirms that the SSD has been trimmed as expected. Disks that don’t trim normally only show the first of that series, ending in the words no trims.
How to trim an SSD
If the SSD has trim support, all you need do is unmount the SSD, perhaps using Disk Utility, wait a few moments, and mount it and its volumes again. If you want to check that it has trimmed, use Mints to inspect APFS entries in the log again.
If it doesn’t have trim support, it may not be possible to trim it using a Mac. One possibility is enabling trim on external SSDs using the command
sudo trimforce enable
then restarting your Mac. In some situations this might actually impair performance, in which case use
sudo trimforce disable
again followed by restarting, to disable it again. Note that this might not have any effect on SSDs which macOS considers don’t support trim.
Some SSDs claim to be self-trimming. To enable them to do that, leave the SSD connected to an awake Mac for several hours to see if that enables the SSD to perform its own maintenance.
