

Once your Mac has started up and you’ve logged in, the keys you press on your keyboard go through a chain of interpretation before they determine what appears in any document. Apple provides a wide range of differently marked keyboards, but for the user the most important steps involve converting a keypress into the Unicode character in an app. This is more complex than might appear: when you press a key, macOS registers both the key down and key up events, together with any modifier keys being held at the time of each of those.
Software keyboard layouts map physical keys to input characters in a global way. Switch layout from one of the English variants to French or German, and you don’t see what is promised on the physical keyboard, but what the software layout determines. In the next article in this series I’ll explain how you can create and use a custom keyboard layout, but that’s a substantial task, and not something to put together in a few minutes. This article looks at a much more convenient way to extend your Mac’s standard keyboard layouts to enter specified Unicode characters straight from the keyboard: input plugins, which enable input methods.
Keyboard layouts are ideal when you want to map one key, with or without modifiers like Shift and Option, to one character. When generating the ideograms and more numerous characters in languages such as Japanese and Chinese, multiple keys are needed, as determined by an input method. macOS then accepts a series of keypresses normally represented by simple characters, but in specified sequences they’re used to generate one or more Unicode characters. In this example, I’ll show how you can create an input method allowing you to insert emoji and other symbols from keypresses alone, without having to use a mouse or trackpad.
Let’s start with an easy and common one: 😀 the grinning face, UTF-8 F0 9F 98 80. While we could set that for an input string of :), we’d probably prefer a common system for our input method. So let’s make that the output string for an input of egrin. In an input plugin, the way we define that is with the line
egrin 😀
All the input plugin does is define each of those input and output pairs. The plugin itself is just a text file stored in an Input Methods folder, either in your Home folder library ~/Library or the same in the main Library folder, for access by all users of that Mac. Once installed, the input method is listed in the Input menu, and more importantly you can switch to it by pressing Control-Space.
Input plugins are text files encoded in UTF-16, normally with the extension .inputplugin, created using your favourite text editor. For this example, I wrote mine using BBEdit, which gives full control over text encoding and other details.
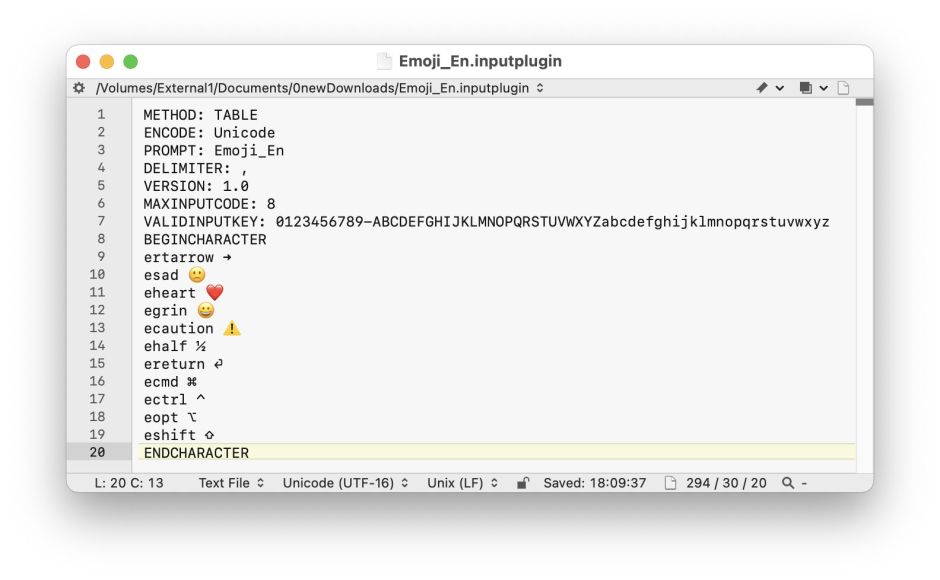
You’ll find the source listed in the Appendix at the end.
Most of the lines in the input plugin are self-explanatory. PROMPT is the name you want to be shown in the Input menu, and usually the same as the name of the file. DELIMITER is used when there are two or more output strings for any given input string, and is used to separate them. VALIDINPUTKEY normally includes all the base characters in the alphabet you’re using. The definitions are then placed between the lines BEGINCHARACTER and ENDCHARACTER. Apple provides a full reference here.
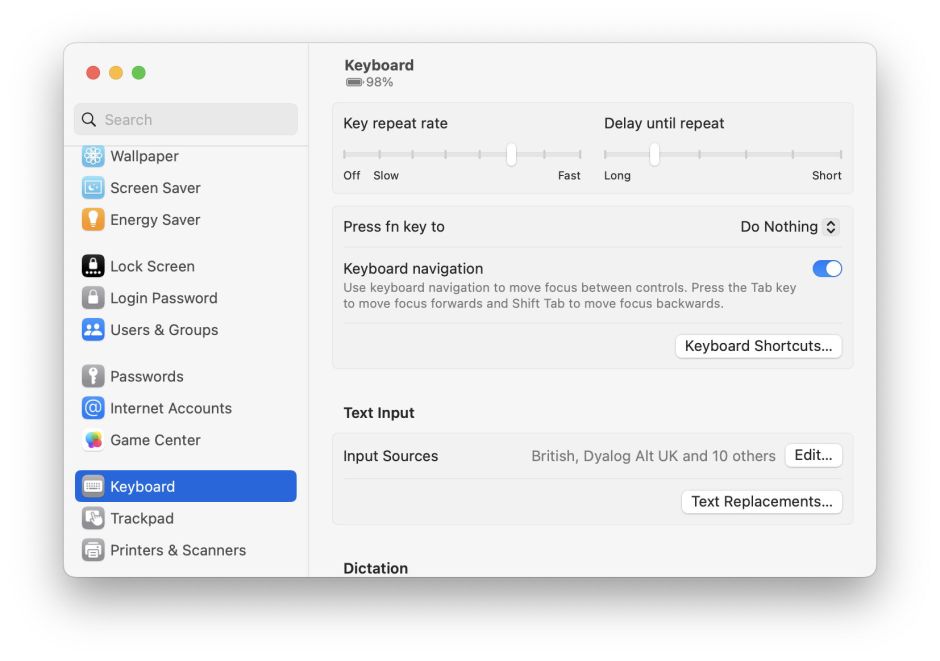
Once you’ve completed and saved your input plugin file, either move it manually into one of the Library/Input Methods folders, or double-click it to let the Finder do that for you, to ~Library/Input Methods. Then open System Settings and select Keyboard. In the Text Input section click on the Edit… button for Input Sources.
If you haven’t already done so, show the Input menu in the menu bar. Then add your input method by clicking on the + tool at the bottom left, selecting your input method from the list, and adding it.
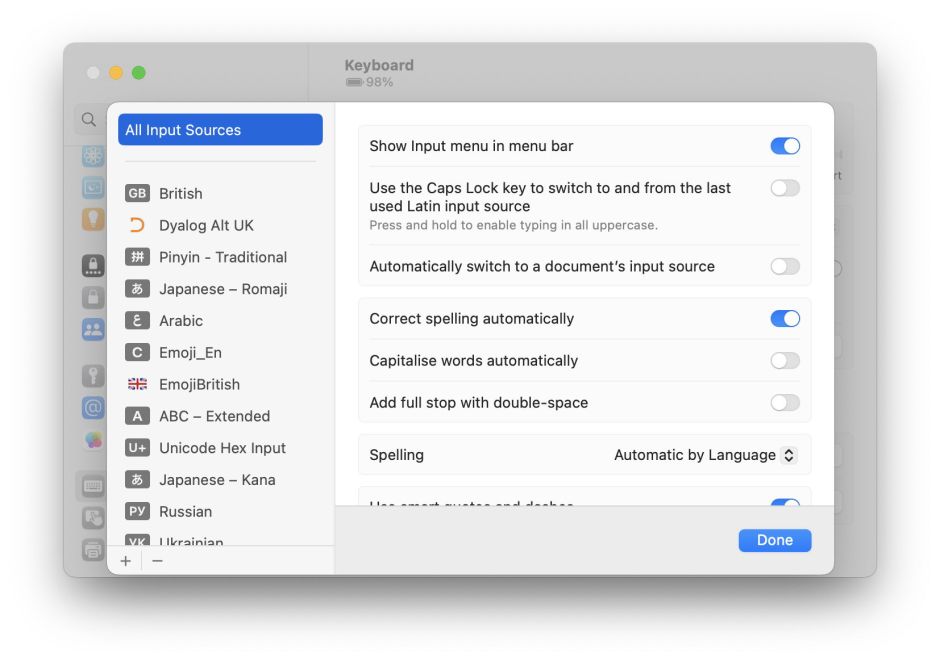
Your new input method will then be listed among the keyboards in the Input menu.

Open a window in any text editor, switch the Input menu to your input method, and type in one of its input strings like egrin. Those characters will then be underlined to indicate that macOS is watching those characters to see if they match one of the input strings. When they do, and you press the Spacebar, macOS will substitute the output string for your input. If you press Return instead of the Spacebar, those characters won’t be substituted, but left as they are. This is the same basic process as you might use for standard Roman-based input methods for non-Roman languages like Chinese.
Typing with your input method active all the time gets tedious. As you get more used to it, you can switch in and out of your input method quickly using Control-Space.
Appendix: Example Input Plugin
METHOD: TABLE

ENCODE: Unicode

PROMPT: Emoji_En

DELIMITER: ,

VERSION: 1.0

MAXINPUTCODE: 8

VALIDINPUTKEY: 0123456789-ABCDEFGHIJKLMNOPQRSTUVWXYZabcdefghijklmnopqrstuvwxyz

BEGINCHARACTER

ertarrow ➜

esad 🙁

eheart ❤️

egrin 😀

ecaution ⚠️

ehalf ½

ereturn ⏎

ecmd ⌘

ectrl ⌃

eopt ⌥

eshift ⇧

ENDCHARACTER
