
The changes in SilentKnight 2.2 are relatively small, but taken with its other features now give you a lot of flexibility in how you use the app. While it was originally intended to help keep Macs fully up to date with macOS, firmware and security updates, SilentKnight is increasingly used by those who only want some updates and not others. That isn’t as straightforward as I’d like, because SilentKnight is built on the command tool softwareupdate, which is again primarily intended to obtain and install updates, not to defer some.
Here, for those who don’t want certain updates, is a walkthrough of how to use those features.
Open SilentKnight
When you first open the app, it may check whether it’s the current version by looking that up on my GitHub page. It only does this once a day, and if you prefer you can disable that in Settings.
It then starts checking the information to be displayed in its window. This involves inspecting version numbers of installed security data, fetching information from macOS, and checking its own records in its preference file as to when updates were last installed. To see whether versions are current, it accesses two files on my GitHub: one lists the current version numbers of security data and other files, the other contains firmware versions for different models of Mac.
The app also checks the log on your Mac to obtain all scan reports from XProtect Remediator (XPR) in the last 24 hours. You can disable that check if you wish.
At the same time, SilentKnight uses the softwareupdate command tool to check whether any updates are available from Apple for that Mac, another feature you can disable if you wish.
All this information is assembled in the app’s window for you to see. If there are updates available, the app will normally display its button to Install All Updates, another behaviour you can change in its Settings.
Settings
To open its Settings window, use that command in the app’s SilentKnight menu. You’ll then see four settings:
- at the top, a radio button to choose between options for checking and download behaviour,
- a checkbox to set whether the Install All Updates button is shown or hidden,
- a checkbox to set whether to check XPR scans in the log,
- a checkbox to set whether to check for updates to SilentKnight itself.

Here are its standard settings, which you should use by default as they make life simpler.
The radio button selects how you want SilentKnight to check for and handle Apple’s updates:
- Don’t check means that whenever you open the app it won’t check for Apple’s updates at all;
- Download only means that the app will check for updates with Apple, but when you choose to fetch them, they will only be downloaded and not installed. That allows you to choose which to install, but some of those downloaded updates may not install properly when obtained in this way. It adds to your work, and makes use more complicated, but it’s available if you prefer.
- Download and install means that when you click on the button to Install All Updates, SilentKnight will both download and install all available updates from Apple.
Note that SilentKnight never downloads or installs any updates automatically: you always have to tell it to do that by clicking on the button, or using a menu command. You remain in control.

It’s easy not to pay close attention to the list of updates available, and automatically click on the Install All Updates button. To help prevent you from doing that, you can set that button to be hidden by unchecking this checkbox. This doesn’t alter the behaviour set by the radio buttons, just determines whether that button is shown (ticked) or hidden (unchecked).
When you’ve made any changes in Settings that you want to stick, click on the Set button, then quit SilentKnight. Open it again, and open Settings to confirm that they’re set the way that you want. Although changing its settings doesn’t require quitting the app, that’s a good way to check that they should remain as you want them when you next use the app.
Checks and updates
This is an example taken from an Intel MacBook Pro which hasn’t been used for some weeks, and has fallen behind with its updates. Settings used are the standard, with Download and install and the Install All Updates checkbox ticked.

This shows both XProtect and XPR are out of date and need to be updated, and there were no XPR scans in the last 24 hours, as the Mac was shut down for the whole time.
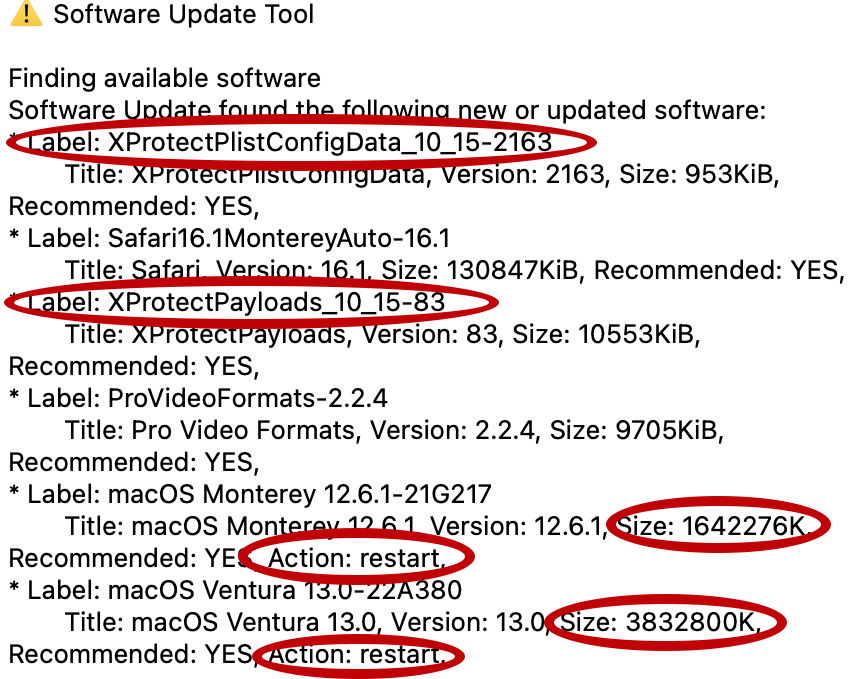
Available updates include a mixture of two security updates, that will bring XProtect and XPR up to date, and two large macOS updates, either to macOS 12.6.1 or 13.0. Although I was going to upgrade this Mac to Ventura anyway, I’d much prefer to do that using Software Update with its progress bar and other aids. So what I wanted was to download and install just those two security updates. To do that, I opened the SilentKnight Updater window using the Install Named Update… command in the File menu, which lets me download and install each update individually.
Look carefully at each entry in the list of available updates, and they consist of a first line like
* Label: XProtectPayloads_10_15-83
followed by a line giving title, size, and other information including whether installing that update restarts your Mac.
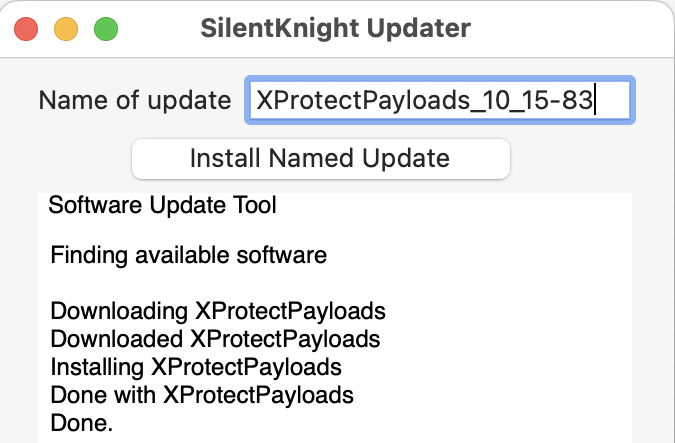
To install a named update, select the name given after Label, here XProtectPayloads_10_15-83, copy that, and paste it into the box labelled Name of update in the SilentKnight Updater window. Then click on the Install Named Update button. The Software Update Tool then tells you what it has done, and here has successfully downloaded and installed that update.
Repeat that with any other updates you want to download and install.
When I did this on my MacBook Pro, I ran into a bug that’s currently affecting the Content Caching server in macOS. Although one of the updates installed fine, the second threw an error when trying to install, as typically happens with this bug.

What I did then was disable the Content Caching server (something you can now do directly in SilentKnight, using the command in its File menu), and once that was no longer active I clicked on the Install Named Update button again. SilentKnight was then able to install that update successfully, and I could enable the Content Caching server again.
Normally, when you use the Install All Updates button, once the updates are complete SilentKnight checks the versions again so you can be confident that it has worked properly and your Mac really is up to date. Because I used Install Named Update instead, I need to run that check manually by clicking on the Check button at the top of SilentKnight’s window.
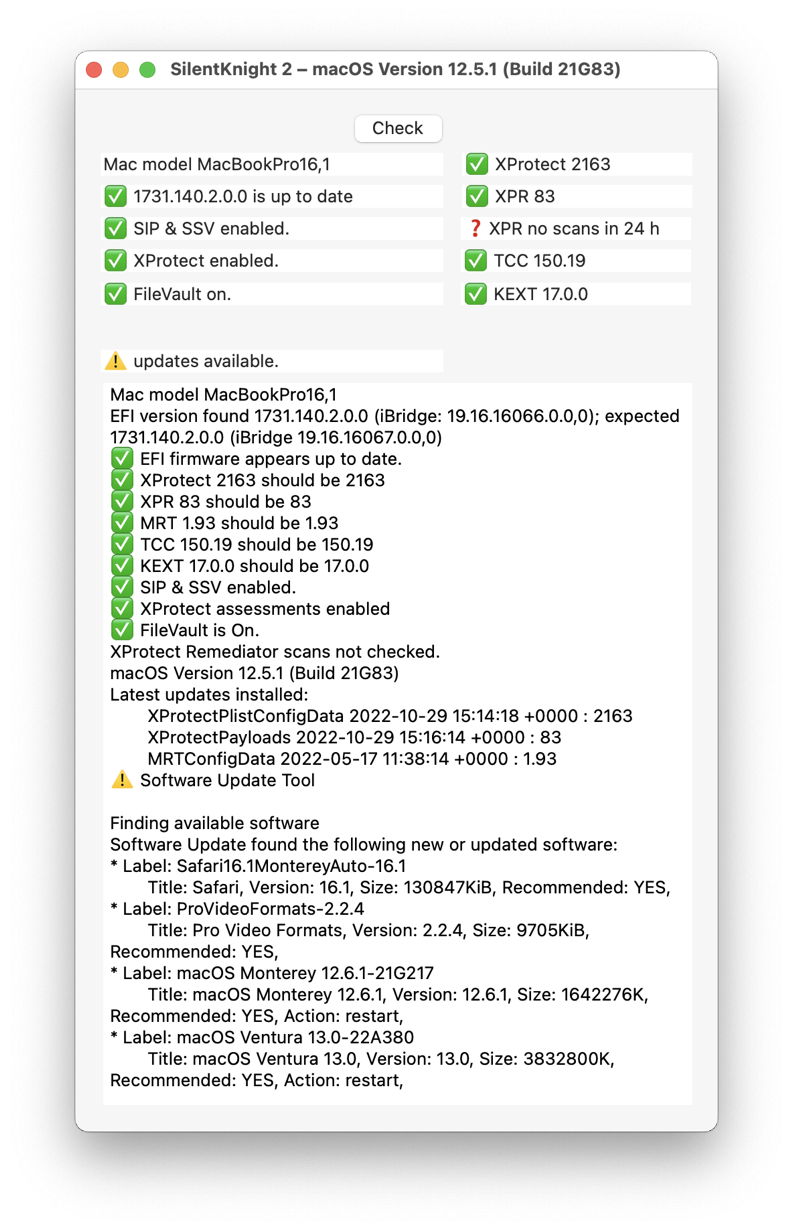
The two red Xes have now gone, as the updates worked. Because XPR scans aren’t checked a second time, that information hasn’t changed. The information in the Latest updates installed now shows the most recent updates, and the other updates available are still listed as being available.
If I didn’t want to install any more updates, all I have to do now is quit SilentKnight. When I next open it, it will go through exactly the same sequence of checks, and no doubt still report that updates to 12.6.1 and 13.0 are available if I want them. But that’s my choice, and when I did upgrade that Mac to Ventura, I used Software Update rather than SilentKnight.
I hope this helps you get the most from SilentKnight.
