
Lightweight virtualisation of macOS and GUI Linux on Apple silicon Macs might appear similar, but there are some important differences. The most obvious is that Monterey hosts support macOS guests, but not GUI Linux, for which you’ll need a Ventura host. More significant in use, though, is the way in which a virtual machine (VM) is created and installed, and the structure of their bundles.
Creating a macOS VM
Creating a macOS VM is a process very similar to restoring an Apple silicon Mac when in DFU mode. The internal files of the VM bundle are created according to the machine configuration set by the user, and the IPSW image is then restored into them. The result is a bundle consisting of:
- MachineIdentifier, containing the Machine ID (MID),
- HardwareModel, containing the MinimumSupportedOS and PlatformVersion,
- AuxiliaryStorage, containing iBoot Stage 1, NVRAM, certificates, nonces, volume UUIDs, boot breadcrumbs, etc.,
- Disk.img, the boot disk image with its three APFS containers.
In Apple’s sample code, the IPSW is moved inside the bundle as well, a convention which Viable follows, but VirtualBuddy doesn’t, and has no need to.
When that VM is run for the first time, it has to be personalised and set up in the same way that a factory-fresh Apple silicon Mac does, but by that time its MID is fixed, and there’s nothing further to be installed from the original IPSW file, which can be moved or discarded. The IPSW image is required as a macOS installer doesn’t contain all the pre-boot components required to construct the whole contents of the boot disk of an Apple silicon Mac.
Creating a GUI Linux VM
Creating a GUI Linux VM is far quicker, as it doesn’t install Linux in the main disk image, merely sets installation up ready to take place during the first run of Linux as supplied on the ISO image being installed. When installation is complete, the bundle consists of:
- Disk.img, the boot disk image formatted by Linux,
- MachineIdentifier, containing the Machine ID (MID), in this case a UUID,
- NVRAM, containing the boot settings for the VM.
When that is first run, the VM boots from the ISO image and runs Linux from there. In some presentations, the user can continue to run that without installation to the disk image, but the usual intention is for that to run its installer to install Linux into the disk image.
Controlling Machine IDs
One major purpose of the MID is to allow the virtualiser to distinguish between different VMs which may be running concurrently, and to that end it’s important to ensure that VMs to be run at the same time have different MIDs. At present, that isn’t checked by the Virtualization framework itself, and the current beta (4) of Viable doesn’t check it for macOS VMs. As no more than two macOS VMs can be run simultaneously anyway, I intend adding that feature to the next version of Viable, but it shouldn’t prove a problem for most users.
Linux has a lighter footprint: it’s quite reasonable to run a GUI distro with just a couple of cores and 4-6 GB memory, making it feasible to run more than one Linux guest at a time. While it’s potentially useful for some to be able to create and install Linux VMs with the same MID, it’s also more important that the virtualiser should check that those running together don’t have the same MID.
Liviable beta 2
This new beta-release of Liviable now has identical support for creating VMs with the same MID as I have just added to Viable beta 4.
By default, Liviable beta 2 generates a new unique MID each time that it creates and installs a new VM, and that MID is loaded and used when that VM is booted.
Liviable also generates a MID to be retained in memory. A new checkbox allows you to Keep that Machine ID for use in all new VMs you create and install while that checkbox is ticked. When it is unticked again, or you quit Liviable, behaviour reverts to the default, generating a new unique MID each time.
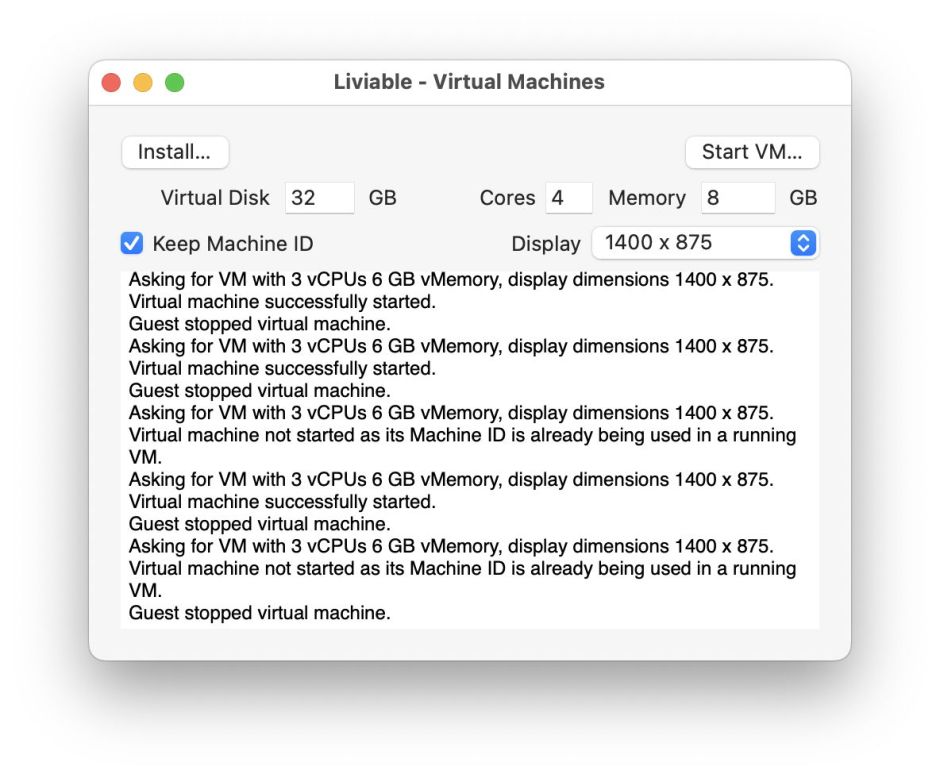
A new menu command, Load Machine ID… in the File menu, prompts you to select an existing MachineIdentifier file, for example within an existing VM bundle, which will then be loaded to replace the retained MID. For example, to create a series of new VMs with the same MID as one of your old VMs, simply use that command to load the MachineIdentifier from that old VM, tick the Keep Machine ID checkbox, then create the VMs you want to use the same MID. You can copy MachineIdentifier files from VM bundles to make a library for creating new VMs using any of a range of existing MIDs, as you require.
Because of the risk of inadvertently trying to run two VMs with the same MID, when you ask Liviable to load and run a VM, it checks whether its MID is the same as that of any running VM. If it is, that VM won’t be loaded, and you’re informed of the MID clash in Liviable’s main window. I have also taken the opportunity to ensure the app closes windows when it can, for example once it has finished running a VM.
Liviable beta 2 (1.0.2) is now available from here: liviable1b2
and from Downloads above. I am in the process of creating a Product Page for Viable and Liviable. My next task in Liviable is to add support for the translation and use of Intel x86 code through Rosetta 2.
Enjoy!
