
Many bytes have been written to disk in the last couple of days, since I looked at problems with the performance of Disk Images. This article presents a lot more data, which both clarify and confound. The TL;DR is that writing to macOS Disk Images – whether plain .dmg, sparse disk images, or sparse bundles – is a complete gamble. Sometimes they perform fairly well, and sometimes they’re excruciatingly slow.
These problems aren’t new by any means, and many have reported their poor performance before. One of the most worrying accounts of how unpredictably they can perform comes from Jeff Johnson, who has wrangled disk images like no other, and still concluded that “It makes no sense!”. Neither did kapitainsky’s comment that unmounting a disk image and remounting it resulted in substantial improvement in write speed.
It was clear that I needed to extend my measurements, so I have been looking at more combinations using my other Apple silicon Mac, a MacBook Pro 16-inch with an M1 Pro chip, 32 GB memory and a largely empty internal 2 TB SSD. This isn’t running macOS 12.4, but the second developer beta of Ventura, and the performance of its SSD is almost identical to that of my Mac Studio Max with 12.4, returning an identical write speed of 7.3 GB/s, which is close to Apple’s claimed maximum read speed of 7.4 GB/s for the Mac Studio. Once again, I’m using my app Stibium; for those of you who want to follow on your own Mac, I have explained in the Appendix at the end how to get the most reliable results from this.
Results
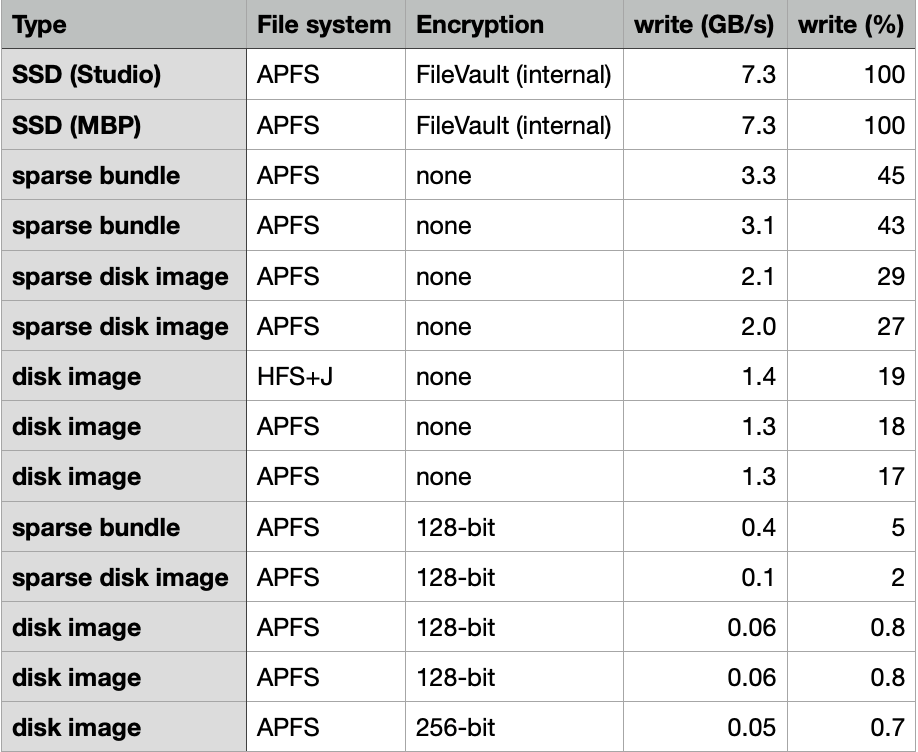
When I pool almost all my results in a single table, what I see makes no sense at all.

These report tests using the three most popular types of Disk Image:
- disk image is a plain fixed-size single-file read-write disk image, UDRW;
- sparse disk image is a variable-size single-file read-write disk image, UDSP;
- sparse bundle is a variable-size read-write bundle containing storage bands, UDSB.
Most tests have used unencrypted Disk Images, or those with only 128-bit AES encryption, but I have also run one using a disk image with 256-bit AES encryption. As expected, this proved the slowest of all, although it was only a little slower than a similar disk image with 128-bit encryption.
The Rewrite column in the table indicates whether that test was run on a freshly created Disk Image (without any unmounting), or after the following sequence:
- fresh Disk Image created in Disk Utility and automatically mounted;
- single folder name stibtest created in the Disk Image;
- first write test using Stibium;
- contents of stibtest folder moved to Trash, Trash emptied;
- Disk Image unmounted using the Finder;
- after a pause of at least 10 seconds, Disk Image double-clicked to mount it again;
- second write test using Stibium.
Where the Rewrite column is ticked, the results are from that second write test; where the column is marked with a cross, the results are from the first write test. This procedure not only includes the unmounting and remounting suggested by kapitainsky, but the second write test is performed on the Disk Image after it has already contained the test files, but they have been deleted.
This is significant for the two sparse types, as the first write test expands the size of the Disk Image to accommodate those test files. When the second write test is performed, no further expansion should be required. To check whether that initial write was responsible for changing write performance, I also tested a disk image with 128-bit encryption which went through the same sequence, but no first write test was performed. Its results were identical to those after both write tests, suggesting that simply unmounting and remounting a disk image can change its write performance.
Analysis
Trying to make any sense of that table proved too much, so I have broken it down into two. I’ll first consider results only for first writes to disk images just created and automatically mounted by Disk Utility.
When ordered by write speed, clear patterns emerge:
- All encrypted Disk Image types performed very poorly, with write speeds of 0.7%-5% of the original SSD.
- When grouped according to encryption, sparse bundles performed best, then sparse disk images, and finally disk images.
- Using HFS+J made little or no difference to a disk image (Jeff Johnson reports that only unjournalled HFS+ has any speed benefit).
- Using 256-bit encryption is slightly slower than 128-bit.
- No Disk Image type achieved even half the write speed of the original SSD, and the great majority wrote at less than 30%.

Turning now to results from the second write test, after a first write test, trashing files, unmounting and remounting the Disk Image, a different pattern emerges:
- The dominant effect now is of Disk Image type, and encryption is secondary.
- The fastest type to write is the sparse bundle; without encryption, this achieved over 70% of the original SSD, and even with encryption it managed almost 60%.
- There is a gulf in performance to the next fastest, plain disk images, which achieved 13% of the original SSD, whether encrypted or not.
- Worst performance is in sparse disk images, which were very slow (12%) when not encrypted, and simply appalling at 0.8% when encrypted.
Which Disk Image?
As things stand, the only type of Disk Image which can be relied on to deliver acceptable write performance is the sparse bundle. If encrypted, when it has been freshly made and hasn’t been unmounted, write speed can be abysmal. But once written to and unmounted, it’s likely to deliver write speeds 60%-70% of those of the host SSD.
Sparse disk images and plain disk images have poor write performance at best, and when encrypted can become abysmally slow. Until their performance has improved substantially, they can’t be recommended for any purpose involving the writing of substantial amounts of data.
I finish with one little oddity to consider. Two different processes can be involved in writing to Disk Images: diskimages-helper sometimes (not always) appears severely limited in the amount of CPU it can use, and only ever runs with 3 threads. Examining it in action with powermetrics shows it pushing two P cores to 70% active residency at a frequency of 3228 MHz. diskimagesiod can use multiple cores, and higher CPU %, with as many as 17 threads. It’s unclear how macOS chooses whether to run diskimages-helper or diskimagesiod, but that choice does appear to have impact on write performance.
I’m very grateful to Jeff Johnson @lapcatsoftware for illuminating discussion, to kapitainsky for his valuable comments, and to everyone else who has helped confuse me.
Appendix: How to measure write and read speeds using Stibium
My first piece of advice is not to attempt this at all. Once you start doing this, you will end up writing hundreds of GB of data to your Mac’s internal SSD. After running over 25 tests, I fear that I’ve written over 2 TB, and I can see the lifetime indicators on those SSDs falling by as much as 1%.
If you want to replicate my test method, you’ll need to be familiar with the ‘Gold Standard’ test documented in detail in Stibium’s Help reference. My test sequence runs:
- Create a new test Disk Image in Disk Utility, saving it to a folder in my Home folder which is set to be excluded from Time Machine backups. When possible, this test Disk Image should be 100 GB, as the test will write over 50 GB of files to it. When free disk space is at a premium, that can be reduced to 25 GB, but Stibium should perform only 2 rather than 5 repeats.
- With the Disk Image still mounted, open it and create a folder named stibtest.
- Change Finder windows to view the folder containing the Disk Image, not its contents, so the Finder doesn’t render the test files in a window during testing.
- Run 5 repeats of the Write Series… detailed in Stibium’s Help reference, writing those test files into the stibtest folder on the mounted Disk Image.
- Once complete, if performing a read test as well, don’t follow the ‘Gold Standard’ procedure by restarting, but change the number of repeats to 1, then click on the Read Folder… button as described, to run the read test.
- On completion, unmount the Disk Image and drag its file to the Trash. Empty the Trash and you’re done.
Happy testing!
