
For many Mac users, the only external disk connected to your Mac stores its backups. There are times when it would be really handy if you could use some of the space on that for other purposes, whether temporary or more permanent. This article looks at how you can do that, either when planning a new APFS backup disk or when it’s already in use. As older HFS+ backup volumes are on their way out and operate quite differently, I’ll only consider backup volumes in APFS format.
Apple’s guide to macOS Monterey states:
“The entire APFS volume is reserved for Time Machine backups. If you want to store files other than the Time Machine backup on the same physical device, use Disk Utility to create an additional APFS volume on the disk. The two volumes then share the available space.”
There’s actually quite a bit more to it than that.
Time Machine’s APFS backup volumes are different. For a start, they’re not formatted in normal APFS, but using its case-sensitive variant. Apple hasn’t explained why that should be so, when the only files copied to them are likely to come from standard Mac case-insensitive volumes. I suspect this may be to ensure that they’re fully compatible with all APFS variants, including those used on iOS and iPadOS. These volumes are also specially marked as storing backups, using a flag that isn’t exposed to the user. Adding your own folders or files to them isn’t a good idea, even as a temporary measure.
Competition for space
Time Machine manages its backups actively to ensure that, whenever possible, they remain well within the disk space available to the backup volume. It does this by a process of ‘thinning’ older backups to recover the space that they occupy. If the backup volume is inside a container which completely fills that disk, then Time Machine will normally fill the volume, thus the container, thus the whole disk. Simply adding another non-backup volume to the same container will put the two volumes into competition for the same free disk space, and will eventually result in your use of the non-backup volume being determined by Time Machine’s thinning of its backups.
One way to avoid that competition from occurring is to reserve space on the backup disk for your non-backup storage. There are two ways to do that: you can set a reserve size on a volume in the same container as the backup volume, or you can put your non-backup volume into a separate container. Neither of those is mentioned in Apple’s guide.

Here, studioBackup is the name of my Mac’s Time Machine backup volume. Alongside it, in the same container disk8, is my own non-backup volume named stibTest. On that disk there’s also another container, disk7, on which is another non-backup volume CrucialRes100gb. These are also shown in the partition map below.

When a disk is formatted in APFS, a hierarchy of two different structures is created. At the top level is the single container, which is an area of contiguous free space on the disk, normally encompassing the whole space available on that disk. Within that container are one or more volumes, each containing its own file system (which has to be APFS, within an APFS container). Those volumes share the physical space allocated to that container, which can be highly beneficial in that two or more volumes share the same free space.
Ordinarily, when you manage the contents of those volumes, it’s an advantage that they share free space, as it gives you complete flexibility to use that space however you want. This changes when one of the volumes is being controlled by a service which is intended to steadily increase the size of its volume over time, until it fills the whole container.
Keeping control
If you just want to copy some files there temporarily, and your backups are still small, there’s no competition, and you need have no concern over setting aside free space for your non-backup volume. But if you don’t plan how to deal with competition for free space, it’ll be too late when it has already happened. And this is one situation where early planning is important.
You can still use a non-backup volume in the same container as the backup volume, but when you create your volume, you may wish to set a reserve size by clicking on the Size Options… button when you’re creating the volume. As man diskutil explains:
“You can use a reserve to prevent running out of capacity due to competition from other Volumes or from a Container shrink attempt.”
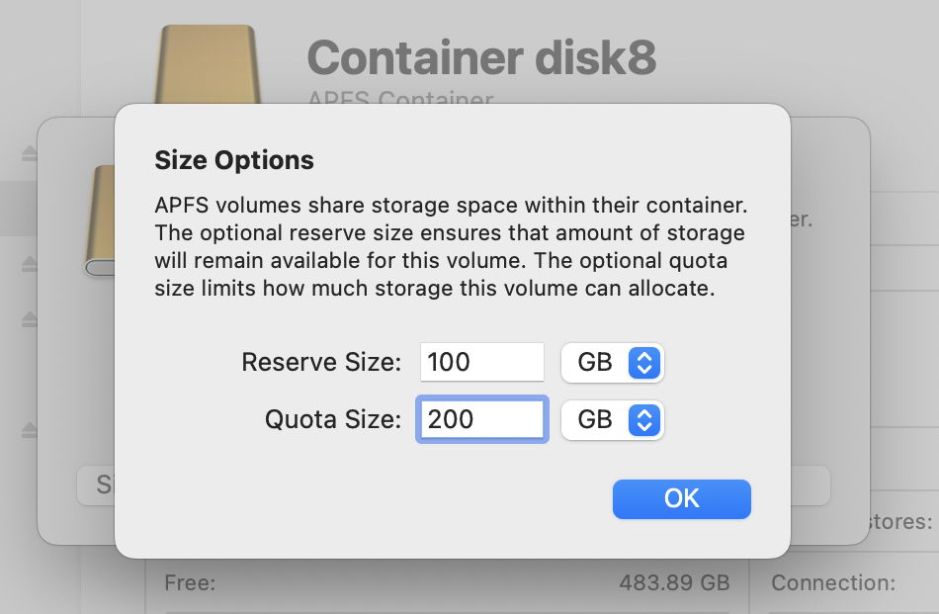
You can also set a quota size, placing a maximum size on your non-backup volume:
“You can use a quota to enforce accounting or to manage against “unfair” premature filling-up of the parent Container due solely to this Volume at the expense of sibling Volumes.”
However, you can only set reserve and quota sizes when you create the volume. Even diskutil can’t change them once that volume has been created. The only way that I know to make such a change is to create a new volume with the desired sizes set, then move the contents of the original volume across to it.
Oddly, the less flexible option for your non-backup volume could prove the more accommodating here. Instead of adding your non-backup volume to the same container as that used by the backup volume, create it inside its own container. Then it’s guaranteed to have the whole of that container for free space, and there’s never any competition with the backup volume.
This is more accommodating in the long run, as you can change container sizes if you need to. There’s an element of risk: if the container with the backup volume is almost full, you won’t be able to repartition the disk giving another container more space, as that would destroy the contents of your backups.
Adding a container
When you add a new container to an existing backup disk, Disk Utility checks the contents of the existing container to see if it can be shrunk to accommodate the new container. That is a complex process when there are Time Machine backups already saved to its backup volume, as each of their snapshots has to be analysed in detail. That will take time, and there’s always the risk that there isn’t sufficient contiguous free space left on the disk to accommodate the new container. If that process fails, your fallback is simply to add a new volume to the backup container, setting its reserve size.
By far the best time to change the partitioning of a disk by adding a new container to it, is before setting it up for your backup volume, or soon afterwards. The later you leave it, and the more that gets backed up, the harder the task will be for Disk Utility.
One final thought arises from yesterday’s article about running First Aid in Disk Utility on backup disks. As of macOS 12.4, if you do want to check and repair any non-backup volumes inside the same container as your backup volume, you’re almost certainly going to have to do that in Recovery. Although there’s no guarantee that First Aid will work in regular macOS on a volume in a different container, it seems more likely to.
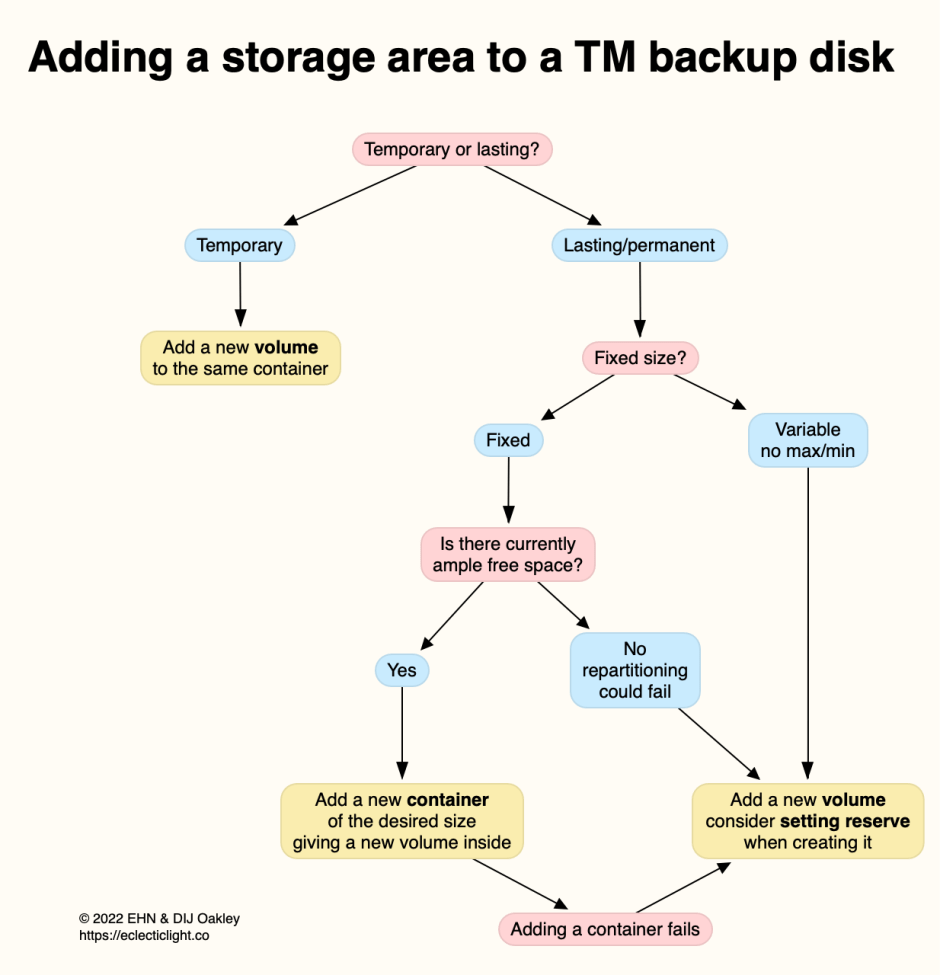
In case this all seems too much, I’ve summarised the main choices in a simple decision tree to help you decide what’s best.
I hope that helps you get more from that external storage.
