
Shortcuts looks to be a simple, linear dataflow programming language at first. This intermediate tutorial runs on from my basic introductions to explore some of its more powerful features, including flow control and the use of variables.
One of the classic uses for scripting environments is to change the name of each in a series of images so that they can be imported into an app to turn them into a slide show or movie. Here, you’ll see how to use the conditional If … Otherwise … End If construct, iteration using Repeat with each, filters and sorting, together with more advanced use of variables.
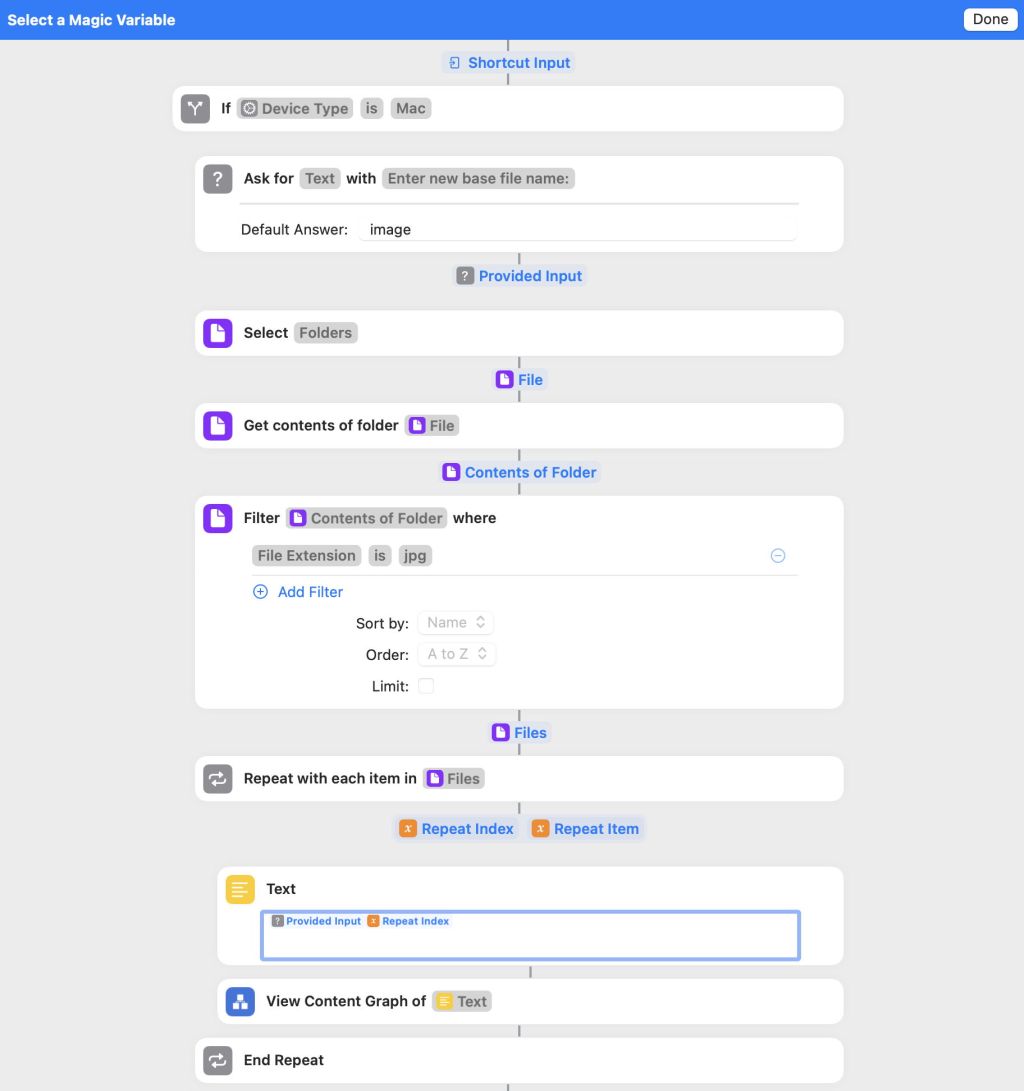
The outline of this shortcut reads:
- Check we’re running on macOS, if not bail out gracefully.
- Ask the user to specify the base name for the files, to which we’ll append their sequence number. This relies on the files being named so that they’re wanted in alphabetical order. For a base name of Image, the first file in the sequence will then be named Image1, and so on.
- Ask the user to select the folder containing the files.
- Iterate through that folder, changing the name of all files with the extension jpg to form a numbered sequence.
Add a new shortcut using the + tool. This time, don’t just give it a name but change its icon too, by clicking on the existing icon to reveal the choice of colours and icons there.

The outermost actions in this shortcut are going to run something like
If (this is a Mac) run the shortcut
Otherwise display an apologetic alert
which is easily achieved using an If construct, the details of which I’m grateful to @mattcassinelli for providing. Although you can find this action in the sidebar, there’s an alternative in the Edit menu, where you select Control Flow and the If command, which inserts the three action blocks within which this shortcut will operate. The tricky part is setting up the If action properly. Click on its blue Input, and in the popup select Device Details. When that’s set, click on it a second time and select Device Type.
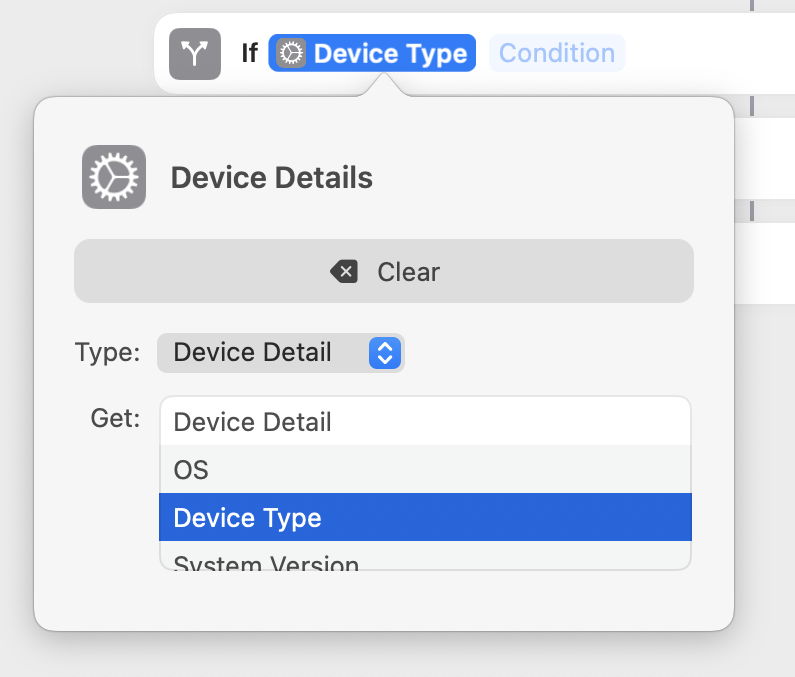
Then click on Condition and set that to is, click on Choose and set that to Mac.
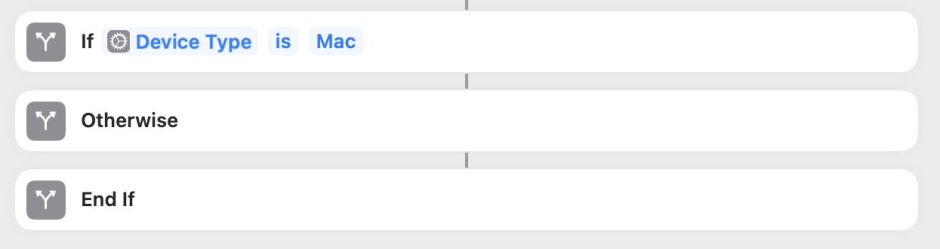
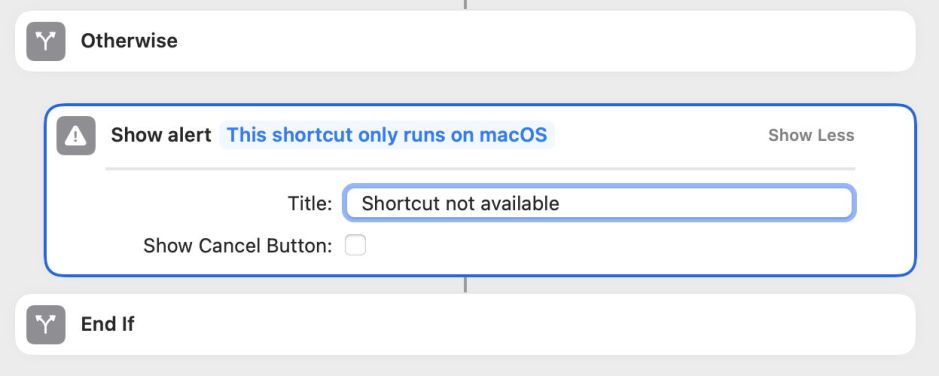
Let’s get the Otherwise action out of the way first. Add a Show Alert action there, to explain that this shortcut only runs on macOS.
Returning to the If section, the next step is to ask the user to enter the base name to be applied to the image files, using the Ask for Input action. Set the text prompt and the Default Answer, which will be the default base file name.

After that, we need to prompt the user to select the folder. Add the Select File action after Ask for Input, click on the word File and change it to Folders. In this example, for simplicity we’ll leave this as a single folder, and not allow multiple selections. With the selected folder, the next step is to add the Get contents of folder action. This time we’ll not make it recursive, only dealing with flat folders.
Having got the contents of the chosen folder, the next action has to filter and sort that list, which is performed in the single action Filter Files. First, we’ll filter by file extension. Click Add Filter, and set that to File Extension, then select is and enter the text jpg. After that we’ll sort the JPG files alphabetically, so set Sort by to Name, with Order as A to Z.

To iterate through that sorted list of JPG files, use an action to Repeat with each item, which is easiest to place from the sidebar rather than its menu command.
For each file, as we iterate through the list, we need to generate the new file name by concatenating the base name, already entered by the user at the start, with the loop counter, which starts at 1 and increments each time a file is processed. To do that we use a Text action. When you’ve added that, click in the text box then Control-click to see the popup menu. In its Insert Variable item, use the top option, Select Variable.

That magically reveals all the variables associated with each of the actions in your shortcut.

Click on the variable named Provided Input from the Ask for Text action near the top, which contains the base name for the files.
Apple calls those Magic Variables, and the Select Variable menu item is an excellent way both to display them and to pick one. If you just want to see them, you can always press Escape to abort selection.
To add the loop counter after the base file name, Control-click again and repeat the process to add the Repeat Index from the sub-menu rather than using Select Variable.
Before going further and changing any file names, it’s a good idea to check that these names are being formed correctly. Although there are other ways, allow me to introduce one of Shortcuts’ debugging tools: the Content Graph. Immediately after the Text action, add a View Content Graph action. Prepare a test folder with a few image files with the correct .jpg extension, and run your shortcut on that test folder. Each time the code reaches that action, it will display the output of the Text action, allowing you to check that it’s ready to be used to rename files.

Finally, add the Rename File action. Initially this sets itself to rename Text, so change the first item there to Repeat Item, and for the text, set that using Select Variable to Text, the output of the previous action. Now load up your test folder of JPG files, and try running the shortcut.

One neat feature is that, once the shortcut has completed, it displays small previews of each of the images it has processed at the end of the actions.

I hope that this has demonstrated some of the more advanced features and techniques available in Shortcuts, and shown that this isn’t just a toy suitable for trivial automation tasks.
Previous articles
Getting started with Shortcuts: 1 Basics
Shortcuts: counting files and Quick Actions
Shortcuts: Automating the Mac
