
The previous article in this series looked at how T2M2 can reveal useful information about problems occurring during Time Machine’s automatic backups. This article considers what can go wrong with those backups.
Every Mac user should make backups as part of a joined-up backup policy, which ensures that you can recover from disasters minor and major without losing significant data, and in acceptable time. As part of backing up, it’s essential that you routinely check that your backups work properly. I’ve lost count of the number of times that I’ve heard of businesses and sometimes even large organisations who have gone to their backups only to discover that nothing is there at all. Don’t get caught out.
What do you do, though, when you go to your Time Machine (TM) backup and it either throws an error, or doesn’t work properly?
For the time being, there are two types of TM backup: those on local storage such as an external drive in HFS+ format, and those on a networked device which uses SMB or the older AFP protocols and stores the backups in a special sparsebundle format, which is compatible with that class of storage. I’m going to leave networked backups to the next article in this series, so here will consider only TM backups on HFS+ format drives.
Backup structure
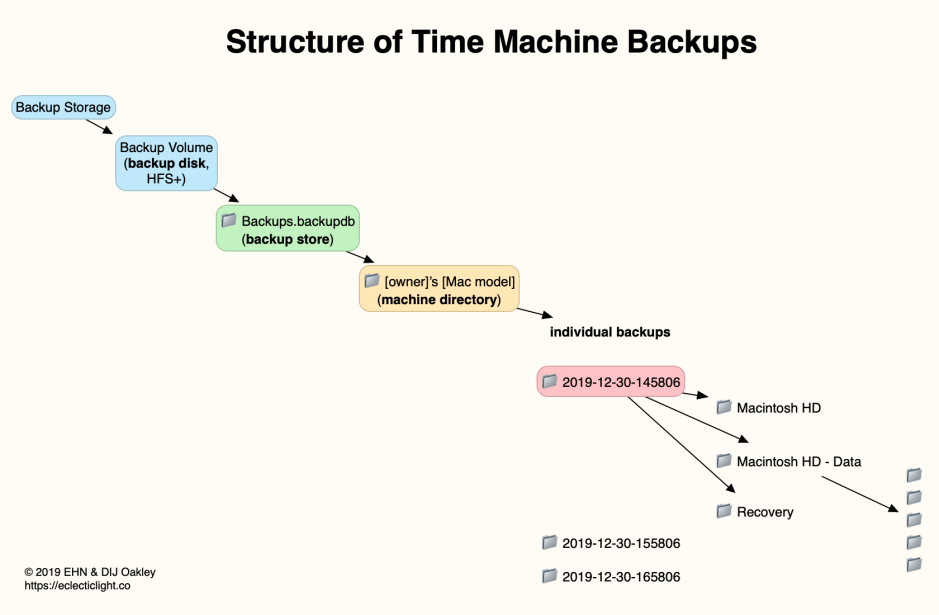
There’s more to a Time Machine backup than just the files and folders of the backup. In the Backups.backupdb folder (the backup store), you’ll find:
- .RecoverySets, a hierarchy of folders containing com.apple.recovery.boot, which is in essence a Recovery volume, complete with Apple Diagnostics. These are needed when you boot from the backup volume.
- .spotlight_repair and .spotlight_temp, with more Spotlight search files.
- [yourname]’s [macmodel], a backup set or machine directory, containing individual backups, which are folders named with a datestamp.
Within each backup folder, you’ll find:
- .Backup.log, a small log file for the backup.
- .com.apple.TMCheckpoint, a tiny marker file.
- .exclusions.plist, a property list detailing all the folders and files excluded from that backup.
- [UUID].eventdb, [UUID].clonedb, and .[UUID].eventdb files, containing details of the items backed up.
- [volname] a folder containing the backup for each volume which was backed up.
In Catalina, the standard set of volumes now includes the System volume, named something like Macintosh HD, the Data volume Macintosh HD – Data, and the Recovery volume, to which you add any other volumes which are being backed up by TM. This is one good reason that backups made by 10.15 are incompatible with Mojave and earlier.
Within a volume file in a backup, you’ll find:
- .com.apple.backupd.mvlist.plist, normally an empty property list;
- .file and .vol from
volfsfor that volume; - .DocumentRevisions-V100 containing a backup of the macOS versioning database;
- the folders and files in the backup of that volume.
Finder and Terminal
As local backups are in HFS+ format, and can be opened and browsed in the Finder or at the command line, it’s tempting to think that you can do anything you like to them and they’ll just carry on working. That’s not true: although you can repair TM backups using regular tools (see below), the moment that you start messing with them, you’re putting all your backups at risk.
The next thing to bear in mind is that even a relatively small backup consists of a huge number of files, folders, and hard links to them. You can, for example, put a complete backup set in the Trash and empty it, but you’ll then discover just how long it takes to remove what could well be several million items. If that backup set – that’s the complete set of individual backups for a named Mac – is the only item on that volume, it’s much quicker to re-format that volume using Disk Utility.
More selective surgery needs to be thought out carefully. Within any backup set (machine directory), you can move, copy, or delete items down to the level of individual backups using the Finder. So if you decide you want to save space by removing one or more complete backups, that should be safe to perform in the Finder.
You can also remove complete backups in the Time Machine app, or using tmutil at the command line (see below): in theory, they should be safer tools to use. You should not make any changes within the Backups.backupdb folder (backup store) using commands in Terminal (other than tmutil), though.
If you want to make changes within backups, such as removing a sensitive file or folder from them, the only safe way to do that is in the Time Machine app, not in the Finder or Terminal.
The tmutil command
The Time Machine command tool tmutil provides a suite of verbs which you can use to configure and control TM. For maintenance, its most useful is the verb delete which can remove snapshots, machine directories, or individual backups, whether or not they were made by the current Mac. To use it, you’ll need a command of the form
sudo tmutil delete [path]
where [path] is the full pathname to the backup to be removed.
For example, to remove all TM backups from a volume, you’ll probably want something like
sudo tmutil delete /Volumes/[newname]/Backups.backupdb
or
sudo tmutil delete /Volumes/[newname]/Backups.backupdb/[macname]
where [newname] is the name of the volume, and [macname] is the machine name, e.g. Howard's iMac. The latter may well contain spaces and single quotation marks, in which case you’ll need to use a form like
sudo tmutil delete /Volumes/my\ disk/Backups.backupdb/Howard's\ iMac
or
sudo tmutil delete "/Volumes/my disk/Backups.backupdb/Howard's iMac"
Removing a complete machine directory is very slow and tedious, and likely to take several hours at least. Surprisingly, this command works through the backups in chronological order, starting with the oldest backup. After it has removed each backup, it reports how much space that has freed.
You can also be more specific, removing backups one at a time, something which you can always do with an active backup to reclaim some space.
To do this, first list the backups using a command of the form
ls /Volumes/[newname]/Backups.backupdb/[macname]
such as
ls "/Volumes/my disk/Backups.backupdb/Howard's iMac"
Then copy and paste the paths of the backups that you want to delete into individual commands like
sudo tmutil delete "/Volumes/my disk/Backups.backupdb/Howard's iMac/2017-05-02-181524/"
Repairing backups
Because TM backups are fundamentally folders on HFS+ volumes, all good repair utilities including Disk Utility’s First Aid, fsck, and Alsoft’s famous DiskWarrior can be used to repair them.
Before attempting any repair, remember that what you’re about to do could easily destroy the backups entirely. Unless you already use a second backup system, such as Carbon Copy Cloner or Superduper!, you should ensure that you have complete copies of your current volumes on independent storage.
Repairing all but the smallest TM backup is a very long and protracted process, which will normally take many hours at least. Before starting it, ensure that your Mac can perform it undisturbed, and (unless it’s a laptop) its power is protected by a UPS. You’ll then have to keep your fingers crossed for a very long time, while you wait to see if the repair has been successful.
In the next article in this series, I’ll look at some of the differences when you make TM backups to networked storage, and how all TM users can manage their backups to minimise risk.
This series is dedicated to James Pond (1943-2013), who really did know everything about Time Machine.
