

Like everyone else, I’m all in favour of better security, so long as it doesn’t make my life any more difficult. When I watched the session at WWDC detailing the changes coming in Mojave’s security and privacy (session 702), I was excited but concerned. As a user, it sounded like app ‘notarization’ was an excellent move; as a developer, I was already worried about whether I would be able to get any of my apps notarized successfully, or perhaps this was going to end up as a cut-down App Store review process.
This article first looks at what notarization brings for us all, then walks through the process to show you what is involved. It doesn’t disclose anything which hasn’t already been shown at WWDC (no, I’m not able to show what happens in Mojave’s log when Gatekeeper meets a new notarized app, not until Mojave is released!), but hopefully it makes a few things clearer.
Signed apps are far from perfect. Code signing has undoubtedly kept a lot of more casual malware at bay, but the bad guys seem able to buy certificates when they want, and a lot of recent Mac malware has been properly signed. As it works up to macOS High Sierra, code signing provides essentially no protection over the critical period between malware first appearing, and Apple revoking that developer’s signature.
Notarization goes several steps beyond that. A notarized app has to be ‘hardened’, in the sense that it is limited in the liberties that it can take, either running code, or in the data and resources it can access. A simple example is access to camera and audio input: if an app isn’t declared as needing access to those, it can’t.
At present, once a developer has a code signature, they can sign anything they like, including malware. Notarization is applied to a specific release of a specific app (or code product), and every release version has to go through a separate notarization process, including checking by Apple. That means that, if an app has been notarized, there is an extremely high probability (in practice, almost certainty) that it is not malicious.
That doesn’t just apply to Mojave, either. When I distribute a notarized app here, even though you may be running it on High Sierra or earlier, the fact that it has been notarized and that its regular signature is valid (checked by Gatekeeper before 10.14) mean that its contents cannot have been tampered with.
So as a user, even when I’m not running Mojave, using notarized apps greatly reduces the chances of any of them being malware, trying to capture video or audio, or accessing my private data. Sure, the bad guys will keep their cat-and-mouse game going and try to find weaknesses in the new system, but its starting point is so much more secure than plain signed apps.
I now swap hats, and consider how much this will impact me as a developer. This is important, as in Mojave at least notarization is voluntary. If few developers use it, then users won’t see much improvement in their protection.
Like many developers, I have a love-hate relationship with Apple’s Xcode. In an earlier version, I had problems getting it to archive my apps properly, so ever since have tended to build them to a ‘regular’ binary rather than archiving an app for release, as I really should. The only exceptions to that have been command tools, which I archive then build into Installer packages and sign manually.
The starting point for the notarization process is an app which builds without any significant issues, runs on all the expected platforms, and signs correctly. If you haven’t got that, then you must fix those first. I always turn sandboxing off, as my apps don’t go to the App Store, and any sandboxing settings start to cause problems.
To notarize an app, you first have to make it Hardened, which you do in the same Capabilities tab that you use for sandboxing, and that starts to make me anxious.

There are two sections which you need to check: those at the top are specialist Runtime Exceptions which should affect very few compiled apps. However, your app may need access to some of the resources in the lower section. Mojave also supports more informative dialogs to help the user approve such access, so if you do tick any of these, you should check whether there’s a new NS… entry which you should add to the Info.plist file to support that.
In this case, there’s no good reason to go anywhere near private data, so I leave all unticked, and breathe a sigh of relief. Perhaps this is going to work after all?

The next step is to build an archive for release, using the Archive command in the Product menu. Then click the button to Distribute App.
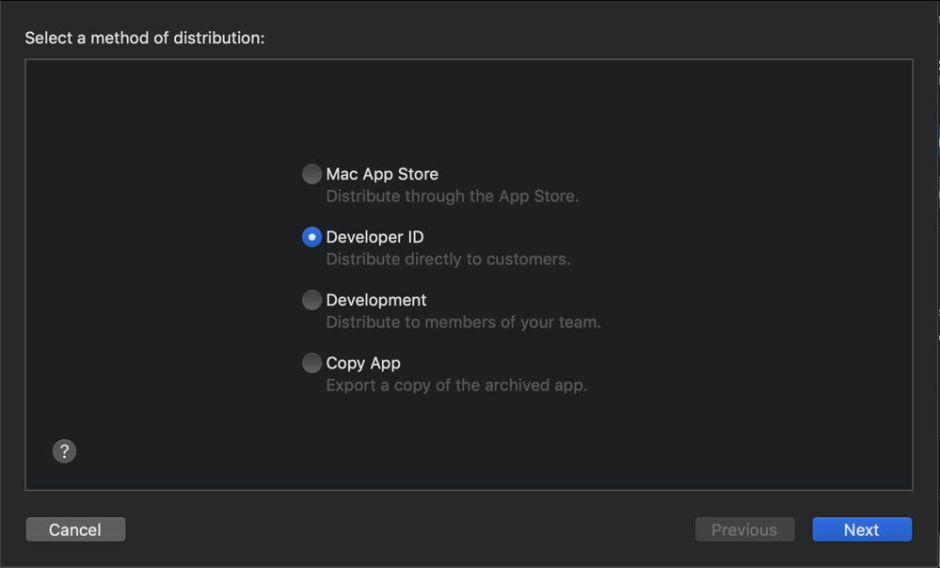
You’re then asked to select the method of distribution. In this case, select Developer ID and click Next.
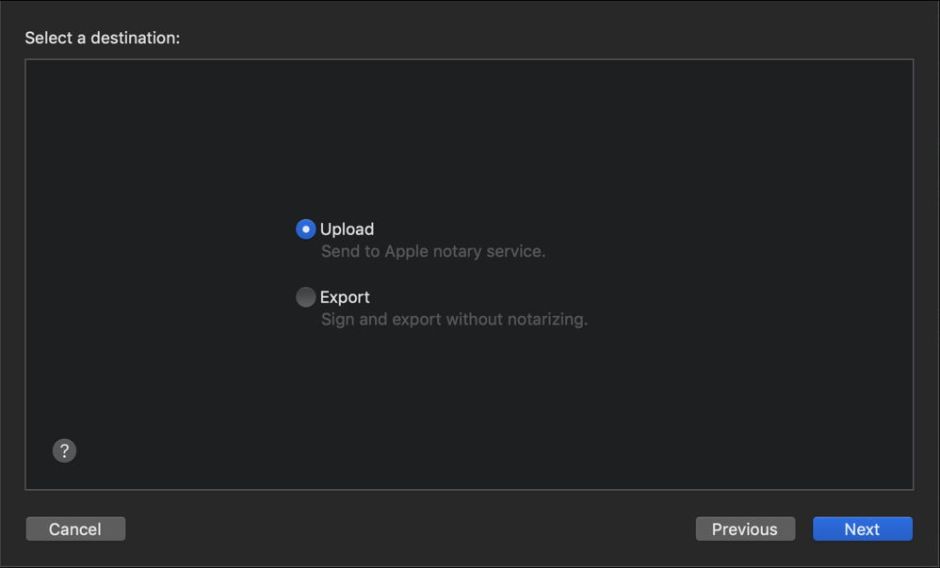
Next, select the new upper radio button to send your app for notarization rather than simply signing it and exporting.
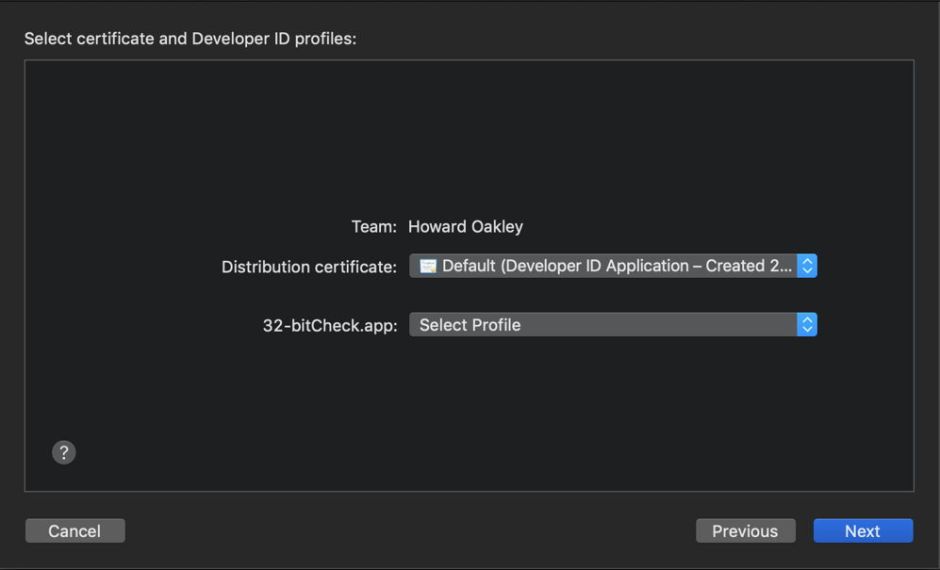
Because I haven’t been archiving apps for distribution, I don’t let Xcode manage my signing automatically, and set my own signing manually. I have also been lazy and not set up any profiles. I know that I should, but the good news is that provided your manual settings work properly, you can stick with those. When you’re happy, click Next.
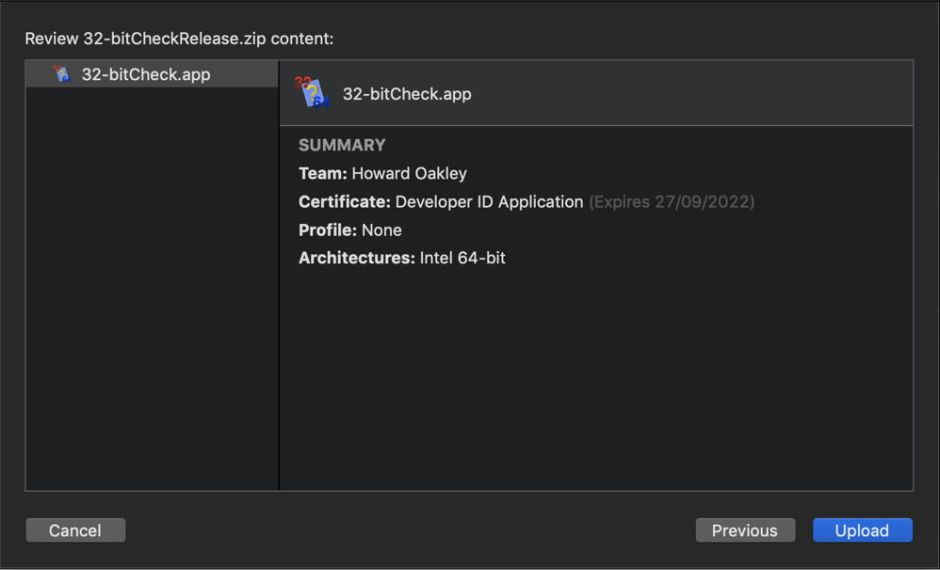
Xcode then gives you a final summary of what is going to be sent for notarization. If you need, you can go back and correct anything. Once happy, click on Upload to proceed.

Xcode then handles all the uploading, and once complete displays this. Click on Close.
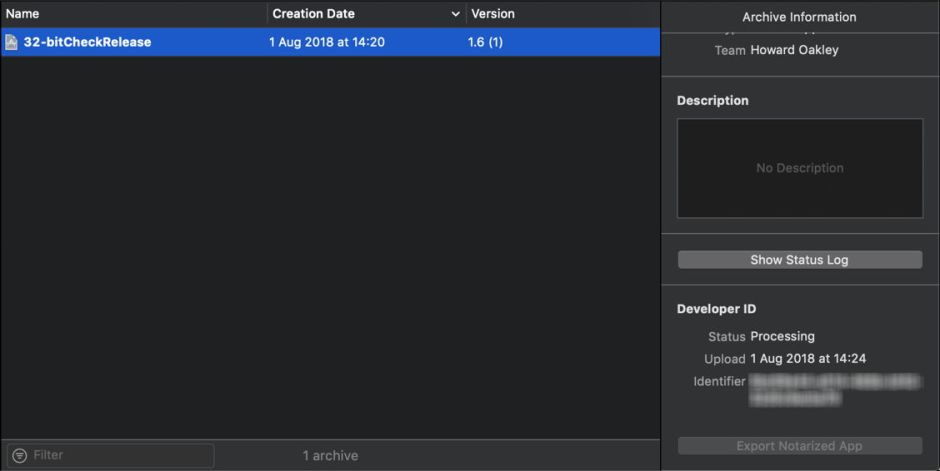
Leave the archiving window open now, as the lower right will display the status of your application, and its unique identifier. Three things should then happen, if the notarization is successful:
- You should receive a notification on that Mac that notarization has been successful and is now complete.
- The Export Notarized App button at the bottom should be enabled.
- You should receive an email from Apple Developer Relations informing of your success.
They don’t always happen in that order, depending on system load, but you want to know whether you have been successful, and you want to export the notarized app. These should only take a few minutes: the service really is amazingly quick.
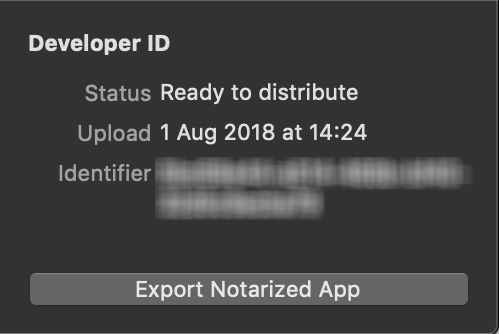
When your app is ready, click on Export Notarized App to save it wherever you want.
There are two final steps which are also worth doing:
- Add a quarantine flag to a copy of the notarized app using xattred (or upload and download to your internet server) then try opening it, just as you would to test your normal distribution app.
- Check its notarization using the command
xcrun stapler validate appname.app, which is documented in Xcode help. You will need to set the Xcode command tools to those in your Xcode 10ß app, using a command likesudo xcode-select --switch /Applications/Xcode-beta.app, which is also documented in Xcode help.
That’s it. It’s free, simple, quick, and for once Xcode’s help is accurate and really helpful. As a developer, I’m thoroughly impressed, and will progressively notarize all the apps here, as I get time. As a user, I know that the bad guys will try to work their way around this too, but look forward to the enhanced security offered by notarized apps.
Anyone who wants more details – such as information about how notarization can be added to command-based build sequences – should watch the WWDC 2018 session 702 video, and consult the supporting documentation.
