

macOS now has several different systems which protect it from most vulnerabilities, and to safeguard sensitive information. However, it can be easy to disable these by accident, leaving your Mac vulnerable to malware and leakage of private data.
Over the last year or so, I have seen quite a few users who have discovered that they have had critical systems disabled, sometimes for many months. Here are the most common errors which have caught them out, which are worth checking periodically even if you don’t remember changing them.
1. Turning SIP off
Since El Capitan, macOS has protected all its system files, even down to standard Mac apps, using System Integrity Protection (SIP). This should make it impossible for malware or even out-of-control software to change those protected system files.
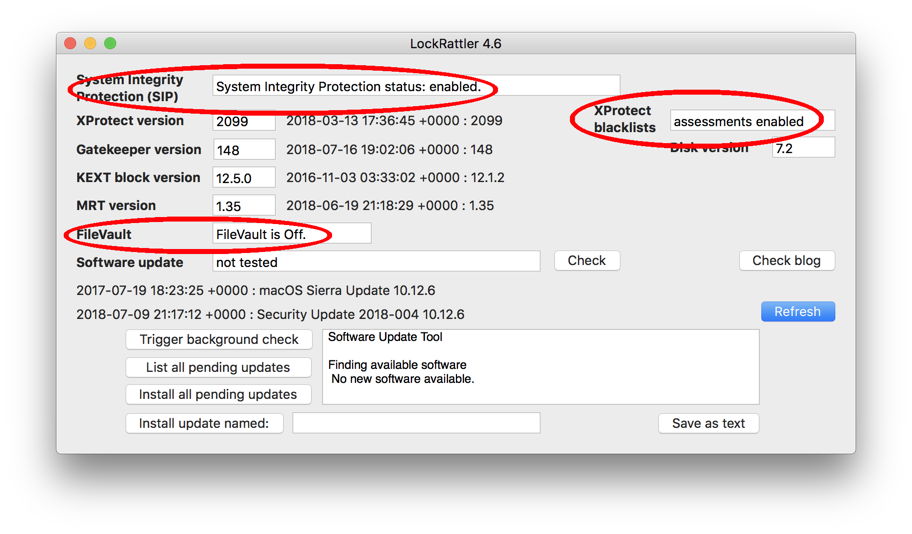
You can turn SIP off, something very occasionally needed to perform certain important tasks. Doing so requires you to restart in Recovery mode, enter a command in Terminal there, and restart. Run LockRattler with SIP disabled, and its top line will tell you of the problem.
To enable SIP, restart in Recovery mode, open Terminal, and type the following command:
csrutil enable
Once that’s done, restart in normal mode, and run LockRattler again, to check that the first item reports correctly
System Integrity Protection status: enabled.
I first developed LockRattler when Apple inadvertently shipped a whole batch of Macs with SIP turned off, so that users had an easy way of telling whether their Mac was affected. Plenty of other tools now report this, but at the time LockRattler was the only simple way to find out.
2. Disabling XProtect
Although I suspect that XProtect’s malware scanning may be on its way out, and will soon be replaced, for the time being it is the only free built-in tool to check for many common types of malware. These checks don’t just apply to fresh downloads: every time that you open a JPEG file, for example, XProtect takes a quick look to see whether it might be malicious.
It is very easy to turn XProtect’s checks off, although I can’t think why anyone would want to do so: if you have to turn it off in order to open a file, then you should ask yourself whether you should be opening that file at all!
Disabling XProtect leaves your Mac vulnerable to malware. Open LockRattler and check that XProtect blacklists are enabled, with the report
assessments enabled
If they’re disabled, you will instead see an error, such as
Failed, error = 1
You may be able to fix this using the command
spctl —enable
but chances are that you will instead need to invoke
sudo spctl —master-enable
which then requires you to authenticate using your admin password.
When you have done so, restart and check that LockRattler still reports that XProtect blacklists are enabled.
3. FileVault is off instead of being on
Many users routinely handle sensitive information which needs to be encrypted using FileVault. However, it can sometimes run into trouble, you may end up turning it off when you encounter problems, and it is all too easy to leave FileVault off when you actually need protective encryption.
Look at the FileVault status in LockRattler: if it should be on but is turned off, you’ll see it reported as
FileVault is Off.
If that is the case, and you should have FileVault active, turn it on in the FileVault tab in the Security & Privacy pane, then when encryption is complete check using LockRattler again.
4. The unified log contains private data
In Sierra and later, the unified log normally protects the privacy of many log entries by removing sensitive private data from them, substituting it with <private>. However, some tools can disable this protection, ensuring that sensitive data are written to the unified log. One tool which can enable this is my iCloud diagnostic tool Cirrus.
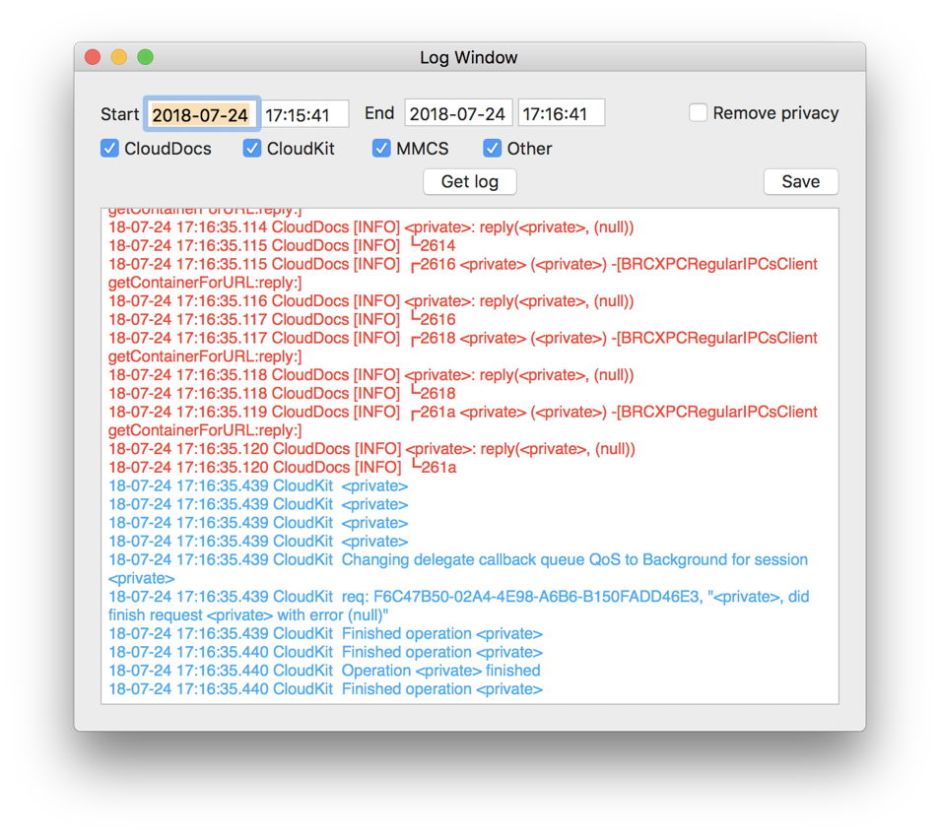
Check that privacy is enabled by opening the log window in Cirrus, and viewing a log excerpt. Browse the entries looking for the likes of
18-07-24 16:55:42.479 CloudDocs [INFO] <private>: reply(<private>, (null))
If you see entries like that, it confirms that privacy is correctly enabled, and your log isn’t leaking sensitive data. If you see few or no entries containing <private>, restore protection by entering the Terminal command
sudo log config --mode 'private_data:off'
and entering your admin password. Wait for a couple of minutes, then get another log excerpt using the Get log button to confirm that <private> is appearing there once again.
Note: this is a new check added to LockRattler version 4.7.1: detailed here.
It is worth checking this whenever you have needed to remove privacy, and think that you have returned your log to its normal state.
In summary:
- Check SIP is enabled in LockRattler.
- Check XProtect blacklists are enabled in LockRattler.
- Check FileVault is turned on if you should be using encryption to protect sensitive data, in LockRattler and the Security & Privacy pane.
- Check that you have restored normal log privacy whenever you have disabled privacy in Cirrus or elsewhere. Check this in LockRattler 4.7.1 or later.
- Any time that disable such critical protection, put a sticky note on your Mac’s display, only removing that note when you have confirmed that your settings are back to normal – much like a ‘safe to work’ permit.
If any of these is disabled in a brand new Mac, contact Apple support, as this may affect a whole batch of that model. If you are certain that you didn’t make any changes, consider whether your Mac has been tampered with by an intruder or malware.
LockRattler and Cirrus are free from Downloads above.
