
In an ideal world, all information about the data in a file, its metadata, would be stored separately from that file’s data, in extended attributes. Because this hasn’t been possible in PCs, although it’s now supported by some of their file systems, it’s common practice to save a file’s metadata to the same file with in-document metadata. This article explains how to select which to use, and how to get the best from them.
In-document metadata
Most cross-platform file formats that can store metadata do so in-document. That ensures its preservation when moved around, transferred between platforms, and hosted in servers and cloud services. However, it also means that changing metadata requires the file’s main data to be saved. In some cases, document editors don’t save the metadata, or metadata editors can upset the rest of the file contents. All apps you use to change that file must be fully compatible with both its data and metadata.
To use in-document metadata effectively you need:
- An app to edit the metadata. This can be more difficult than might appear: many apps can edit RTF Rich Text content, but fewer give access to its metadata.
- A means of viewing the metadata. Normally this would be in the Finder, where the Preview pane and Get Info dialog can display a limited selection of standard metadata, but can’t readily be customised to display others.
- Support for indexing and search of metadata, normally using Spotlight. This in turn depends on the metadata importer for that document type, and again isn’t easy to customise.
- If viewing and searching aren’t supported by macOS, you may be able to use a library manager where appropriate. In general you should try to avoid over-reliance on third-party software.
Check access
Before adding any metadata to your documents, you must confirm that you can edit, view, index and search for it, or you could discover those long hours of work have been wasted. The best way to do that is using the Drop Window in my free utility SpotTest.
Using your chosen editor for that type of document, create a small test document and add test entries or attributes to its metadata, usually referred to as its Properties. Save that, and drag and drop it onto the Drop Window in SpotTest.
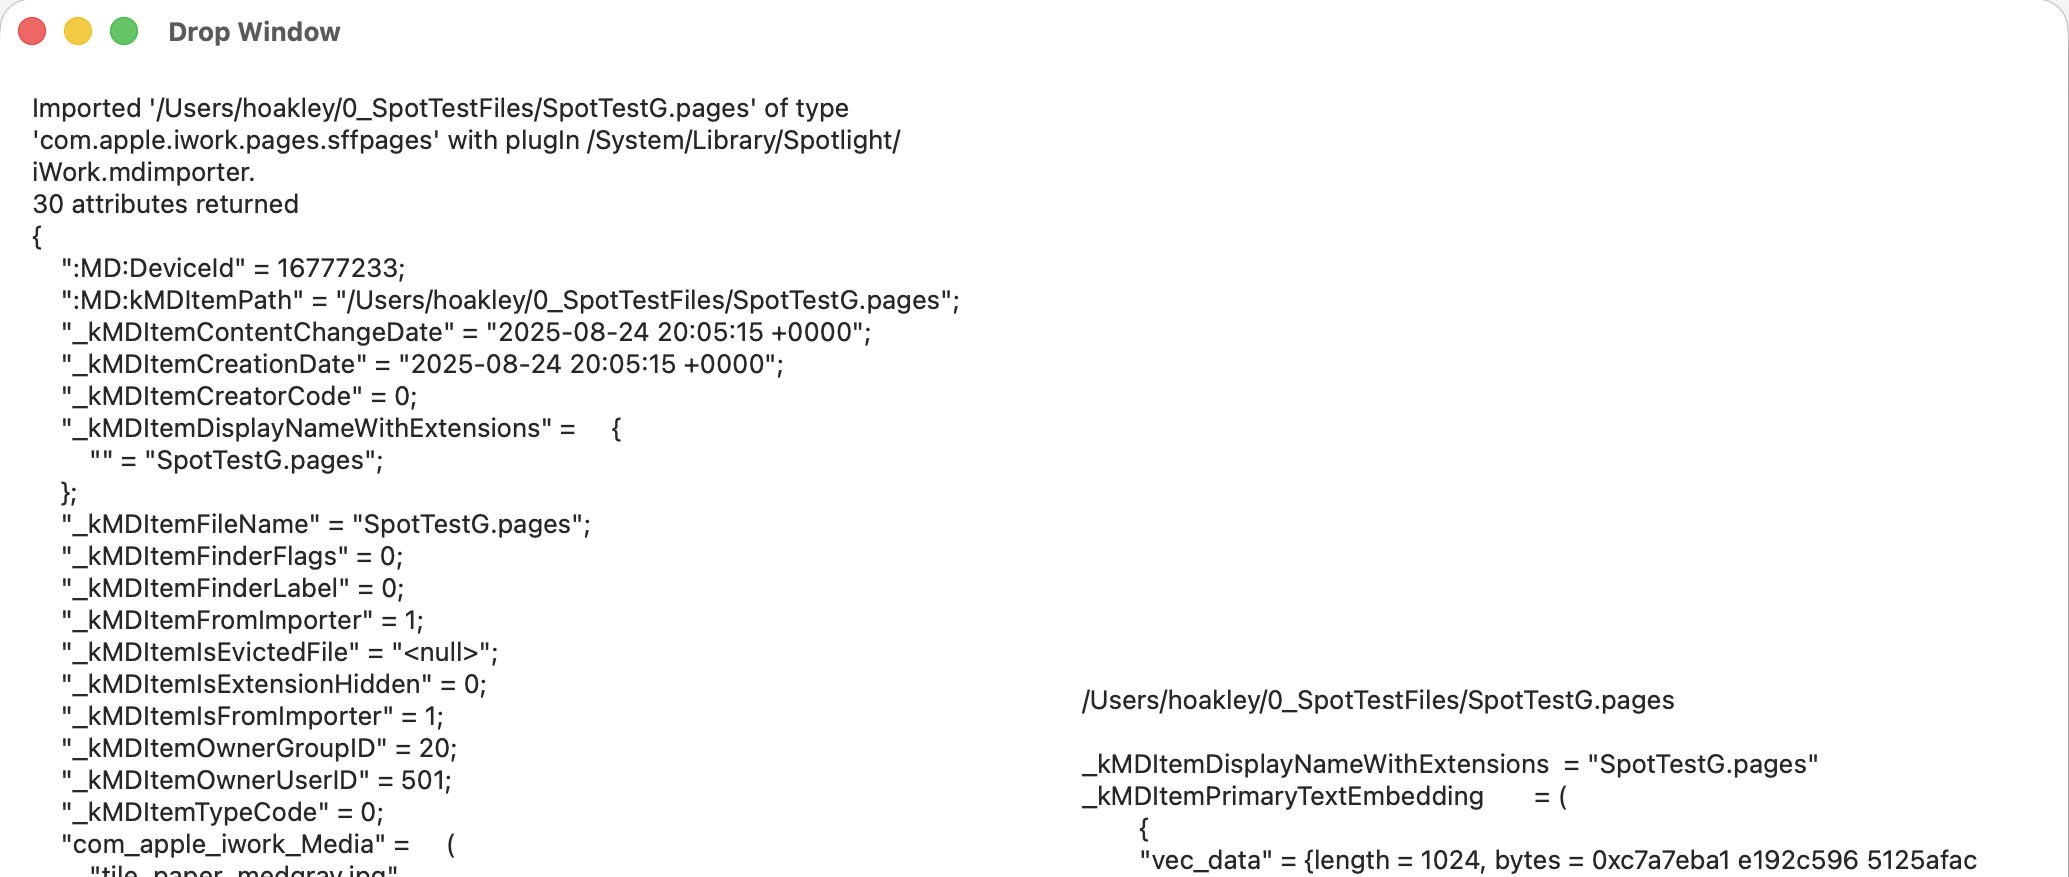
The app then runs two command tools on those files:
mdimport -t -d2 filename
to list all known metadata recognised by the mdimporter used, and
mdls filename
to list all indexed metadata.
That mdimport command currently crashes on most images, so won’t return any information about their metadata until Apple fixes the bug. If you want to save the output in this Drop Window, select the file(s) output in its display, copy and paste it into a text editor or similar. You don’t have to keep the app main window open, and could use the Drop Window alone as a convenient way to inspect metadata.
Now look through the list of indexed metadata returned by mdls and identify your test metadata there. Those attributes that have made it through to that stage will be indexed by Spotlight, and you can search for them using the keys given, depending on how you intend searching. For instance, kMDItemKeywords is normally searched for as Keywords.
Now select your test document in a Column view in the Finder, so you can see the metadata attributes it displays under the Preview shown. Open the Finder’s View menu and select the Show Preview Options command to display the metadata available for display in the Preview pane. Tick them all, and see which attributes are shown under the Preview. Also open the Get Info dialog on your test file, and check which metadata are listed there.
You have now selected your document editor, checked which of its metadata are shown by the Finder, and discovered which are indexed and searchable using Spotlight.
Examples
RTF
There’s a shortage of good Rich Text editors, and even fewer that support editing metadata. Among the latter are Nisus Writer Pro, sadly now moribund, and TextEdit. My own DelightEd doesn’t yet support in-document metadata, although I am looking at how I might incorporate that into a future version.
Metadata attributes shown in the Finder and indexed by Spotlight are particularly rich:
- Shown: Authors, Comment, Keywords, Organisations, Subject, Title
- Indexed: Authors, Comment, Copyright, Keywords, Subject, Title
Most of the better PDF editors have good support for in-document metadata. This is most extensive in Adobe’s ‘pro’ level Acrobat, but those with more accessible interfaces like PDF Expert are almost as good in this respect.
Metadata attributes in the Finder and Spotlight are not quite as rich as RTF:
- Shown: Authors, Description, Keywords, Title
- Indexed: Authors, Description (subject), Keywords, Title
Note that what is indexed and searched as Description is termed in PDF Properties Subject.
Microsoft Word docx
Although other apps can read and write docx format, these are taken from the current version of Word in Office 365.
Only one attribute is displayed in the Finder, Keywords, but Spotlight indexes most of the others as well.
- Shown: Keywords
- Indexed: Authors, Description (comment), Keywords, Organisations, Subject, Title
Again, what Spotlight recognises as Description is the Comment attribute in the document’s Properties.
Exif metadata
Still images, video and audio most commonly use Exif in-document metadata, which contains a vast range of information about settings and location of photographs, and much more. Exif is unusual here in that it’s most used for metadata written automatically when the file’s data are captured digitally, and less for information you add later. While the Finder shows rich information, the one common metadata attribute that you’re likely to use, Keywords, is only displayed in the Get Info dialog, and not in the Preview pane. Keywords are also indexed reliably, and readily searched using Spotlight.
Image editors like GraphicConverter and specialist metadata utilities often provide options for saving metadata using other methods, including Finder Comments and Finder Tags. Although these might appear more accessible in macOS, they have their own disadvantages. Finder Comments aren’t even stored as extended attributes, but in hidden files in the folder, and as such as inherently prone to loss.
Finder Tags are best-suited to classifying files into a relatively small number of categories, rather than storing keywords. macOS has only primitive support for managing Finder Tags, and none suitable for managing them as keywords, for which you are reliant on third-party support. However, Exif Keywords have all the benefits of in-document metadata with both Finder and Spotlight support, and integrate well with Keywords attributes used for other document types.
Beware of duplication
Finally, you need to integrate the metadata attributes you use across different document types. If you were to set in-document Keywords in any of these documents, and to add Keywords extended attributes to the same files, the Finder and Spotlight are forced to choose between them, as they can only display and index one set for each file. In most, perhaps all, cases in-document Keywords take priority over those set in an extended attribute. But you should check before running the risk of any conflicts.
Key points
Use in-document metadata when the document type supports it. Check:
- your chosen editor supports it safely,
- the attribute can be displayed, preferably in the Finder as well as any library manager,
- it’s indexed by Spotlight and can be used in searches.
Of all the metadata attributes available, Keywords are the widest supported.
