
APFS needs plenty of free space on any disk, and on your Mac’s startup disk this is essential. As plenty of folk have discovered, left to its own devices Macs can run themselves so short on their startup volumes they seize up altogether. Recently, I’ve been told of many Macs, including recent Apple silicon models, that have suffered this fate, and had to have their startup disk erased, and undergo a clean installation of macOS before being restored from a backup.
One common mistake that can make matters worse is to trust the information given in Storage settings, in System Settings > About > Storage Settings…. When free space is unexpectedly low it’s common to see loads of space accounted for there as System Data. That can include all sorts of things such as snapshots, including those made during Time Machine backups, caches and temporary files, and detritus that should have been cleaned up but has been forgotten.
Snapshots
These are made routinely by Time Machine and some other backup utilities, and can readily exceed 50 GB. The older they are, the larger they get, so the app that makes them is supposed to delete them fairly soon, in the case of Time Machine after 24 hours. Occasionally, they get orphaned and are left for longer, so need to be deleted manually.
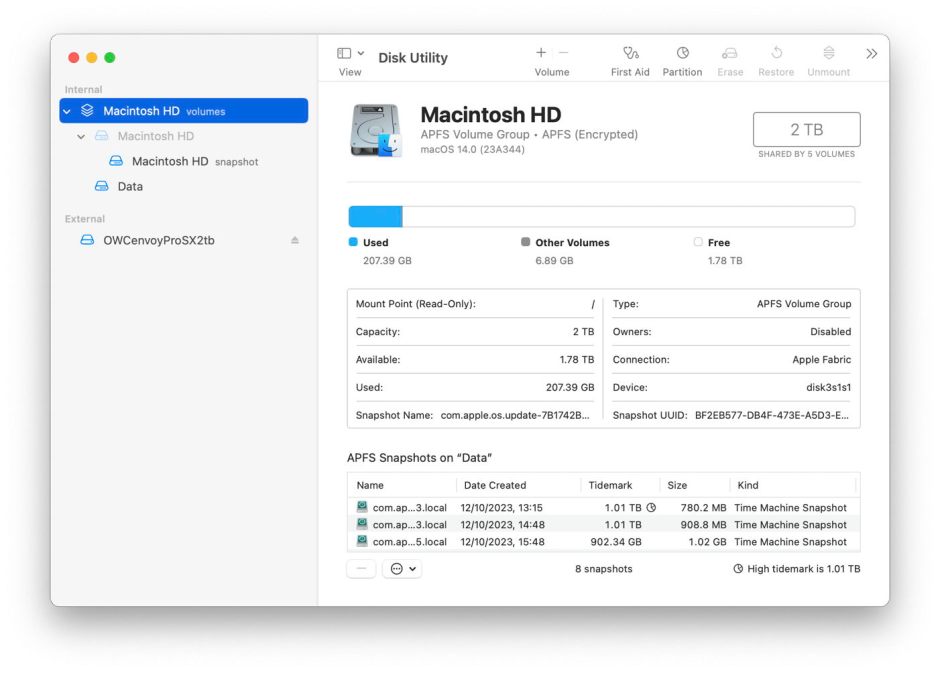
You can do this in Disk Utility. Open its View menu and first enable Show All Devices, then Show APFS Snapshots. Select the Data or Macintosh HD – Data volume in the left of the window, and you’ll see a list of all APFS snapshots for that volume, together with an indication of the size of each. You can safely remove all snapshots from that volume except the most recent, which is also the smallest. That latest snapshot is needed when that volume is next backed up by Time Machine. If you remove that too, then the next backup could be a full backup of everything on that Data volume, something best avoided if possible.
To delete a snapshot in Disk Utility’s list, select it and use the Delete… command from the contextual menu (Control-click). Be careful, though, as there’s no undo. Deletion can take a few seconds, as Space Manager (spaceman) in APFS takes time to scavenge the snapshot to remove all its associated data. Even then it may not free up as much as expected, as estimating size is only a guide.
Disk Utility is also the only place you should believe when it comes to figures for the space used and that free on your volumes, containers and disks, as the Finder can fall behind updating its figures.
iCloud Drive
Another potentially major contributor to used space in your Data volume is that required for files stored in iCloud Drive. If your Mac has Optimise Mac Storage enabled, then both macOS and you control which files are stored in full on your Mac, and which are ‘evicted’ to iCloud. Check that in System Settings > [Apple Account] > iCloud > Drive.
If Optimise is turned off, then all the files you have stored in iCloud Drive also take space on your Mac’s Data volume. You should then be able to reclaim space by turning it on, and allowing your Mac to keep many of them only in iCloud, a process known as eviction. Occasionally, usually after upgrading macOS, iCloud can go wild and download everything, and that could rob your Data volume of a great deal of space. That is often worst if you store Desktop & Documents folders in iCloud, so it’s worth checking your settings and whether folders and files are being evicted as needed. Although it won’t make a big difference, with Optimise turned on, you can manually evict folders and files to free up local storage. You should also ensure that you don’t have too many folders ‘pinned’ so they can’t be evicted.
Volume contents
When you have worked through those, it’s time to look at where the worst offenders are, to see what you could move or remove from your Data volume. Although you can do this in the Finder, it’s far simpler to use a specialist utility like DaisyDisk or GrandPerspective from the App Store.

Time Machine backup stores
Running out of free space on volumes that store your Mac’s Time Machine backups is also not uncommon. Although Time Machine tries to delete old backups to make efficient use of storage, there’s a limit to what it can do. You then have a choice of manually deleting some of your old backups, which risks losing copies of old documents, or starting a new backup series on a fresh, empty disk. Backups made to APFS don’t offer any practical alternative, and attempting more conservative surgery on backups is almost certainly doomed to fail.
Recovery mode
Very occasionally, starting up in Safe mode can solve the problem, but if you’re still not able to release sufficient free space, you can try more radical measures in Recovery mode. Before doing so, ensure that you have a complete, recent backup in case you need to restore that to a new Data volume.
Disk Utility in Recovery is the right place to run First Aid on your Data volume, and ensure its file system is healthy. If you want to attempt surgery that didn’t work when started up in normal mode, this is the best place. However, before you can do that, you may need to mount the Data volume. Go carefully here, as making serious changes to that volume can cause problems when your Mac next tries to boot from it.
In the rare cases where the only way to restore normal function is to remove the system volumes, reinstall macOS and restore from a backup, you should do so in Recovery, and may need to mount the Data volume to attempt those.
Prevention
If this has happened to you once, ensure that it won’t happen again. One good way to do that is to keep an eye on free space on your startup volume by enabling Show Status Bar in the Finder’s View menu. To get an estimate of how much free space remains, just glance down at the foot of any Finder window. Although that figure is only an estimate and not as accurate or up-to-date as that shown in Disk Utility, it should prompt you to check further when necessary.
Keep an absolute minimum of 50 GB free on your startup volume, and preferably well over 100 GB. This ensures there’s sufficient space for macOS updates and its little emergencies, and helps reduce ‘wear’ on the SSD.
Summary
- Don’t trust Storage settings or what it shows for System Data. Accurate figures are shown in Disk Utility.
- Check snapshots in Disk Utility, and delete the oldest, leaving the latest snapshot for Time Machine to use for its next backup, if possible.
- Check iCloud Drive settings and set them to Optimise Mac Storage if possible, so macOS and you can evict files from local storage. Beware of Desktop & Documents Folders if you can.
- Use DaisyDisk or GrandPerspective to identify large files you can do without.
- When backup storage gets full, replace it with a fresh empty disk, or you’ll need to manually delete backups.
- Run Disk Utility’s First Aid in Recovery. If nothing can help you recover more space, remove the system volumes, reinstall macOS and restore from your backup.
- Keep an eye on free space using the Finder’s status bar. Aim for an absolute minimum of 50 GB, ideally well over 100 GB.
