
Many of you still seem puzzled as to how XProtect installs and updates in macOS Sequoia. This article tries to make this clear, so you can keep XProtect up to date.
Sonoma and earlier
Until this changed in Sequoia, XProtect has been straightforward: its data is stored in a bundle named XProtect.bundle, in the path /Library/Apple/System/Library/CoreServices, which is on the Data volume so it can readily be updated. When you or macOS downloads an XProtect update, it simply replaces that bundle with the new one. This is shown in the diagram below.

Sequoia
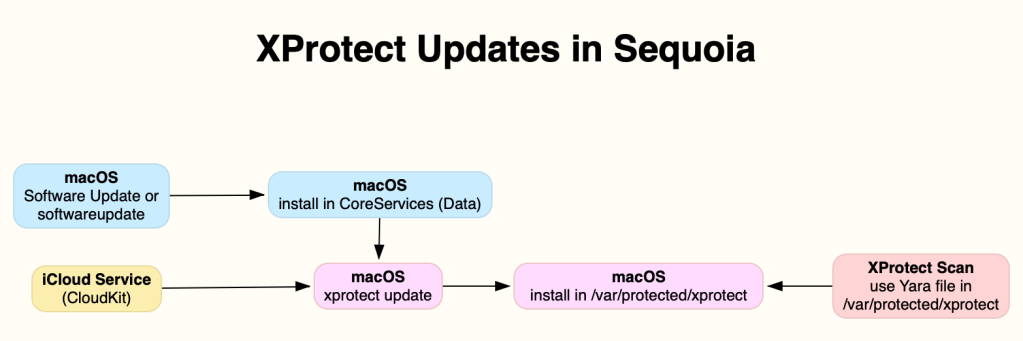
XProtect in macOS 15 prefers not to use the XProtect.bundle in its old location of /Library/Apple/System/Library/CoreServices (although it can do if there’s no alternative). Instead, it looks for XProtect.bundle in its new location, /var/protected/xprotect.
However, when you or your Mac use the old update system, including Software Update, softwareupdate or SilentKnight, that still installs the update in the old location, where it won’t normally be used by XProtect when making its checks. What’s supposed to happen is that at least once a day, macOS checks whether there’s a newer update in the old location. If there is, then it should automatically prepare and move that to the new location in /var/protected/xprotect for XProtect to use.
If you want that to happen immediately, then you can run the following command in Terminal:
sudo xprotect update
then enter your admin user’s password. The xprotect command tool will then complete the installation of that update from its old location in /Library/Apple/System/Library/CoreServices into its new location in /var/protected/xprotect.
There’s also a second way that XProtect in Sequoia can be updated, and that’s over a connection to iCloud. If that’s used, then the update is installed straight into its new location, and doesn’t change the XProtect bundle in the old location at all. Although Apple has used that earlier, all XProtect updates since the release of Sequoia have come using the old Software Update system, so have needed to be completed using the xprotect command in Terminal.
This is shown in the diagram below. The blue boxes show the old Software Update system, and the pink boxes are the new parts that ensure the update is installed in the new location.

SilentKnight
SilentKnight still works using softwareupdate, and can’t use the new xprotect command for updates yet, because that requires structural changes in the app that will be available in version 3. However, in Sequoia it reports the version of XProtect installed in the new location, as that’s the one that XProtect now uses.
When SilentKnight discovers a new version of XProtect via softwareupdate, it therefore installs that in the old location, in the path /Library/Apple/System/Library/CoreServices. It has no choice but to do that. Once that’s been installed to the old location, the version shown for XProtect won’t change, as that requires macOS to complete the second stage of the installation. You can then either:
- leave macOS to complete the installation itself, which should happen over the next day or so, or
- run
sudo xprotect updatein Terminal, which will complete that update immediately. SilentKnight will then show the updated version number correctly.
Key points
In Sequoia, when XProtect is updated by Software Update, softwareupdate or SilentKnight, you should either leave macOS to complete that installation, or run sudo xprotect update in Terminal if you want it to be updated immediately.
This only applies to macOS Sequoia: Sonoma and earlier still work as they always have done.
