
macOS Sonoma no longer supports the viewing or conversion of PostScript or EPS files, although it does still output PostScript to printers that support it. If you want to view or convert either file type, there are three main local options:
- Use an app with its own PostScript rendering engine, such as Adobe Acrobat and other paid-for products; although expensive, Adobe’s Distiller engine is the best available, but Acrobat Reader won’t convert PostScript or EPS files for free.
- Install open source Ghostscript, using either MacPorts or Brew; although this is free, unless you already use either of those, there’s quite a lot of work involved, and they’re centred on the command line. As Ghostscript has had several serious security vulnerabilities, you’ll also need to keep it up to date.
- Use the Preview app in a version of macOS older than Ventura, where conversion was removed from the app. If you’ve got an Apple silicon Mac, this is performed entirely in the GUI, comes at no cost, and is simple to set up.
This article walks you through the third option, of setting up a virtual machine (VM) running macOS Monterey 12.6.1 on an Apple silicon Mac running Sonoma.
Requirements
Any virtualisation app designed to run macOS on Apple silicon hosts: UTM is great, Parallels fine if you’re happy to pay, and my own free Viable does the job perfectly well. If you use Viable, once you have set your VM up, you can run it from a double-click using its free sibling Vimy.
You also need an IPSW restore image for the version of macOS to run in the VM. I chose the latest version of Monterey available from the listing by Mr. Macintosh. Although other sites contain some lists, his is comprehensive and includes beta-releases too.
Here I’m going to build a small VM of 30 GB, for which you’ll initially need around 60 GB free space including that for the IPSW file. However, as the VM is stored as a sparse file, it will actually require less than 18 GB when it’s done. If you can, store the VM and any IPSW files on a separate volume excluded from Time Machine backups and snapshots, or they’ll consume unnecessary space in snapshots and backups.
Installation
The only relevant control in Viable’s main window to begin with is the size of the Virtual Disk, which you should set at a minimum of 30 GB before clicking on Viable’s Install… button to start the process. Set the IPSW file to use, and the name and location of the VM to be created. Viable then announces that it’s Starting installation and shows the busy spinner for a few minutes as it builds the VM bundle.
Although little might seem to be going on, your Mac is copying many GB of data from the IPSW into its VM bundle. This is best done on a fast SSD, and to ensure maximum performance, Viable moves the IPSW inside the VM bundle.

Once this completes successfully, the busy spinner vanishes and Viable reports that Installation succeeded. You can then move the IPSW file back from inside the VM bundle if you wish: click on the Move IPSW… button, select your fresh VM, and a destination for the IPSW file.
File sharing
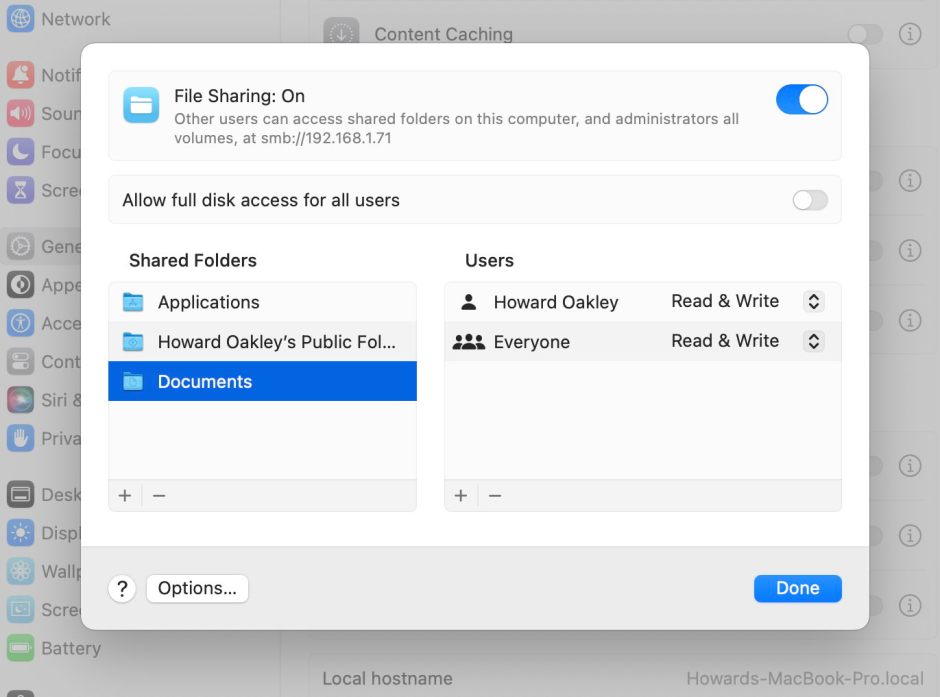
Ventura and later VMs can support shared folders that make it easy to access files on the host from within the VM, but that isn’t available for Monterey, which can only share files via the network. To enable that, open System Settings on the host, open General, then Sharing, and turn File Sharing on, to share appropriate folders such as ~/Documents.
First run
Before running the VM, configure its other settings. Most important here are:
- override and overwrite Saved settings so that these settings are saved to the VM;
- 3-4 cores;
- 6-16 GB memory;
- a reasonable display size such as 1600 x 1000, at 254 ppi with HiDPI turned on;
- network set to Ethernet or its equivalent to enable bridged networking, with the MAC address left at the default.
Then click Start VM… to open the new VM and go through its personalisation and initial setup. Of those screens, two require special settings:
- Migration Assistant – click on Not Now,
- Apple ID – this isn’t available in VMs, so click on Set Up Later and confirm.
Create your user account in the normal way and the VM will then log you into that.
Preview conversion of PS and EPS
To gain access to your PostScript and EPS files on the host, connect to the host’s share through Network in the Finder, and log in using the host’s username and password.
Open the Preview app in the VM, and use its Open command to open the first of the files you want to convert. Preview should then convert that file as it opens it, then displays the converted file. To export that as a PDF use Preview’s Export command in its File menu, and select the options you want. You can save it direct to the shared folder so that it’s back on the host.

Once you’ve completed all the conversions that you want, eject the network share and shut the VM down using its Shut Down… command, which automatically closes its window.
Alternatives
Instead of using network shares, you can drag and drop files between host and VM using screen sharing, as explained here.
If the files to be converted aren’t yours, and could be malicious, then you can run the VM in a sandbox using ViableS, save them locally within the VM, and verify that they’re not malicious before copying them to the host.
Once you have set your VM up to do this, instead of running it in Viable, you can set the Finder to open .vimi bundles using Vimy, and that will then run the VM from a double-click without having to set it up first.
