
Unlike the raw Hypervisor API, the macOS Virtualization framework provides full and explicit support for the creation of Virtual Machines (VM) on disk, including a prescribed structure and their complete installation and configuration. These are also well illustrated in Apple’s sample code.
For Apple silicon Macs to run a guest macOS, a standard macOS Installer app is insufficient, as it doesn’t contain most of the ‘firmware’ components required for a complete VM. Fortunately, those already come in IPSW images used to perform a full restore when an Apple silicon Mac is in DFU mode. Virtualization therefore provides calls to download the latest release IPSW from Apple, and to install that into the VM on disk. You can also provide your own IPSW image for an earlier version, or a beta-release, but those can’t be any earlier than macOS 12 Monterey for them to install successfully. Apple’s sample code also moves the installation IPSW into its VM bundle for safe-keeping, but that isn’t required, and isn’t performed by some third-party implementations.
VM layout
The standard bundle containing the VM on disk consists of:
- AuxiliaryStorage, a little under 34 MB,
- Disk.img, the main VM block storage, amounting to the designated disk size,
- HardwareModel, a mere 150 bytes,
- MachineIdentifier, about 60 bytes,
- optional copy of RestoreImage.ipsw, the IPSW image installed in the VM, typically around 14 GB.
Installation normally starts by creating those components in their bundle. The next step is to obtain a hardware model and configuration supported by the IPSW to be installed. These are normally set to the hardware with the most features. That hardware model is then stored in the HardwareModel of the VM bundle.
From that hardware model, a new platform configuration is set up, specifying the CPU core count, memory, boot loader, and virtio and other devices to be used by that VM. That configuration is validated, and a unique machine identifier is saved in the MachineIdentifier file. The other essential file, AuxiliaryStorage, stores data for the VM boot loader and the guest macOS.
With the VM bundle now ready, the IPSW is installed into it, to configure the containers and volumes within Disk.img and write the boot loader data into AuxiliaryStorage. At the end of that process, the VM is in a comparable state to a ‘factory fresh’ Apple silicon Mac, and ready for personalisation when that VM is first run.
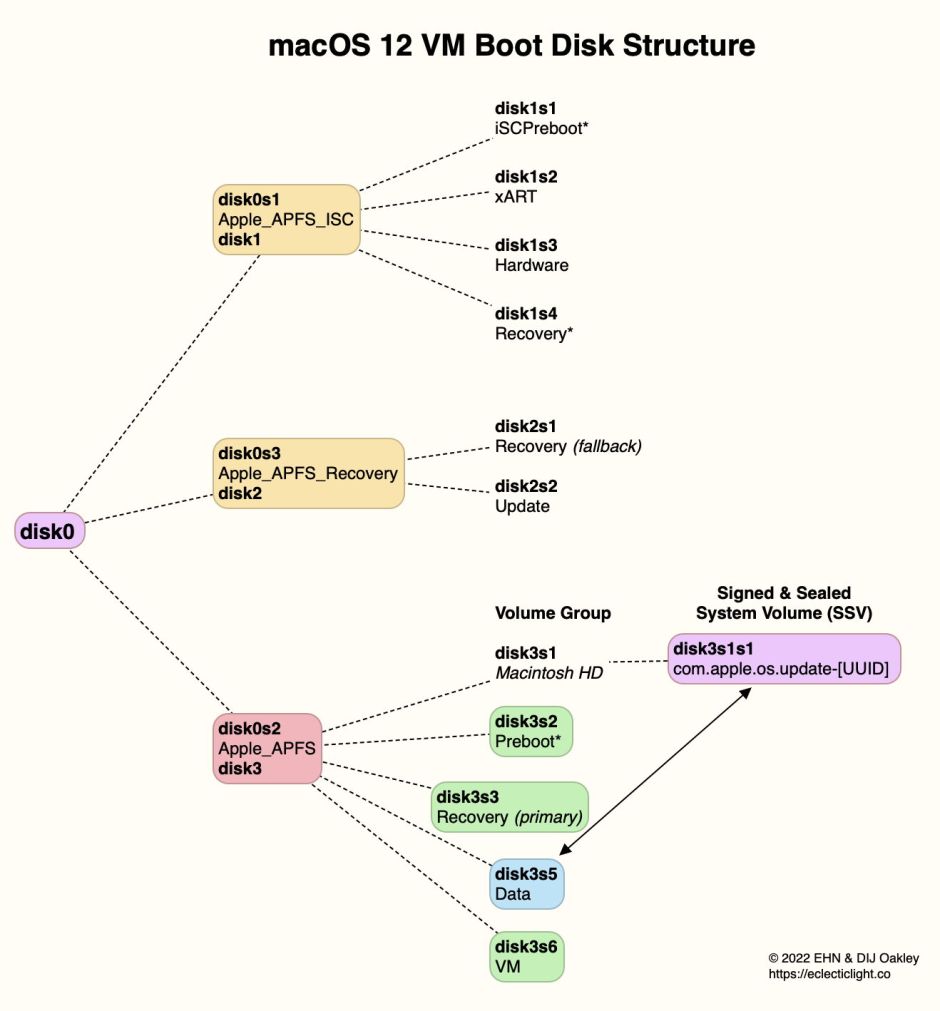
Within the guest macOS its boot disk is seen as having exactly the same layout and structure as the internal SSD of an Apple silicon Mac, with its three containers, and each of the volumes normally found in the boot volume group. These should appear as shown in this diagram:
Starting the VM
To run the VM, a new VM is created and configured, then run with any options chosen. Configuration overlaps that set during installation: some settings, such as the memory and some virtio devices, can be changed or added at this stage, but others like the number of CPU cores appear to be baked into the platform configuration created during installation.
The most significant startup option currently documented is whether to boot the VM into Recovery, something currently documented as only being available in Ventura and later, although some virtualisers appear able to offer that even when running in Monterey.
The VM is conventionally started up in a special VirtualMachineView within a normal window.
Log and boot sequence
The virtual machine maintains its own Universal log, quite separate from the host log. Viewed there, the boot process is remarkably similar to that of the host, although of course it lacks the extensive hardware initialisations of the Apple Neural Engine and all the specialist cores and systems in the Fabric and elsewhere in the SoC.
The start of boot is marked with the normal declaration:
0.000000 === system boot: 1442CD37-B7EC-4D81-B5EA-7F736C302602
following which
0.577966 kernel kprintf initialized
The kernel version declared differs in that its release marks it out as a VM:
0.578038 Darwin Kernel Version 21.5.0: Tue Apr 26 21:06:57 PDT 2022; root:xnu-8020.121.3~4/RELEASE_ARM64_VMAPPLE
The VM is also recognised in the initialisation of Apple Credential Manager:
0.640216 AppleCredentialManager: init: called, Apple Virtual Platform, instance = <private>.
A little later comes the first step in setting up virtio devices:
0.651786 AppleParavirtIOSurface IOSurfaceParavirtMapperService started
which apparently recognises that this is, strictly speaking, para-virtualisation.
Shortly after that comes the allocation of CPU cores. In this example, my virtualiser asked for four cores, and was then successfully allocated them. In the log, these are recorded as being started and brought online the same as they were when the host system booted, with the entries
0.651790 kernel ml_processor_register>cpu_id 0x0 cluster_id 0 cpu_number 0 is type 0

0.651800 kernel cpu_start() cpu: 0

0.651849 kernel ml_processor_register>cpu_id 0x1 cluster_id 0 cpu_number 1 is type 0

0.651854 kernel cpu_start() cpu: 1

0.651869 kernel ml_processor_register>cpu_id 0x2 cluster_id 0 cpu_number 2 is type 0

0.651875 kernel cpu_start() cpu: 2

0.651894 kernel ml_processor_register>cpu_id 0x3 cluster_id 0 cpu_number 3 is type 0

0.651904 kernel cpu_start() cpu: 3

0.652065 kernel [    0.651939]: arm_cpu_init(): cpu 1 online

0.652065 kernel [    0.651962]: arm_cpu_init(): cpu 2 online

0.652065 kernel [    0.651963]: arm_cpu_init(): cpu 3 online
One interesting nuance here is that the cores are assigned to cluster 0, although they are P cores in the host’s cluster 1, and there numbered differently too. Software which tries to use information about cores or their clusters isn’t going to be happy when it’s virtualised. If you were in any doubt as to whether this para-virtualisation dedicates cores to the guest operating system, this is good evidence that it does.
Then comes the first of a succession of entries concerning the configuration of virtio devices:
0.652350 IOUSBDeviceFamily 000000.652348 AppleVirtIOUSBDeviceController@(null): IOUSBDeviceController::createUSBDevice: configuration: No Description Provided

0.652352 IOUSBDeviceFamily 000000.652351 AppleVirtIOUSBDeviceController@(null): IOUSBDeviceController::createUSBDevice:    interface: AppleUSBNCMControl

0.652357 IOUSBDeviceFamily 000000.652356 AppleVirtIOUSBDeviceController@(null): IOUSBDeviceController::createUSBDevice:    interface: AppleUSBNCMData

0.652360 IOUSBDeviceFamily 000000.652359 AppleVirtIOUSBDeviceController@(null): IOUSBDeviceController::createUSBDevice:    interface: AppleUSBNCMControlAux

0.652363 IOUSBDeviceFamily 000000.652362 AppleVirtIOUSBDeviceController@(null): IOUSBDeviceController::createUSBDevice:    interface: AppleUSBNCMDataAux

0.652397 IOUSBDeviceFamily IOUSBDeviceConfigurator: controller->createUSBDevice()=0x00000000
The log on the host is the complement of this: prior to the start of the guest’s log entries, those on the host are copious, and detail the preparations made there to set up the VM and its virtio devices, ready for its boot process. Once that starts in earnest, entries in the host’s log reduce greatly again.
Previous articles:
Virtualisation on Apple silicon Macs: 1 How well does it work?
Virtualisation on Apple silicon Macs: 2 How does it work?
also see Why are Disk Images so slow at writing?
