
Apple silicon Macs have changed much of Recovery mode, and have done away with the many key combinations used by Intel Macs to start up in different modes. This reference guide explains how to navigate features in Recovery, and solve problems on M1 and M2 Macs running macOS up to and including Ventura.
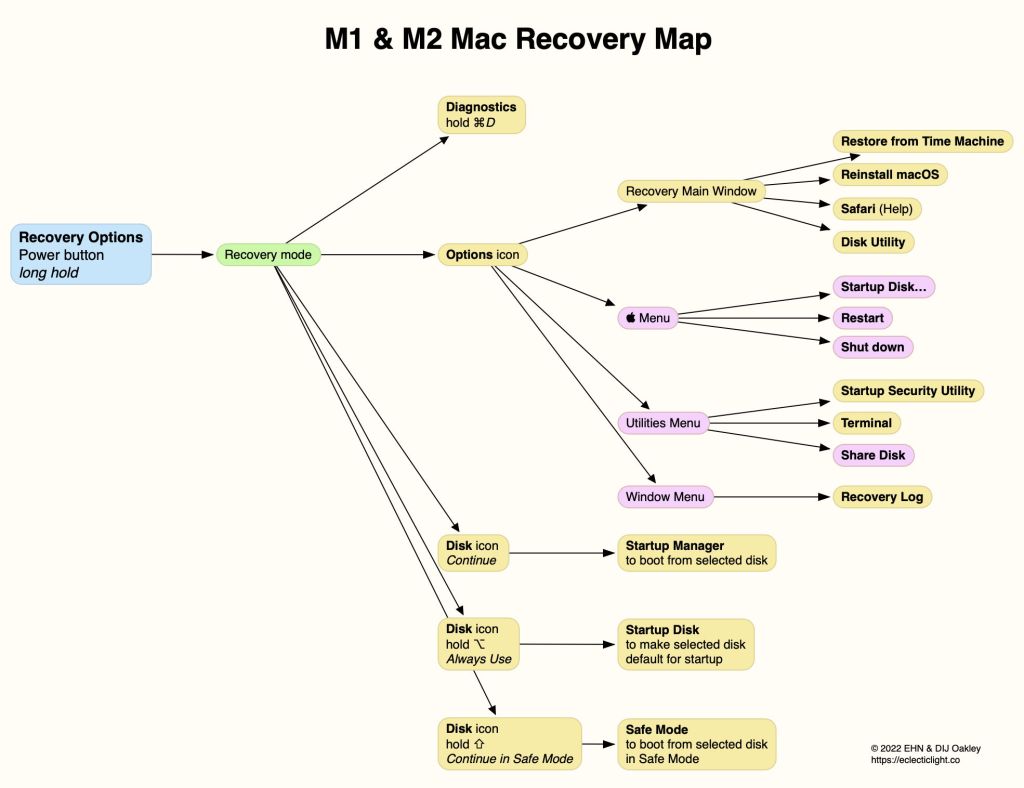
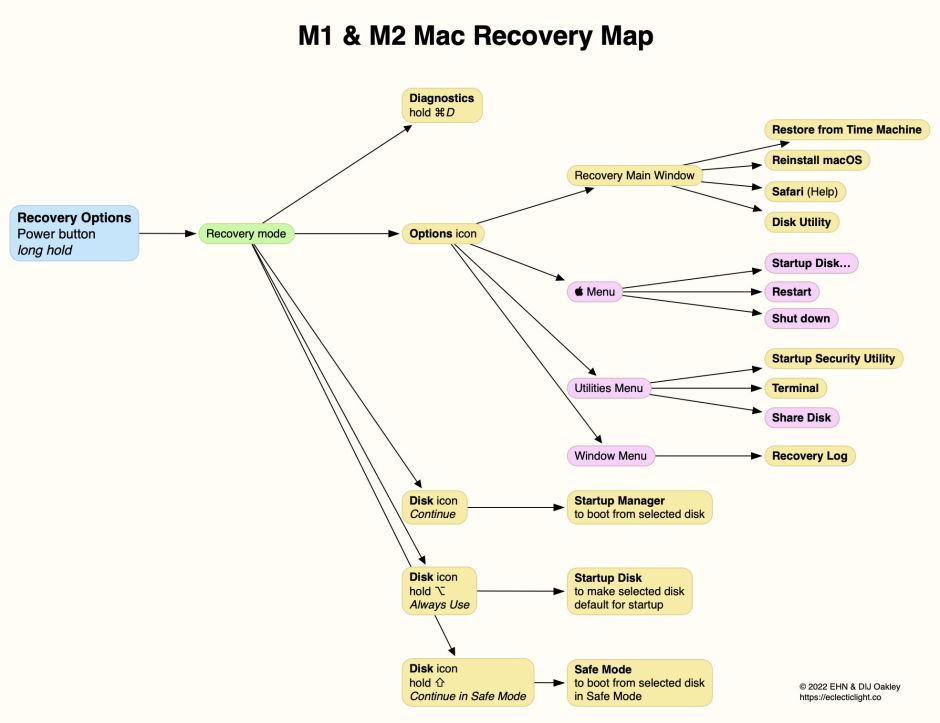
Here’s a map:
Here’s a downloadable PDF: m1macrecovery3
Recovery mode, to check startup disk, reinstall macOS, restore from a backup, change security settings
Press and hold the Power button until the display shows Loading Startup Options, then release it. This takes you to the Startup Options screen. Select the Options icon, then click Continue underneath it. You’ll then be prompted to select a user you know the password for. Do that and click on Next. Enter the password for that user and click Continue.
Tools provided include:
- main window – Restore from Time Machine, Reinstall macOS, Safari, Disk Utility
- Apple menu – Startup Disk…, Restart, Shut Down
- Utilities menu – Startup Security Utility, Terminal, Share Disk…
- Window menu – Recovery Log
- Online help is available when you open Safari.
Fallback Recovery mode, identical to regular Recovery Mode except that Startup Security Utility isn’t available
Press the Power button twice in rapid succession, and on the second of those presses hold the button until the display shows Loading Startup Options, then release it. You will then see the same as you would in Recovery mode, except that Startup Security Utility is non-functional. This is invaluable if regular Recovery Mode is unavailable for any reason, but only becomes available after a Mac has had a macOS update, as it’s created from Recovery from the previously installed macOS.
Diagnostics Mode, to check your hardware
Press and hold the Power button until the display shows Loading Startup Options, then release it. Once the Startup Options screen appears, press and hold the Command and D keys until your Mac restarts and the Diagnostics Loader menu appears in the main menu bar. Follow the instructions from there to perform diagnostic testing.
Safe Mode, to disable third-party extensions, flush caches, etc., for troubleshooting and solving update/install problems
Press and hold the Power button until the display shows Loading Startup Options, then release it. This takes you to the Startup Options screen. Select the disk which you wish to boot from in Safe Mode, then press and hold the Shift key and click Continue in Safe Mode underneath it.
Set default startup volume, use this when you want to start up in a different copy of macOS, or before starting up in its Recovery mode
Press and hold the Power button until the display shows Loading Startup Options, then release it. This takes you to the Startup Options screen. Select the disk which you wish to make the default boot disk, press and hold the Option key and click Always Use underneath it.
Startup Manager, to select which volume from which to boot, but may not change the Recovery system properly
Press and hold the Power button until the display shows Loading Startup Options, then release it. This takes you to the Startup Options screen. Wait until all bootable disks have loaded into the list. Select the disk you want to boot from, then click Continue underneath it.
Note: this appears to do the same thing as setting the default startup volume. However, Apple recommends using that procedure, rather than Startup Manager, if you want to start up in a paired Recovery volume to run Startup Security Utility.
Disk Utility, to run First Aid, add or remove volumes or containers, and more
Press and hold the Power button until the display shows Loading Startup Options, then release it. This takes you to the Startup Options screen. Select the Options icon, then click Continue underneath it. You’ll then be prompted to select a user you know the password for. Do that and click on Next. Enter the password for that user and click Continue. Click on the Disk Utility item.
This is the preferred way to run First Aid on the active boot volume group, and on Time Machine backup volumes (APFS). Disk Utility will check all snapshots it finds. To avoid those being checked, fsck_apfs is also available in Terminal.
Reinstall macOS, to reinstall the current or latest macOS
Press and hold the Power button until the display shows Loading Startup Options, then release it. This takes you to the Startup Options screen. Select the Options icon, then click Continue underneath it. You’ll then be prompted to select a user you know the password for. Do that and click on Next. Enter the password for that user and click Continue. Click on the Reinstall macOS item.
This should install the current version of macOS for that paired Recovery system. If you’ve entered Recovery when previously running Ventura beta, for example, it should install the current Ventura beta. If you’ve been running Monterey 12.4, then that should be offered, even though you may have a different macOS installed elsewhere. Check the version to be installed is correct: there’s no way to change that or opt for an older version.
Startup Security Utility, to change security policy for the startup disk, allow loading of third-party kernel extensions
Press and hold the Power button until the display shows Loading Startup Options, then release it. This takes you to the Startup Options screen. Select the Options icon, then click Continue underneath it. You’ll then be prompted to select a user you know the password for. Do that and click on Next. Enter the password for that user and click Continue. In the Utilities menu select the Startup Security Utility command.
This is used to change the security policy for the System volume paired with the current Recovery system. It’s non-functional in Fallback Recovery mode, and can only change policy for the paired System volume. Before the utility itself opens, you may have to choose a startup disk to apply policy changes to, in an Operating System Picker. Apple gives full details here.
Target Disk mode, to connect to another Mac
Connect Macs using a USB, USB-C or Thunderbolt cable. On the Target, enter Recovery Mode and use the Share Disk command in the Utilities Menu. You should then be able to connect to that share from the other Mac.
DFU mode, to recover from firmware or other system/update problems
Shut down, connect Macs, and follow the detailed instructions provided here by Apple.
Verbose mode, to see details of startup process
A Recovery Log is available from the Window menu in Recovery mode. Normal Unified log records of the boot process start with the initialisation of kprintf by the kernel. There is no readily accessible equivalent of Verbose mode.
Reset SMC/NVRAM
Not available. NVRAM contents are listed in System Information under Software > Logs > NVRAM contents, and can still be edited using the nvram command in Terminal. M1 Macs lack a discrete SMC which could be reset in the way that they were previously, and the only solution to severe NVRAM problems may be a complete system reinstall.
Single-User Mode, to run command tools
Not readily available. Use Terminal in regular Recovery mode.
Paired Recovery volume, introduced in Monterey
In Big Sur, Recovery mode always runs from the copy of RecoveryOS in a hidden container on the internal SSD, even when that Mac is booted from an external disk. To use Startup Security Utility for any boot volume group or disk, you start up in that single Recovery mode (but not Fallback Recovery, which lacks this ability).
Monterey changed that. When you install Monterey on any disk, a Recovery volume is installed alongside its System and Data volumes, and known as that boot volume group’s paired Recovery. To make changes in Startup Security Utility affecting that boot volume group, you must start up in that paired Recovery. The only way to select that is to set the default boot disk to that volume group, start up in that version of macOS, shut down, then start up in Recovery mode.
External boot disks
By default, Intel Macs with T2 chips can’t boot from external disks, and you have to enter Startup Security Utility on them to enable that. Apple silicon Macs don’t have that restriction: they can always boot from a suitably configured external disk, and that isn’t controlled by Startup Security Utility. Instead, boot disks have LocalPolicy to determine their security policy, and an owner. Those are normally set when installing macOS on them, or when setting them to be the boot disk in the Startup Disk pane, or in Recovery. If you’re having problems booting from an external disk, Startup Security Utility will be of little or no help, as it can’t enable or disable them in the way that it does on T2 models.
