
It’s that time of year when many of us are planning our upgrades, either to Big Sur or Monterey. One vital consideration is how to migrate our backups: this article looks at what you need to do for existing Time Machine backups, whether stored locally on an external disk, or on your network.
Time Machine already backing up to APFS
The simplest migration is when you’re upgrading from Big Sur to Monterey, and are already backing up to APFS. Although it awaits confirmation in the final release of macOS 12, all the indications from beta-releases are that you won’t need to do anything: Time Machine should continue to back up happily to your existing backup storage, creating further snapshots which you can access as normal. As Time Machine backups no longer contain any of the System volume, the first backup after upgrading from Big Sur needn’t be much larger than normal either.
Time Machine still backing up to HFS+
If you’re upgrading from Catalina or earlier, or are running Big Sur but still backing up to HFS+, it’s not yet clear whether Monterey will still be able to make backups to HFS+. I suspect that it will, but strongly recommend that anyone backing up to HFS+ and upgrading to Big Sur or Monterey should switch to Time Machine making backups to APFS.
There are many advantages with Time Machine backing up to APFS. The new structure of the backup volume is far more reliable, and doesn’t need routine maintenance in the way that HFS+ does. APFS backups are stored in individual snapshots, each with their own file system, whereas HFS+ backups are all pooled together in a single file system which is inherently prone to error, a tendency which only grows the more backups are made to that volume. APFS backups are faster, and because they can copy changed blocks rather than having to copy whole files, they are more economical in terms of space too.
The problem when upgrading is that Time Machine can’t convert your old HFS+ backups to new-style APFS backups, as that would involve not just changing file system but completely rewriting every backup in the store. So the only way to switch to APFS, whether you do it now or in the future, is to archive your existing HFS+ backups and start a new backup series on an APFS volume.
Although APFS has significant performance penalties when used for Data volumes and general-purpose storage on hard disks, it doesn’t work at all badly for backups to APFS. This is because the read-only snapshots used don’t result in much fragmentation, which is the underlying problem with more general use of APFS on rotating hard disks. However, APFS does still perform better on SSDs, where possible.
Performance problems
Time Machine backing up to APFS generally performs extremely well, and far better than to HFS+ (particularly in Catalina). One reason for this is that the system exclusions list now includes the hidden version database at the root of each volume, which can contain a great many small files which choke the backup process in Catalina.
However, Time Machine still doesn’t perform well when trying to back up folders containing huge numbers of small files, which can be created by some housekeeping utilities, and are found in Xcode. If you use either, it’s well worthwhile adding them to your exclusion list. Although when backing up to APFS, Time Machine is better at coping with Virtual Machines, its hourly backups still aren’t a good way of backing up VMs, and they too should be excluded and backed up using a different system such as Carbon Copy Cloner, SuperDuper! or ChronoSync.
When it’s backing up, Time Machine writes periodic progress reports to the log, and T2M2 now includes a button to Check Speed which displays those, and allows you to identify items which are causing it to choke, so you can add those to your exclusion list.
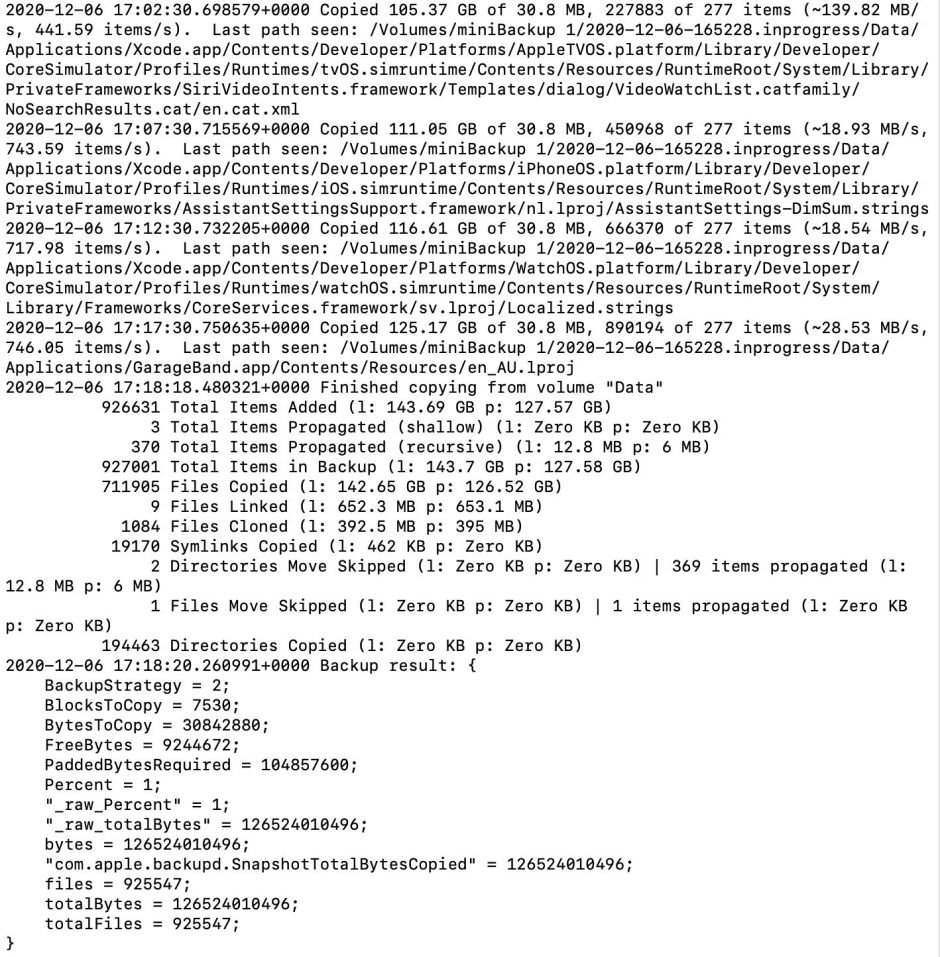
In this case, the first 70% or so of the backup progressed very quickly, at nearly 140 MB/s and over 440 items/s. Speed fell noticeably towards the end when Time Machine was copying large numbers of files from Xcode, when it fell to just over 18 MB/s. Check that the totalBytes transferred matches the size of the backup data on the disk, and the size expected from other entries in the reports provided.
As far as I can see, Apple’s engineers have turned their attention to improving backup performance in Monterey. Public betas run a short copying performance test at the start of automatic backups, and appear to use that to better predict the time required to perform each backup. It will be interesting to see how Time Machine evolves in the coming months.
AFP or SMB?
If you’re backing up over a network, you may have been using Apple’s old network file protocol AFP. Although you may still be able to use this in Big Sur or even Monterey, it has been deprecated for years now, and Apple recommends that you should switch to SMB if at all possible. Many users have reported poor performance with SMB in Big Sur, but I don’t know whether that has been addressed in Monterey, or whether it even supports AFP any more. If you’re using an M1 Mac options may be even more limited, and I believe that sharing a backup volume from an M1 can only be performed using SMB.
Most problems using SMB with Time Machine backups have been reported when trying to back up lots of smaller files, underlining the importance of tuning your exclusion list to minimise the backing up of such folders. However, I have also heard of users backing up to NAS who consider that SMB transfers of larger files are being throttled.
Restoring from backup
Big Sur and Monterey radically change the macOS System volume, which is now mounted as a snapshot, and sealed using a tree of hashes. Backup and restore strategies which rely on restoring the System from a back up are doomed to fail, as Time Machine doesn’t allow you to try to back up this new System volume, and even third-party tools such as Carbon Copy Cloner now discourage you from trying to clone the System volume.
The replacement strategy is to install a fresh System volume, typically in Recovery mode, and to migrate the contents of the Data volume from your backup. Although this may at first appear onerous and clumsy, in the long run it is better, in guaranteeing that the System is perfect every time, as witnessed by its tree of hashes, with the top (known as the Seal) matching that set by Apple for that version of macOS. Gone are the days of wobbly systems which need to be reinstalled to get them to work properly. If any System volume isn’t perfect down to the last bit, that Mac will refuse to boot from that volume, and your Mac will be put into Recovery mode so that you can install a fresh and perfect System volume.
I wish you success in upgrading.
Note: which file system for network or shared storage?
I’ve just realised that some who are backing up to networked (NAS) or shared storage may be confused over my recommendation to use APFS. When you back up over a network, the file system on the server hosts a sparsebundle, and the backup is made into the virtual file system within that sparsebundle, not to the native file system on the server. It doesn’t matter (to Time Machine) what file system the server is using, whether it’s HFS+, APFS, NTFS, or anything else: the important file system for backups is that inside the sparsebundle.
If you’ve already got a backup sparsebundle from Catalina or earlier, then the virtual file system inside the sparsebundle will be HFS+, with all its disadvantages. If you create a new backup sparsebundle using Time Machine in Big Sur or Monterey, then that virtual file system defaults to APFS, which brings all the benefits I’ve explained.
I hope that’s clearer.
