
Using the Unified log can be a daunting experience, yet the rewards can be great. The problem is that so much gets written to the log that simply browsing every entry is pointless, even if you’re exceptionally lucky to locate your point of interest quickly. Many users simply abandon trying, so the aim of this article is to help you gain entry to your Mac’s log.
Rather than using a general log browser, like my free Ulbow, which requires you to set predicate filters and the like, I’ll use my free utility Mints, which provides you with carefully curated filters for some valuable tasks. Here, I’ll use it to add additional detail to the information on Time Machine backups provided by T2M2, and to add even more interest, we’ll compare what you can see in the current release of Big Sur and the public beta of Monterey.
All you need is a copy of T2M2 and Mints from here, and your Mac running Big Sur or Monterey, making Time Machine backups to an APFS volume.
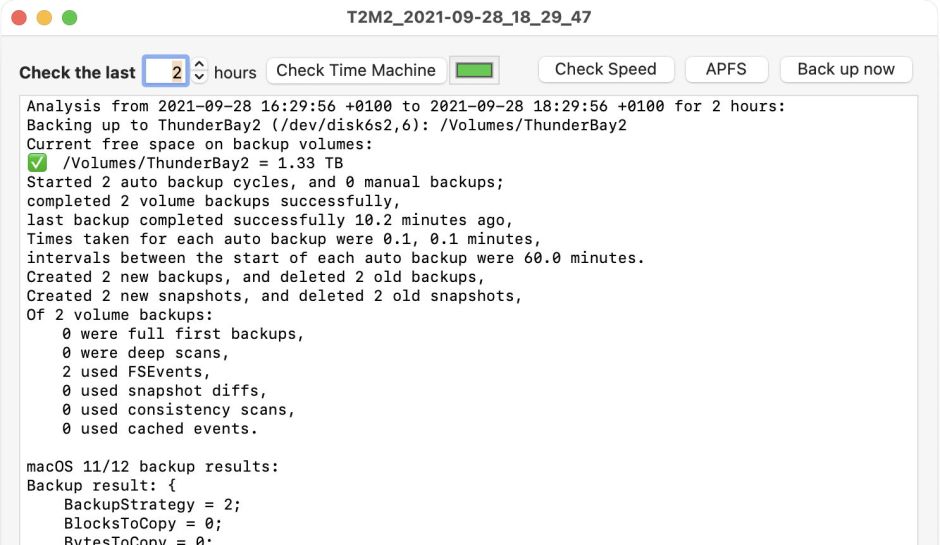
T2M2 analyses entries in the Unified log made by Time Machine to provide a digested report of its recent performance, problems, and any errors. All you do is set the period to analyse, and click on the button to Check Time Machine.
With that report in front of you for reference, open Mints.
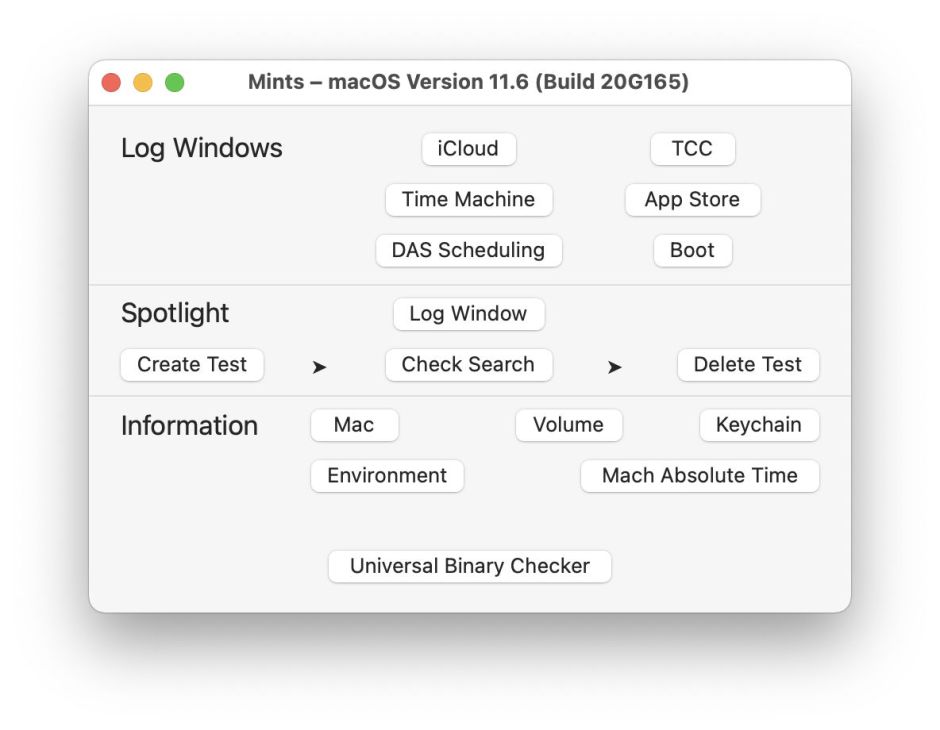
The main window offers six different Log Windows at the top, and a seventh for Spotlight below. Click on the Time Machine button to open its log browser.

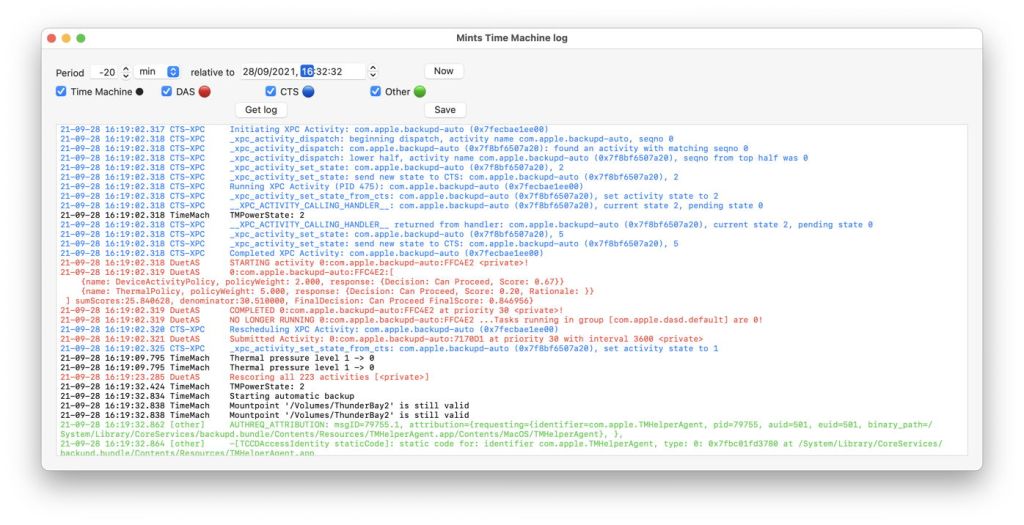
At the top of the new window, the only controls you need to set up are Period and relative to. Mints automatically does all the predicate filtering for you, lays out the most important contents of each log entry, and colours it according to the subsystems concerned.
Referring to the T2M2 record, set the time in relative to so that it’s just after a recent TM backup. Unless that took many minutes, you should be safe to set the Period to -20 min, which means the twenty minutes prior to the time you’ve set in relative to. The filters used here are quite selective for TM entries, so the time period can err on the longer side if you wish: you shouldn’t be overwhelmed with noise.
Once you’re ready, click the Get log button, and shortly afterwards the scrolling view below should fill with log entries in black/white (depending on whether your Mac is using Dark Mode), red, blue and green text. They’re colour-coded by system, as shown in the row of checkboxes.

As you scroll through the lower view, you’ll see how the four different subsystems run a series of dialogues. There’ll be a run of entries in red, from DuetAS (DAS) working out whether to schedule the next backup. Once that’s decided, there’ll be a series of entries in blue from CTS, which runs the backup process, com.apple.backupd-auto. When that gets going, you’ll see Time Machine itself writing entries in black/white. Of course the log itself contains many thousands of other entries interspersed through those exchanges. Mints uses predicate filters which strip out all those other messages so you can see what’s going on with your backup.
The clearest picture is seen in the Time Machine entries themselves. To view those alone, uncheck the other three boxes, leaving just Time Machine at the left ticked, and just black/white text being displayed.
Your first landmark is an entry which simply states
Starting automatic backup
Below that, you’ll see the backup running initial checks on the mountpoint for the backup volume, and the matching machine store. Next comes snapshot maintenance, including age-based thinning to delete old snapshots, the creation and mounting of the ‘stable’ snapshot, and mounting of the ‘reference’ made in the last backup.
Time Machine next has to decide which strategy to use to determine what needs to be backed up. In most cases, after the initial full backup, this will use FSEvents, which is declared in another log entry. There’s a more intricate commentary on that being performed, following which TM declares that it has finished collecting events from that volume, and gives a breakdown of what it intends to back up.
TM then saves the event cache, containing all the detailed information, and works out the size of the changes to be made to the backup. Those will be totalled up and declared as:
Estimated 318 files (565.4 MB) need to be backed up from all sources
Time Machine then switches to making the backup, during which it may give a running commentary on its progress copying items to the backup. T2M2 uses those entries to help you check the speed of a backup in progress.
The next important entry reports when copying is complete:
Finished copying from volume "External1"
followed by a statistical summary of what was done to create the new backup.
After that there’s another phase for handling snapshots, which ends with the new ‘reference’ snapshot being marked as such. An overall summary of that backup is then given, and the closing statement
Completed backup: 2021-09-28-191949.backup
The only remaining task is to thin any old backups.
Once you’re happy with that series of events, tick the DAS (red) and CTS (blue) checkboxes to see the scheduling process which started it all off. If you really want to see all additional detail, the Other (green) checkbox lets you see kernel and other log entries throughout the period.
The following diagram summarises the steps seen in the log in Big Sur.
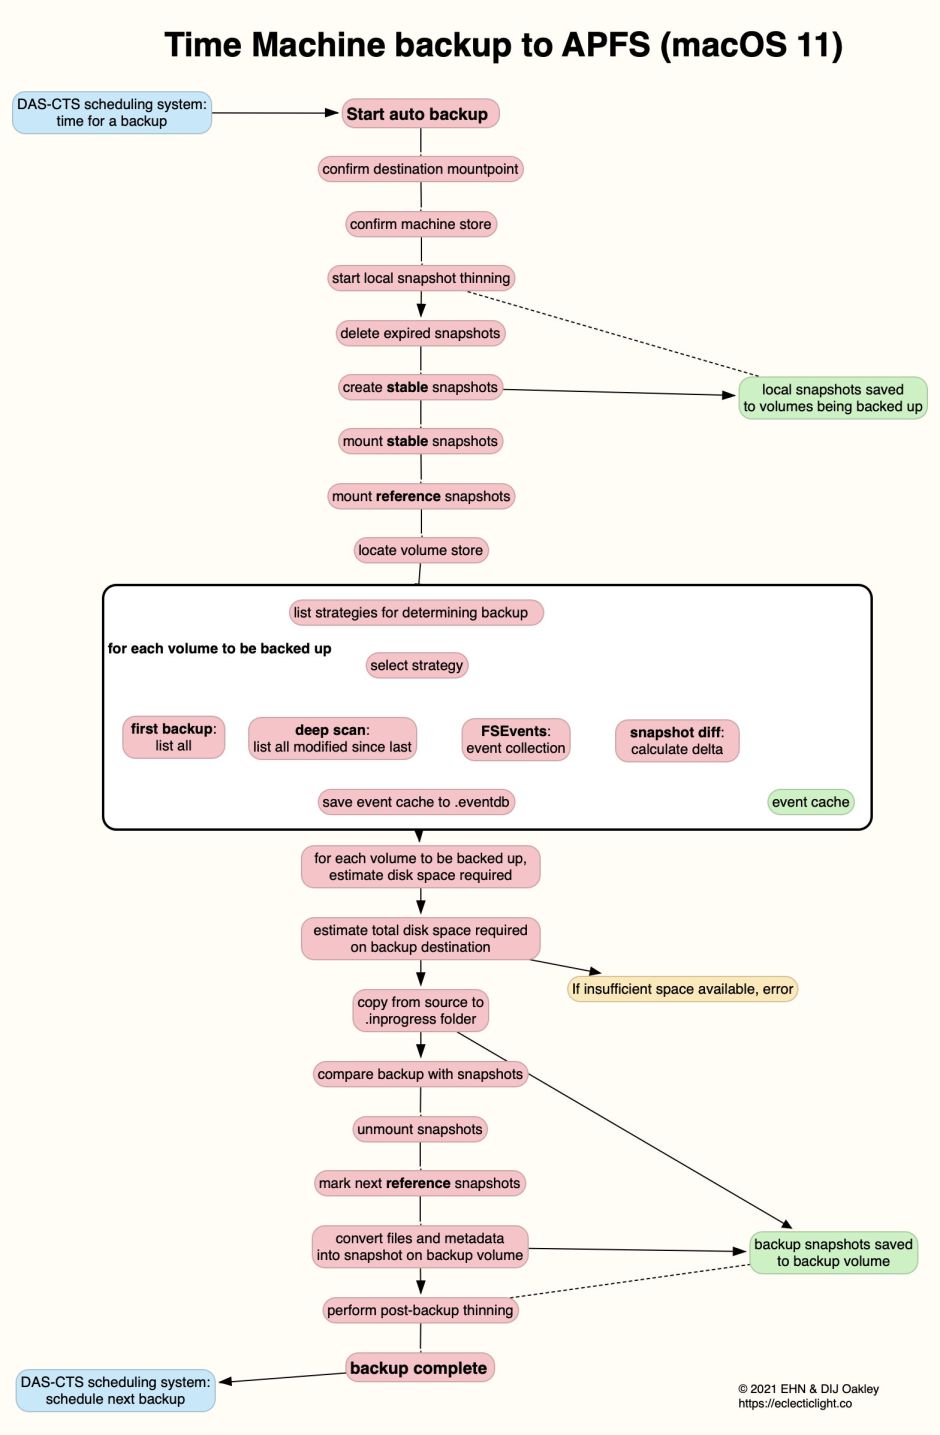
Monterey should appear very similar in the log, bearing in mind that beta-releases often write additional detail into the log so that Apple’s engineers can gain insight into how well any changes are working. One change you might notice in the Other (green) entries is that the backupd daemon is now registered with and monitored by RunningBoard, although the process itself doesn’t appear to be managed in any way.
Once the backup volume has been recognised, Monterey now performs destination IO checks by writing a 50 MB file, and concurrently writing five hundred 4 KB files, and determining the transfer rates. Additional emphasis appears to be placed on the accuracy of time estimates for the backup, with an evaluation on completion of the backup.
As far as I can see, Time Machine backups to APFS volumes made in Big Sur are completely compatible with Monterey. This should mean that, after upgrading to Monterey, Time Machine should be able to continue backing up to the same volume that it has been using in Big Sur. Rather than making any further major changes, the emphasis in Monterey is on consolidation, in terms of improving performance, particularly when copying large numbers of small files, and in predicting the time required for each backup more accurately.
There’s one other Log Window which you may find generally useful: Boot.

This performs a search of all your logs over the last 24 hours to try to find the initial entry made in the log which marks the start of your Mac booting up. Each boot that it discovers it displays with its UUID, another useful piece of information gleaned from the log.
