
Keeping your Mac up to date focusses your attention on the shrinking free space on your startup volumes. Every few days I check how mine are doing, but after updating to Big Sur 11.1, I was shocked to see that it had apparently consumed another 50 GB. For a 3 GB update? This article looks at where all that free space went, and how to get back on an even keel again. The answer isn’t in the Storage section of About This Mac, though, which could leave you more puzzled than you are already.
Most of us were brought up using more traditional file systems, such as HFS+ on Macs. Update a file and the old copy goes away, to be replaced by the new version. If there’s no change in size, then that has no effect on free space. System and app updates therefore might replace a great many files, but their effect on free disk space was usually relatively small.
APFS is far from traditional, and uses lots of tricks, of which the most relevant here are snapshots. The underlying concept is simple, but its implications readily get confusing. When you, or backup software including Time Machine, make a snapshot, the file system stores a complete copy of its metadata at that instant, which in itself is relatively small. That can then be used to look back to, so you could, for example, decide to roll your Mac back to the way it was a couple of hours ago.
Of course, it’s not just the file system metadata – details about all the files and folders on a volume – which need to be preserved by that snapshot. It also needs to keep storage blocks which have changed since the snapshot was taken.

Suppose we have a large app MyApp (which we’ll treat here as if it’s actually a single file rather than a bundle). When version 1.0 of MyApp is installed, Time Machine, Carbon Copy Cloner, SuperDuper! or other backup software then makes a snapshot of that volume. A little later, we update MyApp to version 2.0, which replaces around a third of the original app. If we’re going to be able to roll back to that snapshot, the chunk of MyApp which was replaced in the update has to be kept ready, as it would need to be restored as part of the snapshot.
This gets worse when we delete files altogether. If, after making that snapshot, we’d removed MyApp 1.0 instead of updating it, then the snapshot would need the whole file to be retained if it were to be able to restore the volume to its state when that snapshot was made.
This process is also cumulative: so long as we keep that snapshot of the volume, further changes which might replace the two blue segments will require the whole of the original version 1.0 to be retained.
Updates to macOS inevitably bring updates to apps with them. In the last few days, I’ve installed large updates to over a dozen major apps, including a huge update to Xcode. We also believe that Big Sur updates retain the last snapshot which was previously used as the active system. That’s a great advantage, in that it makes it possible to roll back to the previous version of macOS in the event that something goes wrong with the update, but that also consumes more space.
Unlike the file systems of old, the effective size of a snapshot is thus dynamic; although it’s only going to grow in time, what today may only occupy megabytes could tomorrow become gigabytes of storage space. That’s unpredictable, and can easily become large when there are plenty of updates flying around.
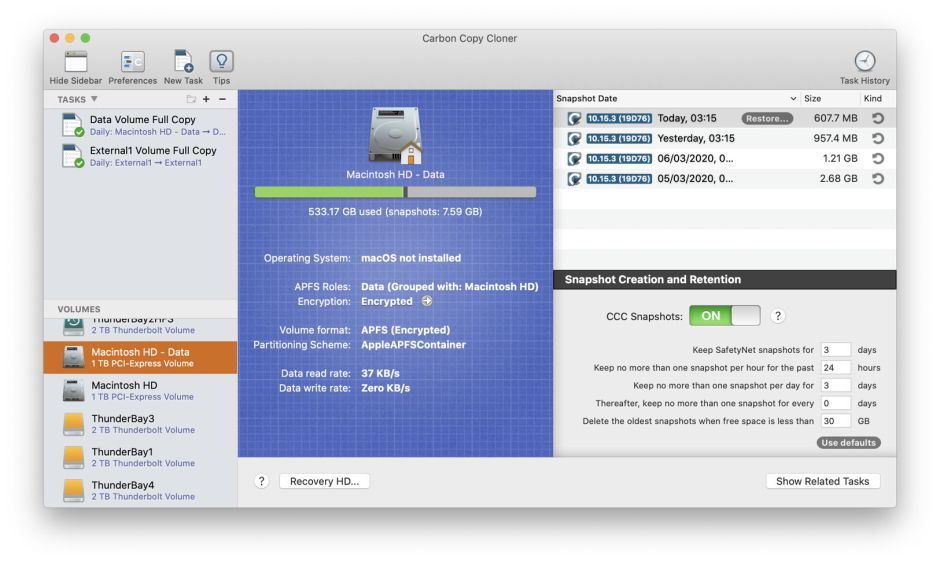
Unfortunately, macOS doesn’t come with a convenient utility for managing snapshots, and even if it did, you have to be very careful deleting them, as your backup system may depend on them. Charging through old Time Machine snapshots like a bull in a china shop isn’t a good idea. However, so long as you’re careful, you can save a great deal of disk space by judicious maintenance of snapshots, for which Carbon Copy Cloner is ideal. It’s the only tool that I know of which lists all snapshots, including those made by Time Machine and Carbon Copy Cloner itself, shows their estimated size (something not even possible in the command line), and lets you delete those which you no longer need.
There are two other useful techniques which can recover some of that disappeared disk space: a simple restart, and a Safe boot. Merely restarting your Mac will clear most temporary areas of storage, including macOS caches in the hidden VM volume. Hold the Shift key down too for a Safe boot and that should flush most caches; give your Mac a minute or two in Safe mode, then restart normally again.
If none of these things does your Mac a power of good, you’ll need to hunt down and remove those large files which you don’t really need and have forgotten about. I wish you success.
