

However you have migrated from your old to your new Mac, you reach the point where you think everything is now ready to use. Until now, I like to keep Time Machine (or any other backup system) turned off, to save it getting in the way of file movements and all those migration activities.
The next task is to restart your new Mac and go through all your most important workflows. Check that your mail client is both collecting and sending mail, is completely up to date, and isn’t missing old messages. Check your key social media connections, in my case Twitter through Tweetbot, Apple’s Messages where you will almost certainly have to turn on its new feature to enable Messages in iCloud, your main browser and any extensions and security settings, whether you need to install Java, and all the other details.

Once all those basics are checked and running, I like to restart into Recovery Mode and run First Aid in Disk Utility there to ensure that my startup volume, container, and disk and any permanently-attached external storage is completely well. APFS has introduced deferred repairs, which remain undocumented, but appear to be minor fixes which are left to the next opportunity. This seems like a good time to catch up with any such outstanding repairs.

While in Recovery Mode, it’s also a good opportunity to check and adjust settings for the T2 chip’s Secure Boot, in Startup Security Utility. If you have changed any of these temporarily to facilitate manual migration, for example, now is the time to return them to your normal working state.
Once happy, restart in normal mode and work through checks on all your major applications. This is the best time to ensure that they are all properly licensed and authorised for use. With a wide variety of different licensing systems in use, this was once a protracted and messy procedure. For some apps (Adobe Creative Studio springs to mind) you had to deauthorise the app on your old Mac, then authorise it on your new one.
In most cases now, there are three simple procedures:
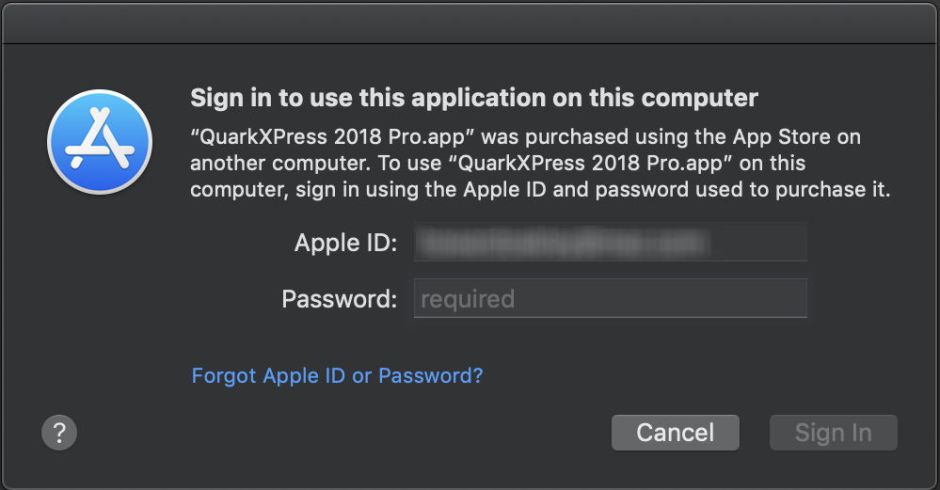
- App Store apps will normally require you to enter your AppleID password when you first launch them, if they were purchased on your previous Mac. Once that has been done, they should work fine without any further issues.
- Third-party apps linked to a subscription or other online service should be enabled when you sign onto that user account. In some instances, you may need to deauthorise your old system from your account. Vendors provide full information about how to do that.
- Third-party apps based on serial numbers usually allow use on a fixed number of Macs, and simply entering your serial number and details may well be sufficient to enable that app on your new Mac. If you run into problems, consult the vendor, who should be able to remove your old Mac from your licence, if necessary.
It is important to settle these issues before reformatting or disposing of your old Mac. You may need to return to it to deauthorise an app before you can authorise it on your new Mac. Although your keychain may well contain your username and password for required services, vendors often design their authorisation dialogs so as not to trigger the macOS password storage system, which could prevent that. No matter how reliable you might think iCloud Keychain or 1Password to be, you should always keep a separate written record; now is the time that you will need it.
At some stage during this, perhaps as a bit of light relief, you should open SystHist and LockRattler, and in the latter check for and install any security updates.
You might think that checking Secure Boot settings, SIP protection, EFI firmware versions, and other mundane information is a waste of time. It’s a new Mac, how could any of those be wrong? Well, the whole reason that I wrote LockRattler was because Apple released a batch of brand new MacBook Pros which came with SIP protection turned off.
Checking, licensing and tweaking your main apps and other software can run on for some days or weeks in very complex installations. Once you’re happy that your Mac is ready to use in its primary tasks, you’ll want to turn your backup system back on.
The first backup made from a new system running Time Machine is normally a complete backup of everything on the volumes you have chosen to back up. Open the Time Machine pane and configure it for your new system, selecting the backup drive, and ensuring the list of volumes to be backed up to that is correct, with the right exclusions. Double check this before turning it on.
If you’re making these new backups to an existing Time Machine backup volume, Time Machine will offer two options:
- to continue backing up to your existing backups,
- to create a new backup set for your new Mac.
If your Mac has come back from repair with a new logic board, or been replaced like-for-like, then the first of those may make sense. But generally speaking, when you replace an old Mac with a newer one, the second is by far the better choice.
You may wish to restart before turning Time Machine on to start that first full backup. You can wait for Time Machine to schedule it automatically, but I like to start it myself.
For the next several hours, your Mac will be busy backing up all 200 to 2,000 GB (or more). How long that will take is anyone’s guess at this stage, and how it will impact any work on your Mac is also unpredictable. With a couple of cores to spare and a fast connection to your backup drive, it could all be done within an hour or two, and let you work on fairly normally.

Once that first backup is complete, I check what happened using T2M2. Because there will have been several automatic backups cancelled while that first backup completed, T2M2 will show an amber traffic light. Read through its text report, though, and you’ll see that the one manual backup, here from two source disks, backed up a total of over 1.1 TB in a tad over 5 hours.

Now’s the time to celebrate. You may still be correcting and tweaking the odd glitch over the next week or two, but your new Mac really is up and running at last.
In the next articles in this series, I will look at some standard migration examples, and how to squeeze a quart onto a 1 TB SSD.
