

Almost every Mac now contains plenty of sensitive information. Many used in business and the professions are required to have measures in place to protect the security and privacy of stored data. Laptops in particular are remarkably vulnerable to theft, even when you don’t travel very often with them, or they’re normally kept in locations which you think are secure.
This article explains how to encrypt your storage using the method built into macOS Sierra (and previous versions), FileVault.
Preparations
When you enable FileVault, the whole of your internal storage will be encrypted. This can take a long time – many hours – and can fail if there are disk errors or other problems. It is simplest and most reliable when performed on a brand new Mac: once you have set it up, and before installing any apps or migrating documents onto it, open the Security & Privacy pane. There select the FileVault tab, click the padlock and authenticate with your admin password, then click on the button to Turn On FileVault.
FileVault will use your current user password to open your Mac up. If you have been using a relatively weak password, consider changing that before you enable FileVault. That is much simpler to do before it starts to encrypt your storage.
Before turning FileVault on, as always, ensure that your Mac is running the latest release of macOS. It doesn’t guarantee that everything will work, but it is usually more reliable than previous versions.
If your Mac has already been in use for some time, it is worth taking a couple of minutes using Disk Utility to check the integrity of the startup volume which you are about to encrypt. If your Mac is more than a couple of years old, you might want to run Apple’s hardware tests and/or third-party utilities to confirm its general health. The encryption process is not a good time to discover that an SSD is becoming a bit marginal!
Inevitably, you must ensure that it is thoroughly backed up, preferably to at least two different stores: relying on a single Time Machine backup store may put your files at risk. Although it is unusual for encryption to fail, when it does there is usually little more that you can do than to wipe the disk and install macOS afresh. If you expect to have to do that, and prepare for it, then hopefully you won’t have to.
When enabling FileVault on a laptop, let it encrypt while on mains power (FileVault should pause encryption if you switch to battery power anyway), ensure it has plenty of airspace to allow it to remain cool, and prepare for the encryption process to take a long time. Although you can use your Mac while encryption is taking place, it will complete more quickly if you can leave it alone to get on with the job by itself.
You will also probably want to disable or delay system sleep in the Energy Saver pane.
Encryption
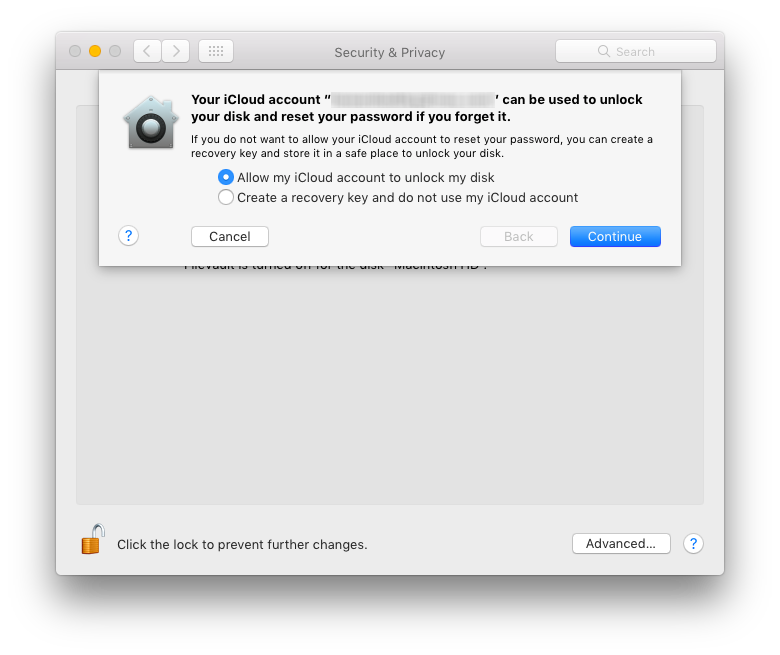
The first question you will be asked once you have decided to Turn On FileVault is whether to allow your iCloud account to unlock your disk, in the event that you cannot do so using your password. Unless you are concerned that your iCloud account could be compromised, that is normally a better choice than creating a recovery key. If you are enabling FileVault in order to comply with an imposed requirement, you will need to check that your choice here meets that requirement.
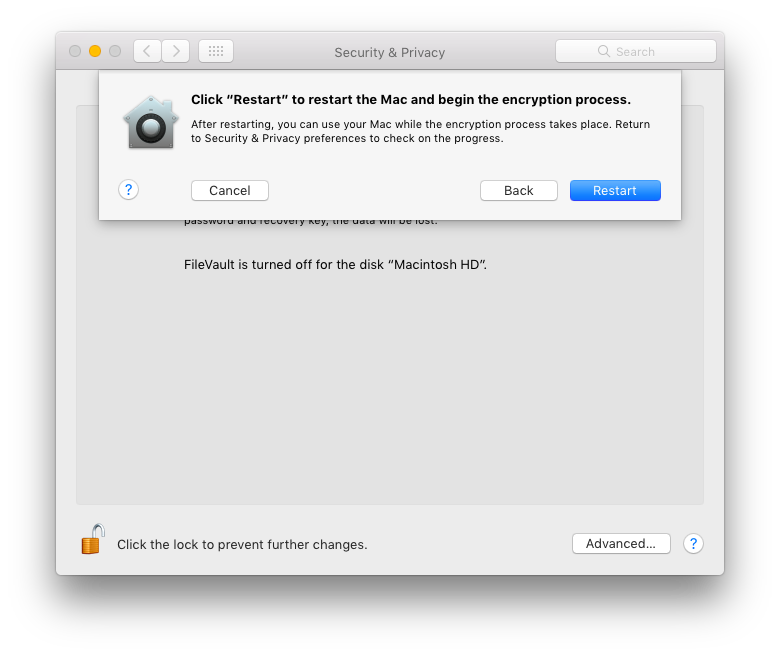
You will then be prompted to restart your Mac through this dialog, and start the encryption of your storage. This is the point of no return: once your Mac restarts and begins encryption, it is difficult to stop it without wiping your startup volume. If you think you might have second thoughts, cancel or go back.

When your Mac restarts, it will do so with part of its storage encrypted for the first time, and you will need to enter your password to unlock it. Encryption of your storage is still far from complete: the Security & Privacy pane should give you a rough idea of progress. Its progress bar is, though, highly non-linear, and the remaining time estimate can swing wildly at times. Don’t be surprised if it gives very long periods, or that they suddenly reduce.
Problems
Normally, FileVault encryption completes fine, and you will carry on working as normal. If something goes wrong and you want to check the encryption status, open Terminal and type the command
diskutil cs list

You should then see a list of attached storage. Look at the Logical Volume section for your startup disk, and it will report the Conversion Progress. If that reads Failed, then FileVault has hit a problem. If you have a third-party tool like DriveDx which can check the health of your startup SSD or other drive(s), this is the time to use it, to find out what is wrong.

If FileVault hits a snag and gets stuck, you cannot reverse the encryption process. If you try turning FileVault off, it will helpfully inform you that you can’t do that until encryption is complete. If FileVault cannot complete encryption, then that will never happen.
In theory, it might be possible to start up in Recovery mode and there start the process of decryption. In practice, the best that you are likely to be able to do is to wipe your startup volume and re-install macOS. To do that, open Disk Utility in Recovery mode, select the partially encrypted volume, and mount it. You will then be prompted for its password, as it is now partially encrypted. You will also see among its initialisation options are encrypted formats: for the moment you will probably want to give them a miss, and return to unencrypted format.
Should you ever need to restore or repair a volume encrypted by FileVault, then it should remain fully encrypted. However some users have reported that restoring to an encrypted volume from a Time Machine backup can leave the volume unencrypted. If your encrypted volume undergoes any sort of significant surgery, you should always check that FileVault encryption is still enabled afterwards.
Other drives
FileVault, as controlled in its panel, only controls the encryption of your startup (boot) disk. If you have other storage permanently or temporarily attached to that Mac and need to encrypt that, you will need to do so in the Finder. Select the volume in the Finder, and use its contextual menu to locate the Encrypt command.

The Finder will then prompt you to create a new encryption password, verify it, and provide a hint. Once you have done that, click on the Encrypt Disk button to start that process. This can only be done if the disk uses a GUID Partition Table (GPT): if it doesn’t you will need to reformat that disk so that it has one, then encrypt it as above.
High Sierra
FileVault will be changing in High Sierra, as Apple’s new APFS file system supports encrypted volumes as well as folders and files. When you install High Sierra on a volume which is already encrypted using FileVault, the installer will by default automatically convert your encrypted volume to a new encrypted APFS volume, using the same password and recovery key.
Because encryption is an option built into the APFS file system itself, it should operate more quickly than FileVault does at present, particularly on SSD. In fact, in High Sierra you should not notice that your storage is encrypted at all.
