
Sunday’s quick little AppleScript hack was to put together an app which would check if SIP is enabled on a Mac. A few minutes later, I had the app tested and ready, thanks to Script Debugger.
So today I thought that I would try to repeat the process using Swift in Xcode. This time the app, dubbed LockRattler (from the process of going round checking that your doors are all properly bolted) would eventually grow into something more capable, which would check all those hidden security features in macOS Sierra.
CheckSIP couldn’t really be simpler. Its entire code reads:
use AppleScript version "2.5" -- Sierra (10.12) or later

use scripting additions

set theShScript to "csrutil status"

set theOutput to do shell script theShScript

set theResult to display alert "csrutil status returned\n" & theOutput message "If disabled, contact Apple Support immediately.\nFurther advice is at https://eclecticlight.co"
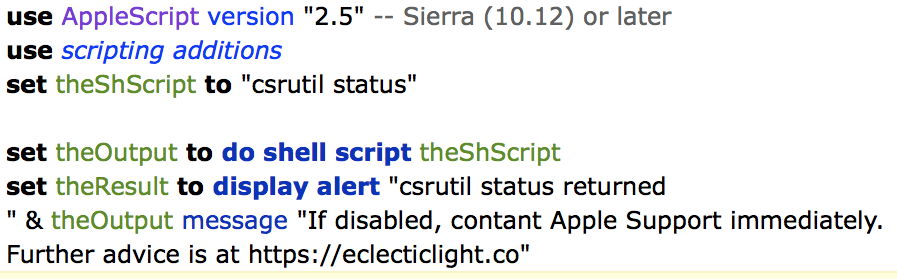
Even if you’re not that familiar with AppleScript, it should be fairly obvious what it does – calls the shell command
csrutil status
and pokes the result from that into a little alert.
LockRattler runs more than a basic alert, as in time I want to enhance it to check the versions of protection files which are updated silently, and as much of the rest of the hidden security systems as I can access. There are two shell commands which I want it to use, as a start:
csrutil status
which checks whether SIP is enabled (as in CheckSIP), and
spctl --status
which checks Gatekeeper and related system security policy.
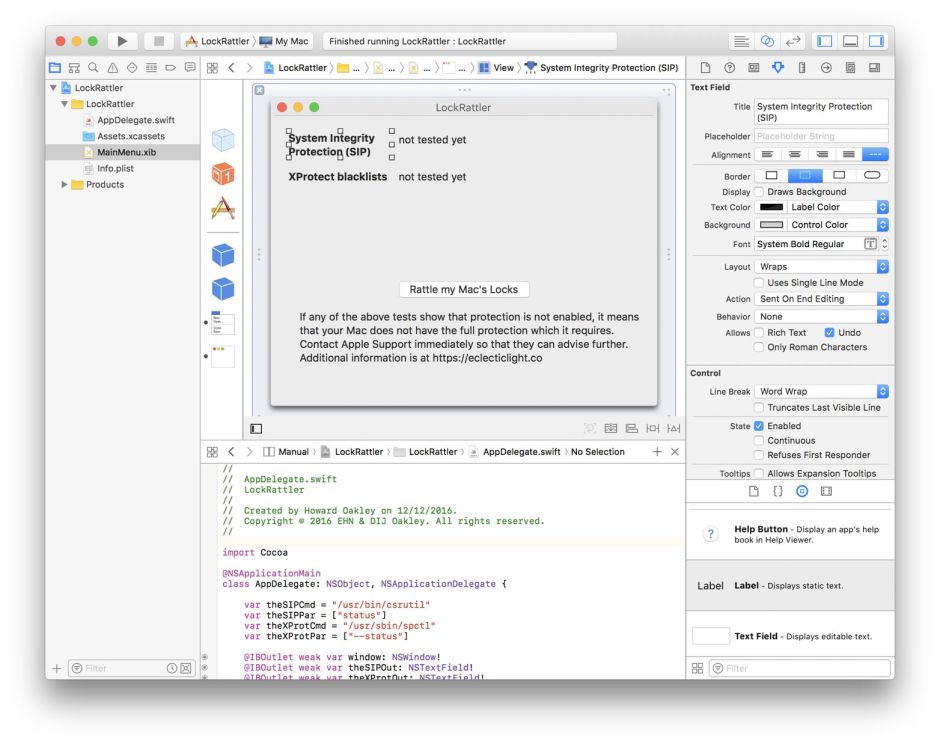
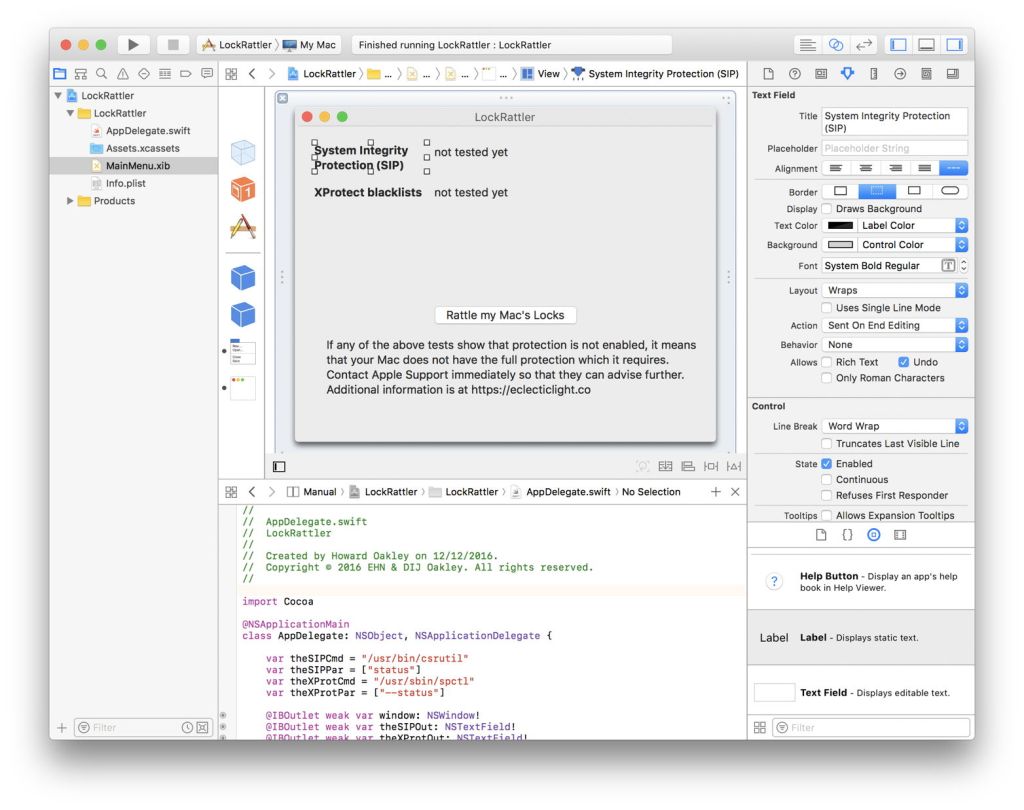
I set this up in Xcode 8.1 as a Cocoa app using Swift, and into its window I placed a push button titled Rattle my Mac’s Locks which will trigger the shell commands to be run, and five labels: two to contain the standard output of each command, two to label those, and the large one at the foot of the window containing useful advice.
The push button has an Action, placed at the end of the code in the AppDelegate.swift source file, which will do all the work. The two labels which take the command output each has an Output, so that I can insert text into them.
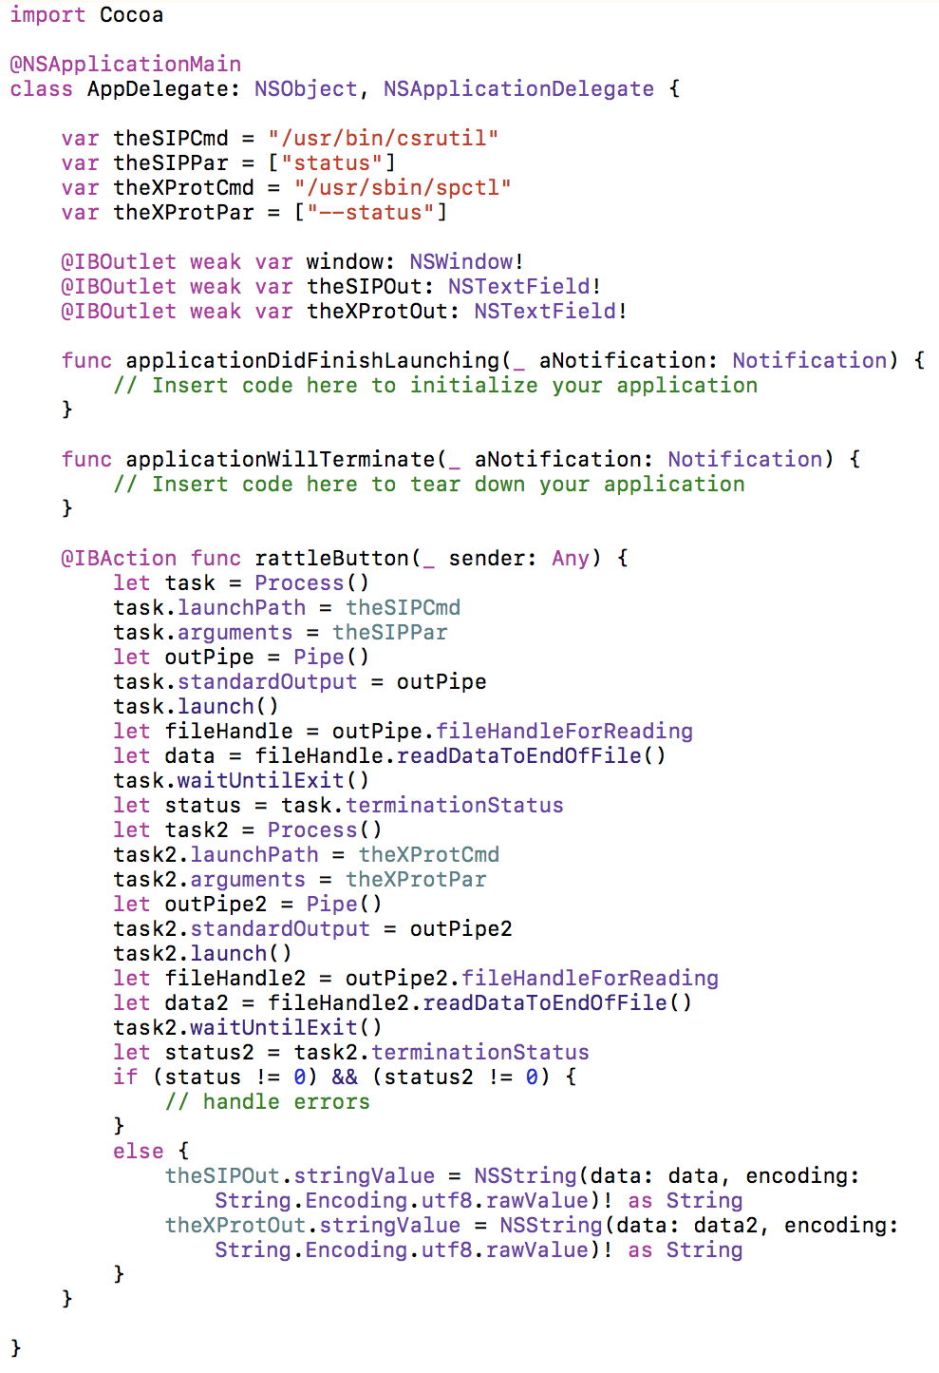
At the start of the source code, I set up the commands and parameters to be run. Each has to have the full path to the command specified (easily checked in Terminal), and the parameter given as a list of strings. In this case, there is just a single member for the single parameter. Below that are the important text field outlets which I will use later.
The rattleButton Action is the workhorse. It goes through the standard Swift code for running a command and getting its standard output back, twice. This initialises the Process, sets its launchPath and arguments, then creates a standard output pipe and launches the process. Standard output is brought back as data, and the task termination status recorded.
Once both commands have been run, if they complete with a status of 0 (indicating success, no error), the data is brought back as a string, and inserted into the stringValue of the respective text field, to display it.

Run the app, click the button, and you should see almost instantly the status of SIP and Gatekeeper etc. on your Mac. For the moment, although this app is signed, you will need to run it for the first time as if it was unsigned, using the Finder’s Open command. Apparently I have yet to sort my signing out with Apple. Here is the app compressed into a Zip archive: lockrattler
But…
Every time that I go back to using Swift for this sort of scripting task, I seem to find something less than satisfactory. This time, it was about authorisation and how to run shell commands which require higher privileges.
My example here is checking whether the automatic Software Update feature is enabled, which would normally need sudo in Terminal, as it will only talk to you when run as root/superuser:
sudo softwareupdate --schedule
checks if it is enabled.
Neither AppleScript nor Swift allow you to use sudo, of course, which requires an admin password to be entered in Terminal. AppleScript does have a wonderful shortcut route, though, in its
do shell script theShScript with administrator privileges
which will prompt you to enter your admin password, then run the command as root (see Tech Note 2065 for the full details).
There is no simple equivalent in Swift, which is another feature which needs to be better wrapped before it is a viable scripting language for macOS.
In Swift, you currently have to go around the houses using the heavyweight app support provided by SFAuthorization in its Security Foundation classes. This is great if you’re doing serious things with authorisation and privileges in a full-blown app, but a real pain for a lightweight script. The pain gets worse too, when you discover that the class documentation (in Swift) leaves a lot of possibilities open, and the reference documentation is none too clear, written for Objective-C, and seems to refer to a long-previous version with different calls.
Turning to those wonderful iBook titles which you have purchased, it seems to be one topic which is skilfully omitted by them all. Once again, using Swift is badly let down by its lamentable lack of documentation and examples. Even searching on the internet returns lots of terse suggestions about ‘read the documentation’, suggesting that few have yet tackled this successfully in Swift 3. It also looks as if it will be a tough one to try out in a playground.
I’ll let you know when I have got it cracked.
