

For some users who try, making a bootable external disk for an Apple silicon Mac seems like the Everest of computing, a peak that is remote and almost inaccessible. This article shows how to achieve this using Ventura, and gives updated information about the behaviour of these disks for macOS 13.0.
Hardware
If you’re going to boot your Apple silicon Mac from an external disk anything more than occasionally, you’ll want a reasonably fast (NVMe) SSD inside a case with a Thunderbolt 3 or 4 interface. This should all work equally well with USB-C storage, and I’ve set up several cheap hard disks with USB 3.2 Gen 2 over USB-C similarly, but they’re significantly slower to boot, and not a good move if you’re going to use them regularly.
Even more important than the disk is the cable. Unless that supplied with the disk is a reputable brand, I’d always use a branded Thunderbolt 4 cable, such as one of CalDigit’s used for this article, with a Samsung 980 Pro NVMe SSD inside an Orico TB3 enclosure. Sabrent and OWC enclosures are also recommended when available.
Installer
Because Ventura was supplied as an ‘update’ for upgrades, you probably don’t yet have a copy of the full installer app suitable for your external disk. If your Mac is already running Ventura, the easiest solution is to download it from the App Store; when performed to a Mac already running Ventura, you should then get the full install app named Install macOS Ventura installed in that Mac’s Applications folder, just as we used to when upgrading.
Installation
I like to (re)format the external disk using Disk Utility in Ventura first, creating a single APFS volume in a single container, with the name of my choice. Once that’s done, open the Install macOS Ventura app, agree with its licence, and continue until it invites you to install to the current internal SSD. At that stage, click on the Show All Disks… button, select the external disk, and click to Continue.

You’ll then enter a sequence unique to Apple silicon Macs, in which you assign an Owner to the external disk. This is needed by Secure Boot, which requires a LocalPolicy for all bootable disks. If anything can go wrong with installation, it’s ownership and LocalPolicy that’s most likely to fail.
The first step is usually simple: you’re prompted to select one of that Mac’s users to become Owner of the new disk. With one admin user on the internal SSD, that’s a choice of one, as here. Select that user, and you’ll be invited to copy that user’s account settings as the owner. Unless you know what you’re doing, simply tick the box here and proceed to Install.

You’ll then be asked to authenticate as that user before installation continues. Once that’s done, your Mac will restart from the external boot disk for you to personalise that system. In previous versions of macOS, this could result in a very long pause of “1 minute”, but with Ventura this now seems far quicker.

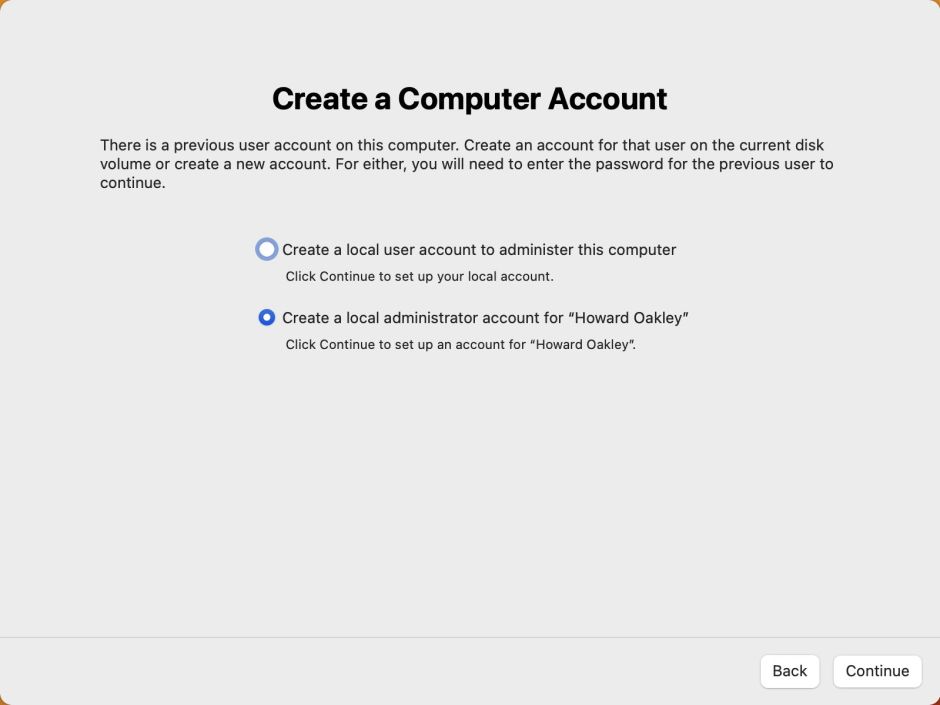
After the installation, you’ll be prompted to create an account on the external disk. The simple answer here is to select the lower option, which creates the primary admin user as the owner of that system.
Switch between boot disks
Once your external disk has been personalised and configured, try restarting from it. This has changed, to System Settings > Startup Disk, where you select the boot disk and click on Restart…. You can also boot into Recovery and change startup disk there, as I explain below.

Using my NVMe/TB3 SSD, boot time from startup chime to login screen is only 16 seconds, which isn’t much longer than from the internal SSD.
You can also use the same boot disk with multiple Macs, but before each can boot from it, LocalPolicy will need to be created for that Mac. This should be handled by macOS when you select that external disk as the startup disk for the first time.
Missing boot disk
When I first got booting from external disks working on Apple silicon Macs, there was one serious snag: if your Mac had been booted from its external disk, then shut down, and the external disk was removed, when you tried to start it up normally it went into a boot loop because it panicked when it couldn’t find the external disk to start up from. I’m delighted to confirm that seems to have afflicted only Big Sur, and is certainly fixed in Ventura.
Should you inadvertently try starting your Mac up from a missing boot disk now, it will display a black screen for a long time as it struggles to find that disk. Eventually it will restart spontaneously into Recovery mode, without any user intervention.

You don’t need to go any deeper into Recovery than its opening screen: select the internal SSD, hold the Control key and the button below that will change from Continue to Always Use. Click on that button, and your Mac will restart from its internal SSD again. Use the same technique to change boot disk in Recovery mode, should you ever need to.
Key point reminder
- Use a reliable, branded Thunderbolt 4 cable.
- Select the correct destination disk.
- Make the primary admin user the Owner, and tick to copy that user’s settings.
- Pick the lower option during setup, to create the primary admin user account.
I wish you success.
