
There are few topics in macOS which appear as difficult and sometimes insoluble as making Time Machine backups to network storage, such as a NAS. Some can’t even see their shared storage as a destination for their backups, others wonder whether the new option to back up to APFS is any better than their existing HFS+ backups, and many find backups slowing to a crawl for many hours or even days at a time. This article provides some pointers which I hope lead to resolution of at least some of those problems.
These arise because of the complexity of the backup chain when using network storage, compared with that using local disks.
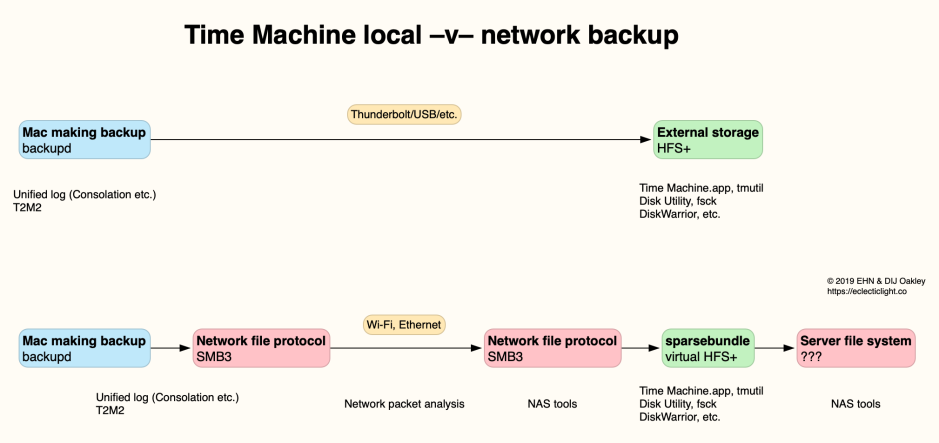
That summarises the chains in Catalina; with Big Sur this has only become more complex as the destination sparsebundle can now host a virtual APFS file system instead of HFS+.
APFS or HFS+?
If you want to continue backing up to the same sparsebundle, then that can’t be converted to APFS but will remain in HFS+ format. To start using APFS in the sparsebundle, you’ll need to close any existing backup and start a new sparsebundle as a new backup destination on your network storage, using Big Sur or later.
Although switching to APFS doesn’t solve any underlying problems with the speed of SMB, your new backup still benefits from the many advantages of APFS, including:
- APFS backs up changed blocks, rather than whole files, which is both quicker and more economical in its use of storage.
- The file system in the sparsebundle is APFS, which structures backups much more reliably into snapshots, rather than a single file system which can choke on millions of hard links.
- APFS backups support new file types, sparse files and clones, in their original form, rather than having to expand them to full-sized files.
AFP or SMB?
Apple’s original AFP was introduced in Classic Mac OS System 6, way back in 1988, and its use has been deprecated for the last eight years. It became popular with network storage with the release of the open source Netatalk server which hasn’t been updated for three years. Apple is now progressively removing support for AFP, and has already removed its server from Big Sur. It’s not known when Apple intends to remove its client from macOS, though.
Unfortunately, Apple’s support for SMB hasn’t been particularly helpful. In its list of storage types you can use for Time Machine backups, Apple merely refers you to check the documentation of your NAS, although it does explain how to configure shared storage on a Mac.
If you’re going to use SMB as recommended by Apple, the most robust way seems to be disable AFP on all NAS which support SMB. It may sometimes help if you’re not connected to the NAS in the Finder, before you start setting that up as your TM backup destination.
Configuring SMB
Sadly, as many users find, SMB is one of those features which often don’t ‘just work’, or when it does, it’s interminably slow. Search a little and you’ll find all manner of recommendations as to how to address these. I therefore offer a compilation of suggestions which I’ve seen in more reputable sources. Several involve adding or changing settings in your client Mac’s /etc/nsmb.conf. By default, that file doesn’t exist, and you’ll need to create it using a command such as
sudo touch /etc/nsmb.conf
Once you have changed it, to bring those changes into effect, you’ll need to log out and back in again.
Synology has suggested one way to speed up backups over SMB is to disable client signing, which is enabled by default in macOS 10.11.5 and later. This involves writing
signing_required=no
to the /etc/nsmb.conf file on your client Mac.
Apple’s archived specification for Time Machine over SMB includes two promising tips which may still be worth following up. One is to set a shorter value for the Timeout field of the server’s SMB configuration. The other is to ensure that it advertises its availability to Time Machine through Bonjour.
Apple suggests that you can speed up SMB file browsing by preventing macOS from reading .DS_Store files on SMB shares, using the Terminal command
defaults write com.apple.desktopservices DSDontWriteNetworkStores -bool TRUE
then log out and log back in to bring that setting into effect.
In macOS Big Sur 11.3 and later, SMB Multichannel is enabled with default settings that are ideal for most. Apple explains here how to tune that by creating or changing the /etc/nsmb.conf file on your client Mac.
Configuring Time Machine
Two issues are well-known to choke local and network backups, notably:
- backing up folders containing very large numbers of small files;
- backing up very large files.
Exclusion strategies you should consider include:
- avoid backing up Xcode;
- avoid backing up large folders created by some third-party housekeeping utilities;
- never back up Virtual Machines using Time Machine; it’s the wrong tool, and you should exclude all folders containing VMs;
- exceedingly large Photos libraries are inevitably very slow to back up; there’s no good way around that.
Note that Big Sur and later already exclude the hidden .DocumentRevisions-V100 folder at the root of each volume other than the System, and Spotlight indexes, so those don’t need adding to your exclusions list.
Use my free utility T2M2 and its Check Speed button during a long backup to see where delays are occurring. If they prove to be with a folder which you don’t need to back up, add it to the exclusions list.
If you know of other good tips to improve SMB performance, then I’d value your posting them as a comment.
