
M1 Macs bring a great deal more than better performance, and in some ways will modify old habits. This article looks at one change which is challenging and worrying many users: you can’t rely on cloning an M1 internal disk from a copy, as a method of recovering from disaster. I first drew attention to some of these issues four months ago, and more recently Mike Bombich of Carbon Copy Cloner has reiterated how the M1 changes ways to recover from disaster.
The boot disk problem
Until Catalina, the structure of bootable System disks was relatively simple.
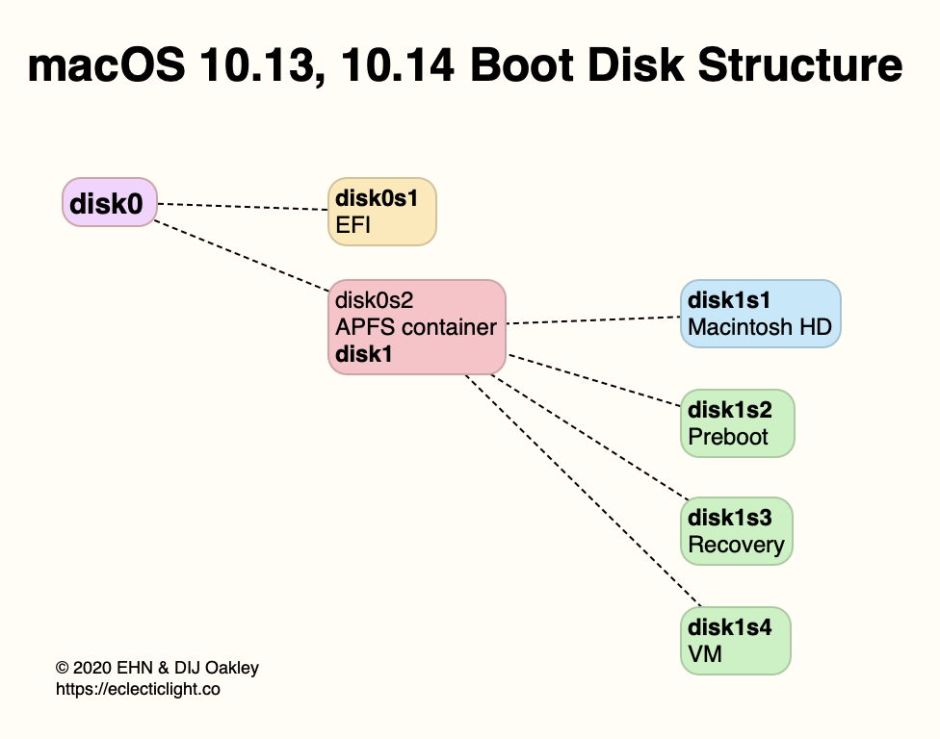
A standard APFS boot disk in High Sierra and Mojave consists of an EFI partition and the main APFS container. Within the latter are a minimum of four APFS volumes:
- the startup volume, by default on the internal disk named Macintosh HD, which forms the root of the boot file system,
- Preboot, a small volume of around 40-50 MB,
- Recovery, the Recovery Volume, of around 500 MB,
- VM, containing virtual memory caches, which is upwards of 20 KB depending on use.
Catalina changed that by dividing the startup volume into two, a Volume Group consisting of a read-only System volume, and a writable Data volume, which is mounted in /System/Volumes and accessed via firmlinks from the System volume. Although it’s more difficult to clone or copy this volume group, it’s by no means impossible.
This Volume Group is tightly integrated. Some system files, including data used by the macOS anti-malware utilities XProtect and MRT, are updated outside full macOS updates, so have to be stored on the Data volume, but appear as if they’re in the folder structure of the system. Applications are divided between both: bundled apps which come with macOS are on the System volume, but Safari and user apps are on the Data volume; the file system uses special firmlinks to make those two directories appear one in the Finder.
Big Sur changes that further: what’s mounted as the system is now actually a snapshot of a sealed volume known as the Sealed System Volume (SSV). Cloning that is an order of magnitude more complex, as snapshots can’t ordinarily be copied between volumes, and a Merkle tree of hashes has to be built to ‘seal’ it before it can be used.
The same is true for an external bootable disk for an M1 Mac, which comes complete with its EFI partition and the single container with its boot Volume Group and a volume named Recovery too. But that’s very different from the structure and contents of that M1 Mac’s internal storage.
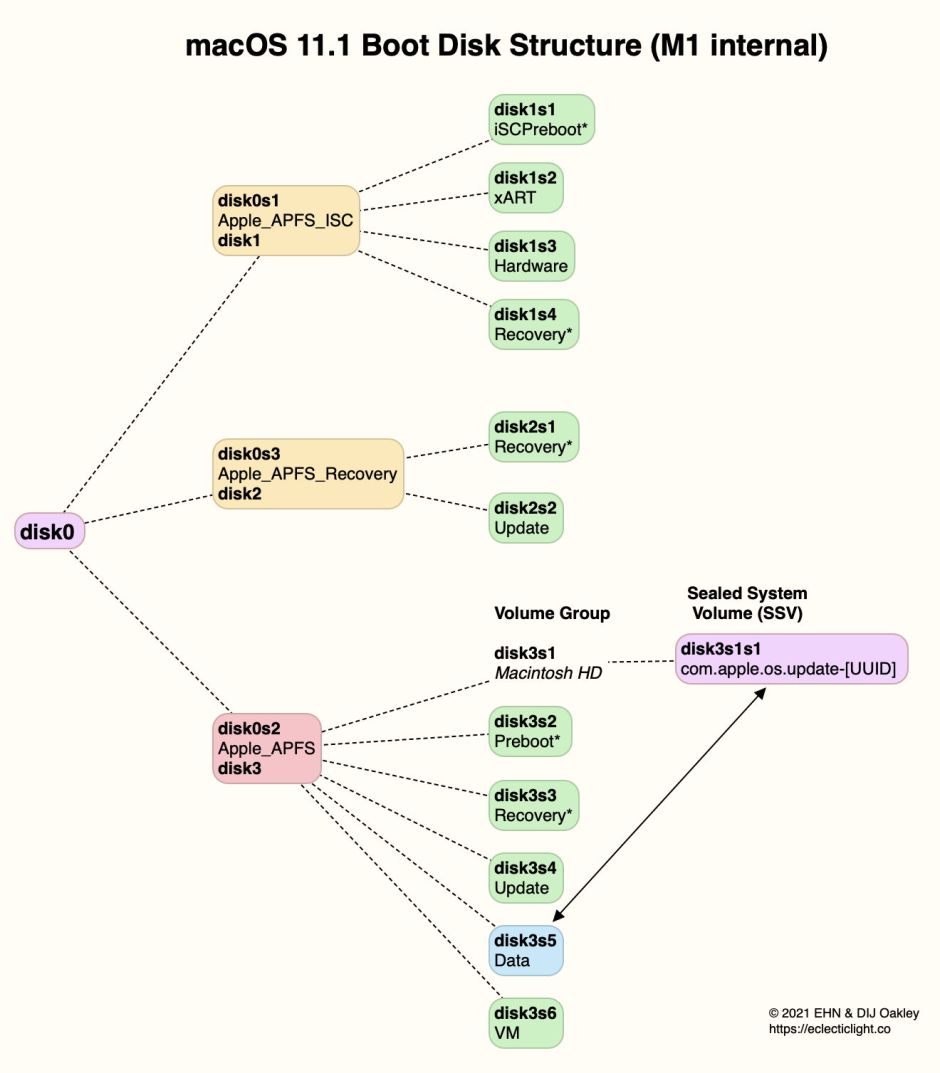
The three containers on an M1 Mac’s internal storage have distinct functions.
The first, Apple_APFS_ISC, is the iBoot System Container (iSC), and supports the iBoot firmware in the early boot process, as well as providing trusted storage for the Secure Enclave within the M1 SoC. Like the two other containers, it can have designated ‘booter’ and ‘recovery’ volumes, indicated in the above diagram by an asterisk * next to the volume name. Here, the iSCPreboot volume is the designated booter, and the empty Recovery volume is for recovery. The xART volume provides trusted storage, while the Hardware volume contains hardware-related files such as logs and activation data.
The Apple_APFS_Recovery container is dedicated to providing recoveryOS (or 1 True Recovery), which is stored on its Recovery volume. This includes a second part of iBoot and all that’s necessary for the M1’s full Recovery Mode. That Recovery volume is designated for recovery, but this container doesn’t have a separate booter volume.
The normal boot container Apple_APFS isn’t quite the same as that on an Intel Mac either: one subtle but significant difference is that the Data volume isn’t named Macintosh HD – Data, as it is on Intel Macs, but simply Data.
When you clone an M1 internal disk to external storage, all that can be copied across is the normal boot container Apple_APFS. If your Mac’s internal SSD were to fail, as any external disk lacks the other two crucial containers, that Mac will no longer boot, and even if it did, cloning that external disk back to the internal SSD wouldn’t help you recover that Mac, as it would still be missing those other two containers.
Recovery options for M1 Macs
Complete failure of the internal SSD is fatal to an M1 Mac. As that’s soldered onto the logic board, this requires replacement of the whole logic board. When that’s done, you’ll be relying on the backups you made of your Data volume to set up what is effectively a new Mac.
Soft failure of the internal SSD, for example significant corruption in the absence of any hardware failure, is recoverable by putting the Mac into DFU mode, connecting to another Mac, and restoring its firmware and software using Configurator 2. This is surprisingly quick and simple, although it may appear daunting. For those without another suitable Mac, Apple stores and service providers can do this for you. What you then end up with is effectively a new Mac, and you’ll be reliant on your backups to set its Data volume up.
Corruption of just the normal macOS boot container is best managed by installing macOS from recoveryOS, and migration from your backup. It’s this step which might appear most amenable to cloning, but the advantage of installing a fresh copy of macOS is that it’s guaranteed to be completely wholesome, and will hook up correctly with its firmlinked Data volume.
Big Sur has a new failure mode too: if your Mac tries to boot from macOS on its internal SSD and detects that its seal is broken, perhaps because of damage to the SSV, macOS should then restart your Mac in recoveryOS and offer to re-install macOS. This allows the installer to preserve your existing Data volume, and you may then not have to restore from your backup.
Another situation in which you may find yourself wishing to be able to clone back to the internal SSD is when a macOS update goes wrong and you want to roll back to the previous version. If you can, you may be able to install the previous release of macOS, although that’s not easy to do in recoveryOS, which is geared to installing the current version.
Perhaps the simplest option is to put the Mac into DFU mode and restore the older firmware and macOS from the appropriate IPSW image available from Apple. With that older version installed, you can then migrate from your backup. There is an advantage here to using DFU mode, in that it restores not just the system software but the firmware too; as many problems with updates are the result of firmware updates, and Intel Mac firmware can’t be downgraded, this is much better than cloning back to the internal SSD.
Why has this changed?
Versions of macOS before Big Sur have tried various mechanisms to protect the integrity of the system files in macOS. The primary driver here is of course security, but this also has the advantage that it ensures that those system files can’t be corrupted, something that has troubled older versions of macOS. M1 Macs are the first models in which Apple has complete control of their security, and it has designed their hardware and software together to ensure the integrity and robustness of the entire boot process, from ROM through the kernel and its extensions to its many services.
This may appear to be overkill today, but Apple’s design is intended to last not just the life of your Mac, but to provide good foundations for what will be required in the years to come. This is a better approach than repeatedly adding new and more complex layers, as it has done in the past with Intel Macs. We all hope this will bring not just better security, but a more stable future.
