
If there’s anyone left who’s still trying to boot their M1 Mac from an external SSD, the question now is how to update it to macOS 11.2.1. As I reported, booting from the external disk isn’t likely to result in successful update, although a few users have reported that Software Update worked first time for them. Assuming that you have the same bad luck that I’ve had trying to do this on numerous occasions, here are my findings to guide you.
What has changed now is that Apple has finally made the full installer for Big Sur 11.2.1 available, both through the App Store and the command softwareupdate in Terminal. It has also repeated exactly what it did when 11.2 was released and removed access to version 11.2. If you haven’t saved a copy of the 11.2 full installer, then you can’t obtain it from Apple any more.
As Mr Macintosh has pointed out, the 11.2.1 full installer also increments the build number from the online update which Apple released last week. Although Apple hasn’t explained its significance, this is believed to be a change not in Big Sur itself, but in the installer, which now checks properly that there’s sufficient free space to complete the installation.
So, armed with this new full installer for 11.2.1, how could you use that to update an M1 external boot disk which is still running 11.2 and won’t update successfully using Software Update?
Delete 11.2 System
Since late Catalina, macOS installers have been able to install a fresh System volume into a container which already has a Data volume, match the pair as a Volume Group, and make that a bootable system. This unfortunately doesn’t yet work with Big Sur on an M1. The 11.2.1 installer won’t even attempt this, as it simply complains that the disk is damaged and can’t be selected for macOS installation. So if you do by any chance damage or delete the System volume on your external disk, there now seems no way to recover it from your M1 without formatting the disk and destroying its Data volume. That’s a big step backwards.

Erase 11.2 System
Rather than deleting the old System volume, you could try erasing it instead. If you then run the full installer and select the now-empty System volume as the destination for macOS 11.2.1, the installation will proceed almost to completion, but will then restart twice and throw you back into the internal boot disk. On examining the external disk, there are now two identically-named Data volumes and one System volume. Unfortunately, it’s the existing Data volume which is the duplicate, and no longer part of a volume group. Deleting the orphaned Data volume doesn’t help, as trying to boot from the external disk now reports that the “Operation couldn’t be completed (SDErrorDomain error 104).”

Install 11.2.1
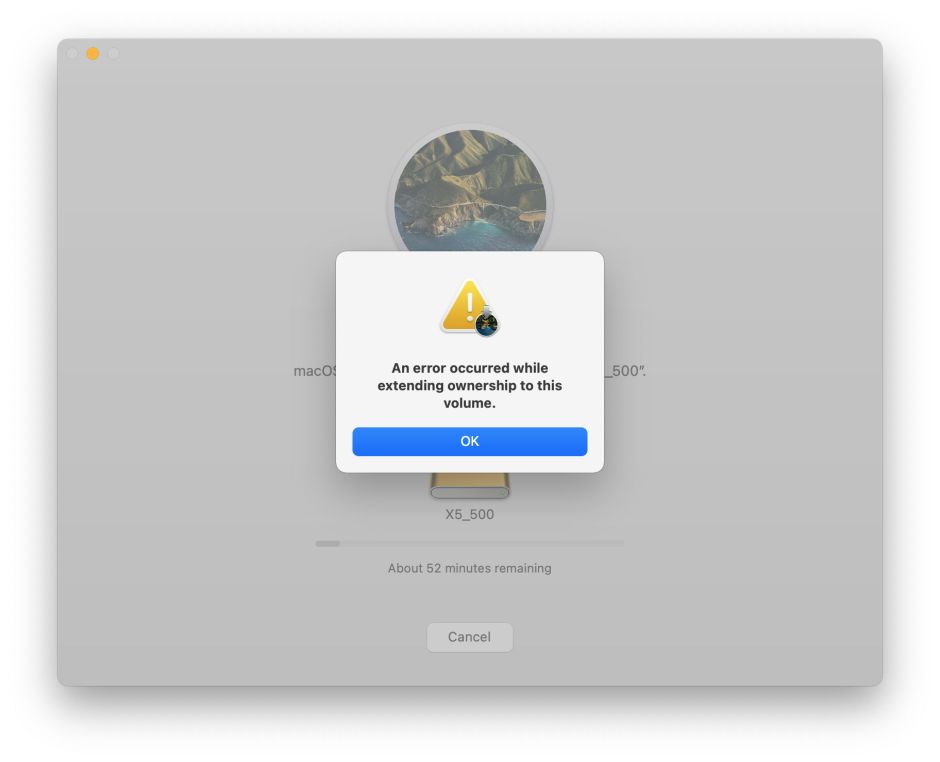
The only other option is to leave the existing System and Data volume group and try to install 11.2.1 over the top. This too is an abject failure: although the installer app lets your start this, it fails quite soon into the installation, complaining that ownership can’t be extended to the disk.
Install 11.2.1 in 1 True Recovery
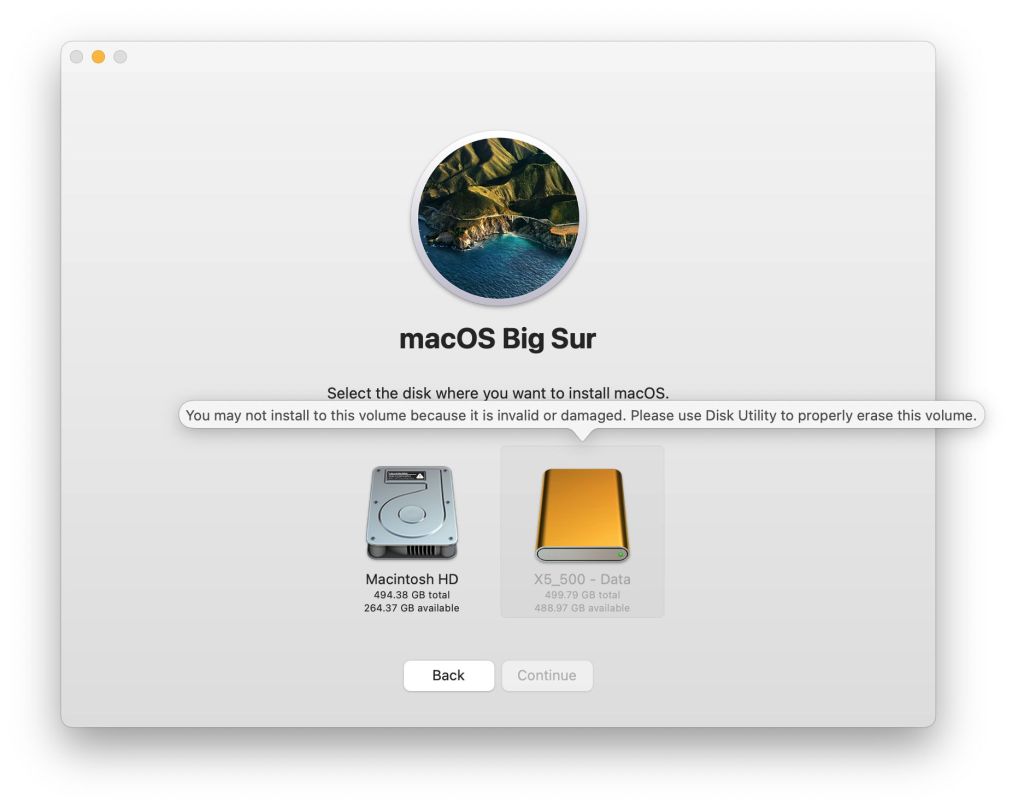
This is detailed as a technique by Mike Bombich in this article, which explains how to make a Data-only copy bootable. If the System volume is damaged or missing, this fails, because “You may not install to this volume because it is invalid or damaged. Please use Disk Utility to properly erase this volume.”
Format the disk and install 11.2.1 afresh
The only remaining options involve wiping the entire contents of the external disk by formatting it in Disk Utility, then installing a fresh copy of macOS 11.2.1, migrating the contents of the Data volume from a backup or copy.
There is a chance to try migration during the system install, when the user is prompted as to whether they’d like to migrate from an existing account. Unfortunately, that only partially works, creating the existing user account, but it fails to migrate any significant amount of data, reporting:
“Due to an error unlocking this system, you can’t migrate. Please update this Mac and retry.” As you’re later still required to create a new user account, leaving that box ticked will end up creating two new users, neither of whom will have their data migrated properly. Unticking that box is the only way to end up with a single account on the external disk.

Installing 11.2.1 afresh also means that some external disks will be pernickety over which port they’re connected to. For Thunderbolt disks, there are few options, and most storage should work. For SATA disks which are normally connected by a USB-C to USB-C cable, you’ll almost certainly need a USB-C to USB-A cable when connected to an M1 Mac mini, and installations over a direct USB-C connection are liable to fail right at the end, when the M1 Mac restarts from the external disk.
Restore from a backup
Finally, I tested installing macOS 11.2.1 and restoring from a Time Machine (APFS) backup of the internal disk to an external SSD using the features of 1 True Recovery. In this case, the disk in question was a SATA model (Samsung 860 EVO) with a USB-C interface. To be confident of this working properly, I connected it to a USB-A port. Although the procedure took several hours, in addition to the time required to download Big Sur, and isn’t something to be attempted in a hurry, it completed successfully.
It’s unfortunate that Recovery installation of Big Sur appears unable to benefit from a local Content Caching Server, which could greatly reduce the time required to download Big Sur.
Conclusions
Using external bootable disks with an M1 Mac is still riddled with problems and bugs, and not an option you should choose until it works more reliably. In particular:
- Apple urgently needs to improve compatibility of its updaters and installers with USB-C disks connected to a USB-C port on M1 Macs. Currently, this is too unpredictable for general use.
- Providing only full installer apps and online updates for macOS doesn’t give users sufficient flexibility to cope with situations when an online updater won’t install correctly. Without the fallback of a standalone update installer, users are forced to adopt lengthy workarounds.
- Big Sur installers must be able to install into containers with an existing Data volume and use that to form the new volume group. Otherwise there are no good options for dealing with a damaged or absent System volume.
- 1TR does appear reliable and capable, but also needs to be able to install a System volume alongside an existing Data volume, to form a new volume group.
At present, trying to use external bootable disks with an M1 Mac is a nightmare.
