
In recent articles, I have described what I believe is a new bug in Catalina 10.15.3 which can make its backups exceedingly slow, to the point where most users cancel them and try something different. This article explains how you might determine if this is the cause of your Mac backing up slowly, and if it is, what you might do about it.
When to be suspicious:
- When the backup is being made by Time Machine. There’s no reason to suspect that it might affect any other backup app.
- Most probably when running Catalina 10.15.3. I’ve not encountered it in any other version of macOS, but can’t be sure that it doesn’t affect others.
- It could affect any model of Mac, as there’s no reason to suspect that this is hardware-specific.
- Backing up any source volume, provided that the volume has the hidden and locked folder
.DocumentRevisions-V100at its root level. That excludes the read-only System volume, but normally includes the Data volume and any external volumes. - Saving the backup on any destination. Although I’ve only seen this on locally attached storage, there’s no reason to believe that it shouldn’t affect backups to networked storage too.
- Although more likely with larger backups, more important is the size and number of items in the
.DocumentRevisions-V100folder on that volume. Even making very small backups, if that hidden folder is old, well-used by versions, and large, the problem is more likely to occur. - So far, I have only observed this in first full backups, in which Time Machine selects the first backup strategy for that volume.
- Backup progress as seen in the Time Machine pane almost grinds to a halt. This may follow or precede a period during which progress is much faster.
- As a result, that backup appears to be taking much longer than would be expected.

How to confirm the problem:
- Open my log browser Ulbow (or Consolation 3), with the additional Predicates installed.
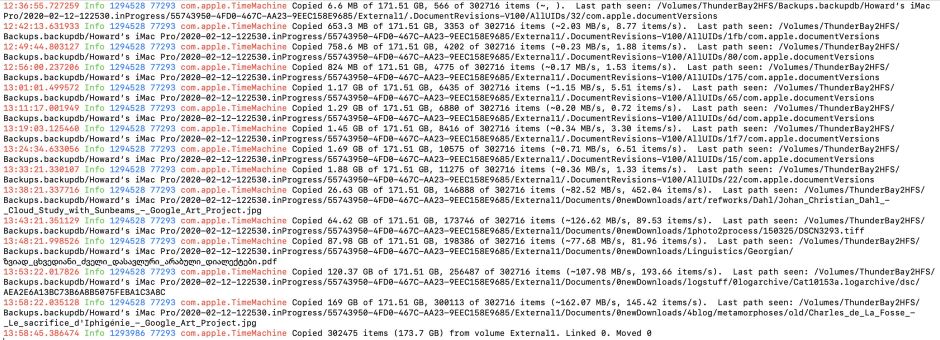
- Set the Predicate to TimeMachineBasic, and type into the filter box the word Copied plain and simple. Set the style to regular or similar.
- Set the Period to -20 min, relative to the current time. Click on the Get log button.
- The log excerpt should then show at least three entries which give the transfer rate in MB/s.
- If those transfer rates persist below 5 MB/s, and the Last path seen is to an item within the
.DocumentRevisions-V100folder, then that is diagnostic.
If you don’t see messages such as
Copied 1.29 GB of 171.51 GB, 6880 of 302716 items (~0.20 MB/s, 0.72 items/s). Last path seen: /Volumes/ThunderBay2HFS/Backups.backupdb/Howard’s iMac Pro/2020-02-12-122530.inProgress/55743950-4FD0-467C-AA23-9EEC158E9685/External1/.DocumentRevisions-V100/AllUIDs/6d/com.apple.documentVersions
then this may well be a different problem. Try setting the filter to none using the popup menu to see a fuller selection of log entries. You may even need to change the Predicate to TimeMachineFull and Get log again to get a better insight into the problem.
What to try to work around the problem:
- If you can, leave the backup to complete.
- If it has been running for more than a couple of hours and doesn’t seem to be making further progress, cancel that backup using Time Machine’s menu or pane, and turn automatic backups off for the moment.
- If this is a first full backup, and the only backup in the Backups.backupdb folder, delete the whole backup. On an otherwise empty volume, a quick way to do this is to erase that backup volume in Disk Utility.
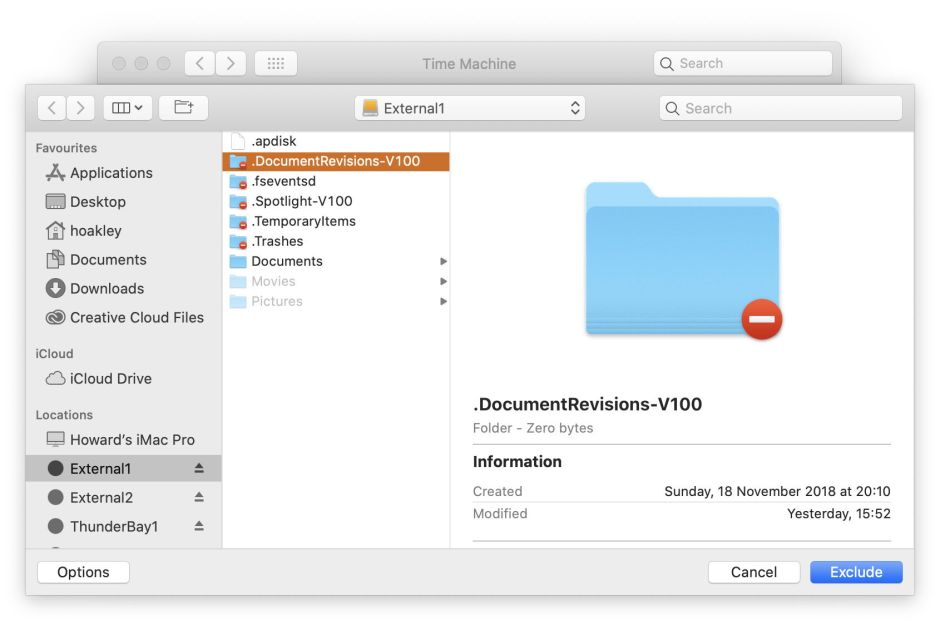
- Open the Time Machine pane and add
.DocumentRevisions-V100for the affected source volume (and other source volumes as required) to the exclude list. - Turn automatic backups on again, and watch the next attempt to back up.
To add the .DocumentRevisions-V100 folder to the exclude list:
- Open the Time Machine pane and ensure that Back Up Automatically is not ticked.
- Click on the Options button.
- Click on the + tool at the left to add the folder(s) to the exclude list.
- When the window drops down for you to select that folder, press Command-Shift-. to show hidden files.
- Navigate to the root level of the volume affected, and select the
.DocumentRevisions-V100folder there. - Click on Exclude, and add the same folder on any other volumes you wish to exclude using the same process.
- Click on the Save button to save and use that list of excluded items.
If you try any of the above, please let me know whether it proves successful. If there is sufficient interest, I am likely to add some transfer rate checks to T2M2, which may make this process simpler.
