

Many of us have been using APFS for two years now, since its was first made the default file system for SSDs in High Sierra. Yet one topic keeps cropping up: the lack of third-party repair and maintenance tools. Although some now claim to be able to perform limited tasks, there’s no doubt that HFS+ is fully supported, and with APFS you’re essentially reliant on Apple’s Disk Utility and fsck.
The great majority of everyday repair and recovery tasks are at the volume level. Whether a user has just trashed most of their files inadvertently, or an installer has gone badly wrong, it’s generally the volume which needs attention. Although there’s no reason to doubt the efficacy of Disk Utility and fsck for tackling directory errors – which seem to be exceedingly rare on SSDs – they’re not designed to recover contents beyond that. APFS does, though, have a new feature which should be ideal: (local) snapshots.
I’ll look in more detail at how snapshots work in the next article. For now, consider them to be an image of the APFS file system on that volume at a particular moment in time, together with the blocks of storage which make up the data. Once that snapshot has been made, the file system keeps old storage blocks which contain data that has been deleted or replaced. This allows you to restore almost instantly the state of the file system and all its storage at the moment that snapshot was made.
Assume then that a user had just made snapshot of a volume, then decided to trash some folders. They made a mistake, trashed the contents of the whole volume, and now want to restore it using that snapshot. So long as they have left the volume with its snapshot, this should be possible in the twinkling of an eye. And I happened to have a brand new 2 TB SSD on which to try this out.
The first problem you face is making a snapshot, as there’s no app or command tool which will take an arbitrary APFS volume and make a snapshot of it. The reasons for this are complex, and currently Apple only allows specially-approved backup apps such as its own Time Machine, Mike Bombich’s Carbon Copy Cloner, and SuperDuper! this privilege. I will explain the reasoning behind this in the next article; it appears bizarre, but turns out to be good sense after all.
Cursory reading of the documentation for tmutil might suggest that all you need do is type in the command
tmutil localsnapshot
but that only works for volumes which are already part of your Time Machine backup set. I didn’t want to make this 2 TB external SSD clutter up my backups, so had to remove it from Time Machine’s exclude list, type the command to generate a complete set of snapshots across all volumes in the backup list, then quickly add the volume back to the exclude list. This triggered another Time Machine backup, because of the change in the exclude list, of course.

You can then check that the snapshot has been made using a command like
tmutil listlocalsnapshots /Volumes/myVolume
Before making the snapshot, this returned an empty list, but now there were two entries in it made by Time Machine.
I then trashed the entire contents of that volume, and emptied the trash. I could perhaps have used Time Machine to recover items from the snapshots, but chose to use Carbon Copy Cloner (CCC) for its more powerful and flexible controls over restoring from snapshots.

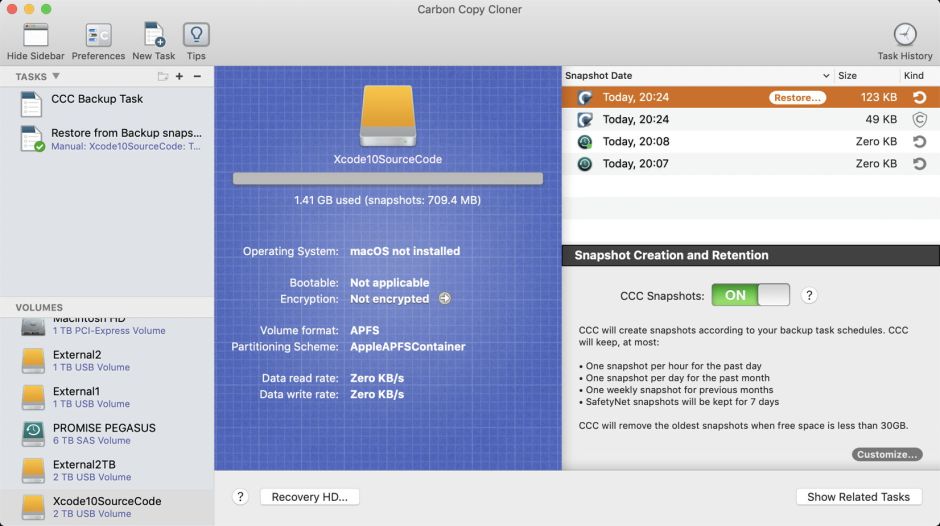
Selecting that volume in CCC, I now turned its own snapshot feature on, and checked that the two snapshots I had already made were listed, as shown. The app conveniently offers a button from which to restore from either of the existing snapshots.
Don’t be put off here by the sizes reported for those snapshots: zero KB is normal and correct for a freshly-made snapshot when all that’s happened since is the deletion of files.
Clicking on the Restore button brought up a new Task, in which I set all files, totalling 716 MB, to be copied from that snapshot to the same volume.

I then clicked on the Clone button, and in less than 6 seconds the volume was fully restored from the snapshot.

CCC then made its own two snapshots, which it added to the list.
You can also view those in Terminal, using a command of the form
tmutil listlocalsnapshots /Volumes/myVolume
which now returned a list of the two snapshots made by Time Machine, and the two made during the restore by CCC:
com.apple.TimeMachine.2019-09-17-200751

com.apple.TimeMachine.2019-09-17-200810

com.bombich.ccc.safetynet.[UUID].2019-09-17-202401

com.bombich.ccc.[UUID].2019-09-17-202408
I’m happy that I’ve demonstrated that snapshots can be used as a tool to almost instantly restore an APFS volume which has had its entire contents trashed – provided that the volume and its snapshots are still intact. Not only that, but the same snapshot could have been recovered several hours or days later, after extensive changes had been made to the volume contents. This is impossible in HFS+ without restoring contents from a formal backup or clone.
As far as I am aware, though, apart from those specific backup apps, no software tools exist to use snapshots for restoring APFS volumes. Making a snapshot in the first place, without putting a volume into a backup regime, is impossible. The reason for this is the fatal flaw in snapshots, which I will describe tomorrow.
