
As mentioned earlier, Disk Utility 18.0 in macOS 10.14.2 Mojave doesn’t do what it claims when you select Security Options for formatting SSDs. This article explains exactly what it does, how to perform what it doesn’t, and details another separate bug and its workaround.
Security Options
When you erase or format a disk in Disk Utility, there is a button offering Security Options for secure erase. These appear to work as claimed on conventional rotating hard disks, but work quite differently on SSDs.

The first option (control at the far left) is the default, and doesn’t attempt any form of secure erase.

The second option claims to overwrite the free space with random data (first pass), then with zeros (second pass). It doesn’t do that at all.

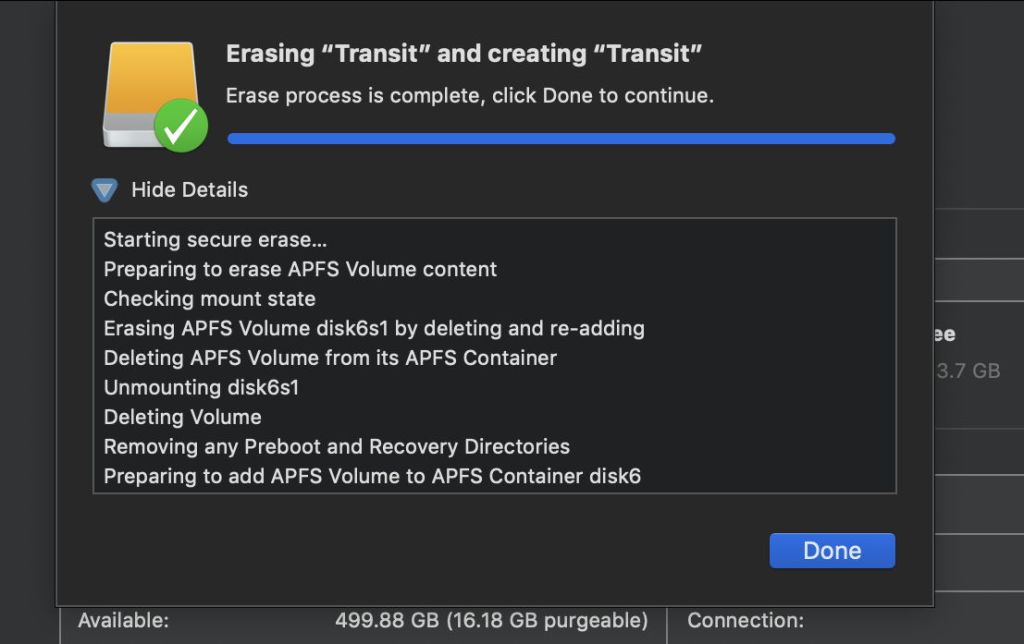
Instead, according to its own commentary, it deletes the APFS volume completely, removes any Preboot and Recovery “directories”, then adds a new APFS volume in the chosen format, which is exactly the same process which is followed when no secure erase option is chosen, or the first option is chosen. Disk Utility doesn’t overwrite any free space at all.
To perform the secure erase which it describes, you have to use the diskutil command in Terminal instead. For a volume named volumeName, the two commands required to perform the advertised secure erase would be
diskutil secureErase freespace 1 /Volumes/volumeName
diskutil secureErase freespace 0 /Volumes/volumeName
which would be expected to take several hours for a 1 TB USB 3 SSD.

The third option claims to perform a DOE-compliant 3-pass secure erase, but actually performs the same volume removal and replacement as the default.
To perform the secure erase which it describes, you have to use the diskutil command in Terminal instead, using a command of the form
diskutil secureErase freespace 4 /Volumes/volumeName
which would again be a very slow process.

The fourth option claims to perform a US DOD 7-pass secure erase, but actually performs the same volume removal and replacement as the default.
To perform the secure erase which it describes, you have to use the diskutil command in Terminal instead, using a command of the form
diskutil secureErase freespace 2 /Volumes/volumeName
which is an even slower process.
Before using diskutil secureErase, you should read man diskutil, where Apple cautions:
“This kind of secure erase is no longer considered safe. Modern devices have wear-leveling, block-sparing, and possibly-persistent cache hardware, which cannot be completely erased by these commands. The modern solution for quickly and securely erasing your data is encryption. Strongly-encrypted data can be instantly “erased” by destroying (or losing) the key (password), because this renders your data irretrievable in practical terms. Consider using APFS encryption (FileVault).”
Bug reformatting APFS volumes
It isn’t possible to encrypt an existing APFS volume non-destructively using Disk Utility, and in some cases when attempting to erase and reformat a volume, Disk Utility returns “an internal state error” and fails to perform the operation.
This occurs when you select the volume, container, or disk and use the Partition tool instead of Erase. In the next dropdown sheet, select Partition, then select the format for the partition.

This consistently results in the error shown below.
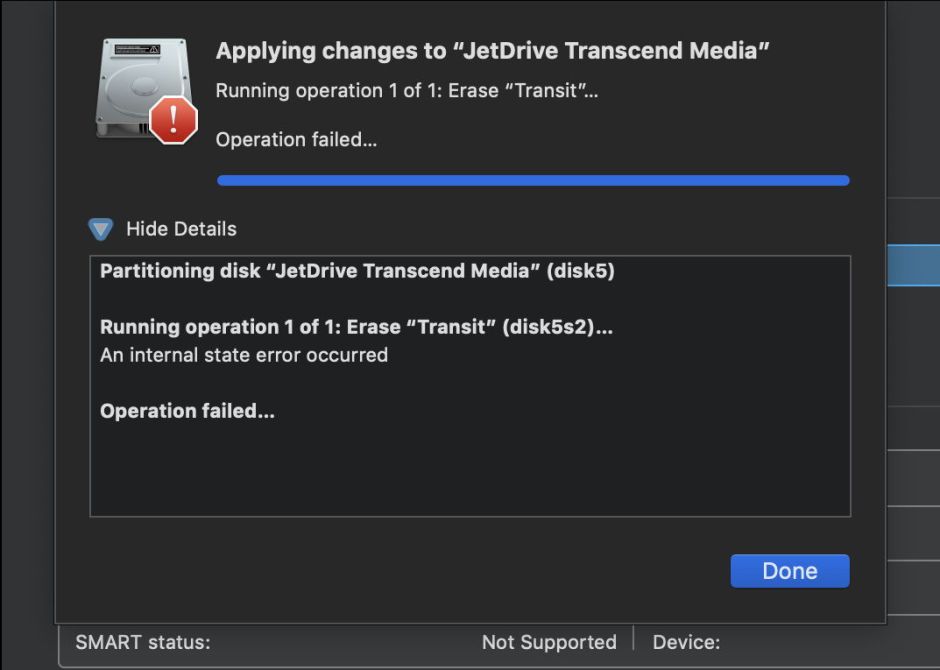
The workaround is to select the volume and use the Erase tool instead.
