
The most common reason for wanting to clean up sensitive files on internal or external storage is when you’re going to sell or give your Mac (or drive) away. If it’s going for recycling, the issue is quite different: I will consider that in a future article here.
Before you even think about how to clean these files up, you must know what they contain, and what risk they would pose if someone else were to be able to view them. Governments and large organisations use security classification systems, and you should think in similar terms:
- Files which have national security content. If you ever handle any of these, you will be subject to national legal requirements and must follow those. Don’t go it alone, but get proper security advice. In most cases, the storage or computer must be returned to security experts, who will almost certainly send it for secure destruction.
- Any legally-protected information, covered by national data protection law. Here you must follow best practice as laid down by your national data protection authority. This may well involve physical destruction, and you will need appropriate certificates to demonstrate that whatever you have done is within those legal requirements. Don’t try going this alone.
- Private files which would potentially have serious consequences to you and others, but are not covered by data protection legislation. You need to be confident that these are completely destroyed, but can choose how to do that yourself.
- All other private data which you don’t want others to see. This should, for example, include all your keychains and any other account information. Again, you need to satisfy yourself that it is destroyed.
The first two may seem irrelevant to almost everyone, but a lot of business information falls into the second category. However, we’re prone to pretend that it really isn’t that important, until something goes wrong. Here I’m going to concentrate on the latter two, as those are the ones for which you make all the decisions.
The next question is what type of medium they are stored on: a traditional rotating hard disk, an SSD, or both in a Fusion Drive?
Sanitising hard disks
If you just reformat the hard disk, this makes it relatively easy for a third party to recover all or most of your sensitive data using a cheap and readily-available tool. That is probably sufficient if your Mac is going to a close friend or relative who isn’t going to sell it (or have it stolen) in just a few days, and the private data are in category 4.
In all other circumstances, you should take active steps to ensure that your data can’t readily be recovered from the storage.
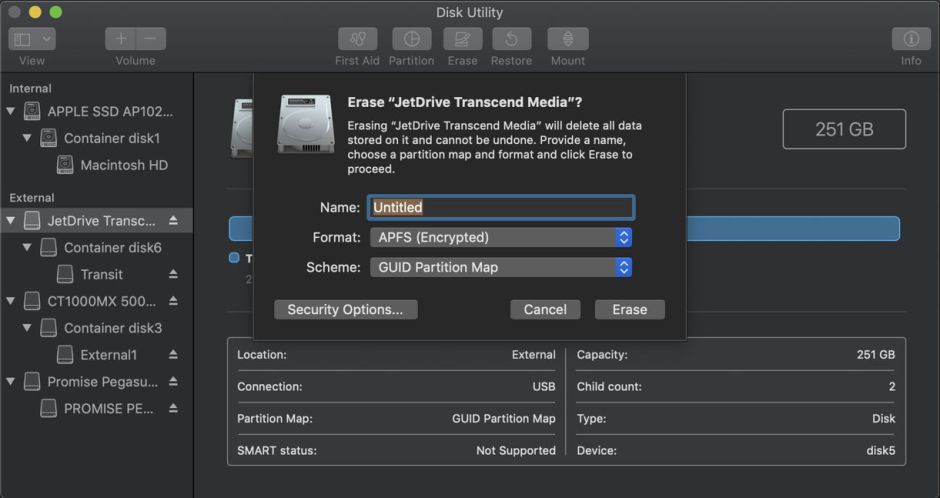
The reason that simple reformatting doesn’t do a good enough job is that the free space contains all your old files, and disk recovery utilities are designed to reassemble the contents of that free space into recovered files. What you therefore need to do is overwrite all the free space remaining after the reformat. This is easily done using the secure erase option in Disk Utility – click on the Security Options button.
Disk Utility offers three different levels of secure erase, above the Fastest setting which doesn’t overwrite free space at all. Those three offer different numbers of passes in which the erase is performed. The most basic overwrites all free space twice: the first time it writes random data, and the second time zero bytes. This is ample to ensure that someone can’t use a readily available tool to recover your old deleted files.

If your hard disk falls into the hands of a state-sponsored intelligence agency or another well-funded group, they may still be able to recover some of the data which were on your hard disk. In theory, you might then wish to choose a higher level of security at this stage, but that will take much longer and you should ask yourself whether that is really worth it.
Most secure erase features like that in Disk Utility can’t clean some storage blocks which have been marked as bad, so they might leave a small amount of data which could potentially be recovered. There isn’t any straightforward way of addressing that, but the risk is exceedingly low, even if that disk were to be passed to the best of data recovery specialists and cost were no object.
Sanitising SSDs
Unfortunately, SSDs perform a lot more low-level management with routines such as TRIM and wear-levelling. As a result they can be much harder to sanitise properly than a hard disk. If you’re concerned about category 4 data and the SSD is going to a good home, simply re-formatting the SSD should suffice.
Problems come with category 3 data, or when you don’t know where the SSD will end up. Studies carried out at UCSD some years ago drew attention to many problems which can occur using different techniques. Even writing non-sensitive data to an SSD until it appears full can’t be trusted to overwrite every storage unit because of the management features built in.
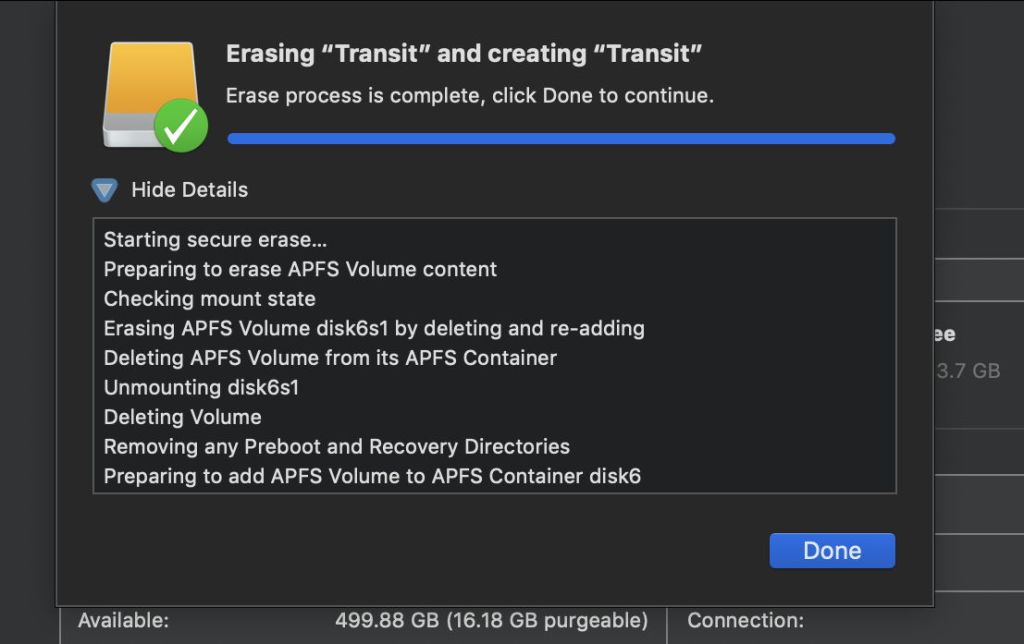
The snag is that Disk Utility won’t overwrite an SSD’s free space in the way that it does with hard disks. It pretends to offer the same three secure erase options, but in fact none of them does what the dialog says. Indeed, in Sierra they aren’t even available, which is perhaps a little more honest.

In Mojave, all three secure erase options offer is that the original APFS volume is completely deleted, with any Preboot and Recovery directories, and it is then added back as a new volume. This will destroy all APFS data about the original volume, but the file data for that volume will remain on the SSD. Although at present there appear to be no macOS utilities which can reconstruct such a removed volume, that situation will change in the future.
Mojave does provide a command which will overwrite all the storage according to a range of options:
diskutil secureErase freespace 0 /Volumes/volumeName
overwrites all the free space on the volume named volumeName with zero bytes. Replace the 0 with a 1 for random bytes, 2 for a US DoD 7 pass secure erase, 3 for a Gutmann 35 pass, or 4 for a US DoE 3 pass version. These can take a very long time: for a USB 3 drive, a single-pass erase may take as long as 100 minutes for 1 TB.
For each pass, diskutil secureErase freespace creates a temporary file which fills the free space on that volume, then ‘securely’ erases it. It then creates a secondary temporary file and mounts the disk normally. However, Apple warns:
“This kind of secure erase is no longer considered safe. Modern devices have wear-leveling, block-sparing, and possibly-persistent cache hardware, which cannot be completely erased by these commands. The modern solution for quickly and securely erasing your data is encryption. Strongly-encrypted data can be instantly “erased” by destroying (or losing) the key (password), because this renders your data irretrievable in practical terms. Consider using APFS encryption (FileVault).”
To sanitise an internal SSD properly, you should:
- Turn FileVault on, using a long, random password, and allow this to complete, if it is not already enabled on that disk.
- Reformat the SSD in encrypted format (APFS strongly preferred) using a strong password, with any of the three ‘secure erase’ options selected, and provide that password to the new owner of that Mac.
If you want to use diskutil secureErase freespace, the best time to do so is at the end, when the SSD has been freshly reformatted.
You can’t simply enable FileVault on an external SSD, though: it isn’t covered by the FileVault pane, and changing its format from APFS to APFS Encrypted is a destructive process for that volume.
To sanitise an external SSD properly, you should reformat the SSD in encrypted format (APFS strongly preferred) using a long, random password, then perform diskutil secureErase freespace if you wish. Destroy that password before passing the SSD on to its new owner. When they get the SSD, they will then have to reformat it to their own requirements.
diskutil secureErase freespace isn’t something to use lightly: it takes a long time to complete, uses up some of the SSD’s working life, and may actually add little or nothing to the protection of your data.
Sanitising Fusion Drives
Fusion Drives are quite different in HFS+ and APFS. In the former they use CoreStorage, while in the latter they work as a complex APFS volume in which the SSD component acts more as a cache for the hard disk. They are not documented well, and the chances of anyone other than a disk recovery engineer being able to recover data from them are considerably less than with conventional storage. In most cases, simply reformatting them using Disk Utility should be sufficient.
If you want to go further than that, you will almost certainly need to split the drives and perform secure erase on each, before re-forming the Fusion Drive using command line tools. I wish you the best of luck.
What about the T2 chip?
Macs with T2 chips don’t behave any differently with respect to external storage and its sanitisation. They are quite different, though, in respect of sanitisation of their internal SSD storage.
The internal SSD of a Mac with a T2 is permanently encrypted, and can only be accessed while it is integral with the T2 chip. In most cases, SSDs are soldered to the logic board, and as far as recovering data from them, they all may as well be. To sanitise an SSD in such a Mac, all you need do is:
- If FileVault isn’t already enabled, turn it on with a long, random password.
- Reformat the SSD with FileVault enabled, using a different strong password which you must pass on to the Mac’s new owner.
All data on the SSD is already encrypted by the T2 chip; enabling FileVault in the first step is almost instantaneous, and makes it impossible to access the contents of the SSD without the password. The second step then renders the contents inaccessible to the original password. Even if the second password is discovered, it will not allow access to the contents prior to the reformat.
The T2 chip severely limits the number of attempts which can be made to guess a password during an attack on encryption. The first 14 attempts are allowed without any delay, thereafter increasing delay periods are enforced up to a maximum of 30 attempts. Then 10 further attempts are allowed in Recovery mode, and up to 30 in each of the FileVault recovery mechanisms. The maximum total number of attempts to guess the password is 90, following which decryption is not possible. This makes a brute force attack impractical, unlike normal software FileVault which doesn’t impose delays or any upper limit.
Simple, isn’t it?
